I was standing in my kitchen, half‑asleep, watching a fire alarm dance its frantic red waltz because I’d left a pan of garlic butter sizzling on high. By the time I managed to silence the shrill siren, my brain was still humming with a craving that no amount of take‑out could satisfy. I wanted something that felt like a night‑out at a bustling street market, yet cozy enough to tuck into a Friday‑night couch session. That was the moment I dared myself to reinvent the classic chicken pizza with a sweet‑chili‑garlic twist that would make even the most skeptical pizza purist swoon.
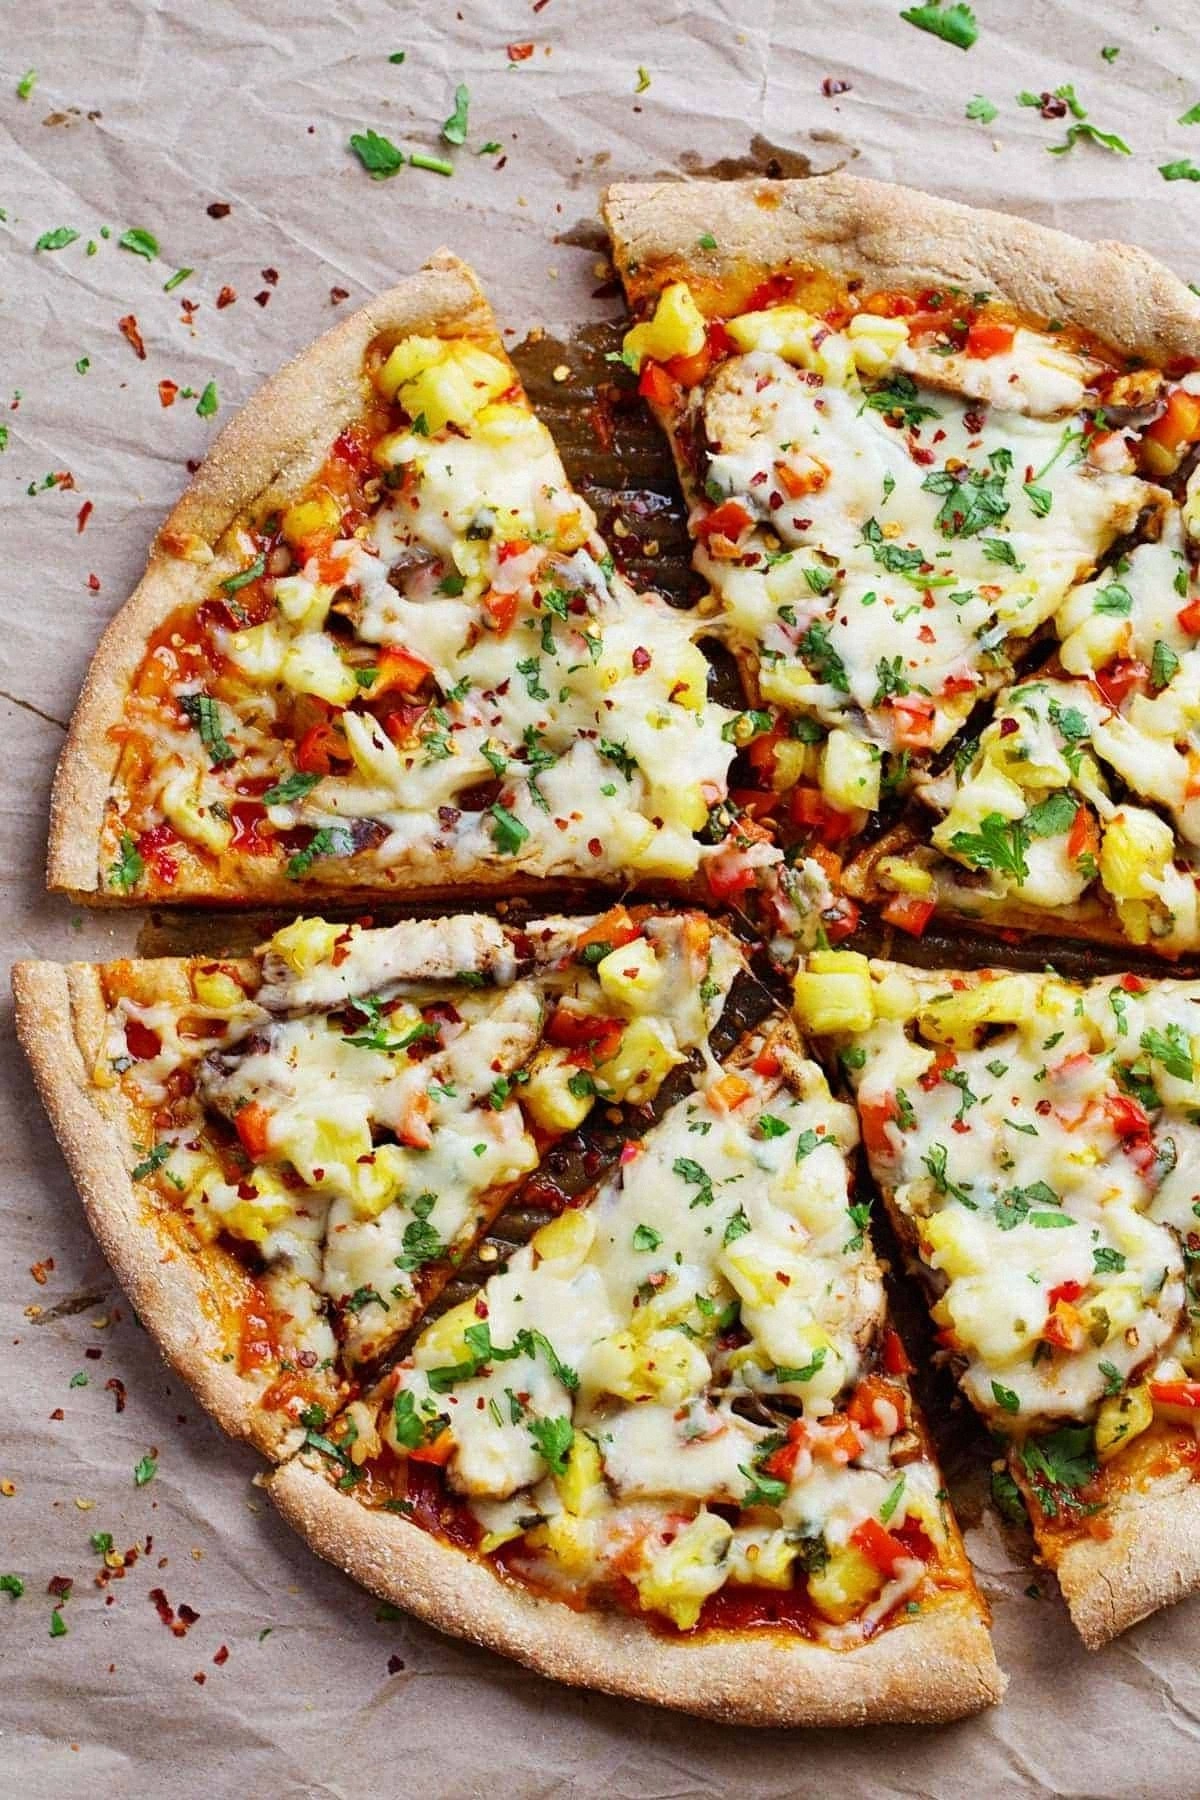
Picture this: the dough, airy and feather‑light, stretching under your fingertips like a warm blanket; the chicken, marinated in a sauce that clings like a glossy, caramelized glaze, each bite bursting with a symphony of heat, sweetness, and that unmistakable garlic punch. The oven’s heat kisses the crust, turning it golden, while the cheese bubbles and browns, creating those crispy edges that shatter like thin ice under a spoon. The aroma that fills the kitchen is a heady mix of toasted dough, sizzling garlic, and a whisper of chili that makes your nostrils tingle in anticipation. You can almost taste the crunch before you even take a bite.
Most chicken pizza recipes either drown the meat in a swamp of sauce or leave the crust soggy and sad. I’ve tried them all – the ones that over‑sweeten with ketchup, the ones that under‑season the chicken, the ones that forget the crucial step of pre‑cooking the toppings. Most get this completely wrong. Here’s what actually works: a quick sear of the chicken, a balanced sweet‑chili‑garlic glaze, and a high‑heat bake that locks in moisture while giving you that coveted char. The secret ingredient? A splash of honey that tempers the heat and adds a glossy finish that makes the pizza look restaurant‑ready.
I’ll be honest — I ate half the batch before anyone else got to try it, and I’m still not over the feeling of that first bite. I dare you to taste this and not go back for seconds. Let me walk you through every single step — by the end, you’ll wonder how you ever made it any other way.
What Makes This Version Stand Out
- Flavor Explosion: The sweet‑chili‑garlic glaze hits the palate like a fireworks display, balancing heat, sweetness, and umami in perfect harmony.
- Texture Contrast: You get a tender, juicy chicken interior, a crisp, slightly chewy crust, and molten cheese that stretches like taffy.
- Simplicity: Fewer than ten ingredients, most of which you probably already have, make this a weeknight hero without a long grocery run.
- Unique Twist: The addition of honey and a dash of ginger elevates the sweet‑chili base from ordinary to unforgettable.
- Crowd‑Pleaser: Even picky eaters love the familiar pizza feel, while the bold sauce sparks conversation at the table.
- Ingredient Quality: Using fresh garlic and high‑quality sweet chili sauce makes a world of difference – you can taste the care.
- Cooking Method: A hot oven (475°F) gives the crust that restaurant‑style puff while keeping the toppings from sliding off.
- Make‑Ahead Potential: The dough and sauce can be prepared a day ahead, meaning you can assemble and bake in under 30 minutes.
Inside the Ingredient List
The Flavor Base
Sweet chili sauce is the heart of this pizza. It brings a bright, fruity heat that coats the chicken like velvet, ensuring every bite is uniformly seasoned. If you skip the sauce, you’ll end up with bland chicken and a missed opportunity for that signature sweet‑heat flash. For a gluten‑free version, swap the regular sauce for a tamari‑based sweet chili glaze. When buying, look for a sauce with real chilies and a hint of garlic rather than a syrupy, overly sweet brand.
The Texture Crew
All‑purpose flour forms the foundation of the dough, giving it that airy lift while still providing enough structure to hold the toppings. Using bread flour would make the crust too chewy, while cake flour would lead to a crumbly disaster. If you’re out of flour, a 1‑to‑1 substitution with whole‑wheat flour works, but expect a nuttier flavor and a slightly denser base. The mozzarella offers melt and stretch; mixing in a bit of sharp cheddar adds a subtle tang that cuts through the sweetness.
The Unexpected Star
A drizzle of honey might sound like a dessert move, but it’s the secret weapon that rounds out the heat and prevents the sauce from becoming cloyingly sweet. It also gives the glaze a glossy sheen that makes the pizza look as good as it tastes. If you’re avoiding sugar, substitute with a splash of maple syrup – it will add a caramel nuance without compromising the balance.
The Final Flourish
Fresh cilantro and a sprinkle of red pepper flakes finish the dish with a burst of herbaceous brightness and an optional extra kick. Cilantro should be added after baking; its delicate leaves wilt too quickly in the oven, losing their flavor. If cilantro isn’t your thing, fresh basil or even thinly sliced scallions work beautifully. A final dusting of cornmeal on the peel not only prevents sticking but also adds a subtle crunch to the crust’s underside.
Everything's prepped? Good. Let's get into the real action...
The Method — Step by Step
Start by activating the yeast. In a medium bowl, combine 1 cup warm water (about 110°F), 1 tsp sugar, and 1 tsp active dry yeast. Stir gently and let it sit for 5‑7 minutes until it becomes foamy. This is the moment of truth; if you don’t see bubbles, your yeast is dead and you’ll need fresh packets. Once frothy, add 2 tbsp olive oil and 2 cups flour, mixing until a shaggy dough forms.
Turn the dough onto a lightly floured surface and knead for 6‑8 minutes until it’s smooth and elastic. The dough should feel supple, not sticky. Shape it into a ball, coat it lightly with olive oil, and place it back in the bowl. Cover with a damp towel and let it rise in a warm spot for 45 minutes, or until doubled in size. Power tip: If your kitchen is chilly, preheat your oven to its lowest setting, turn it off, and let the dough rise inside the warm oven.
While the dough is rising, slice the chicken breasts into thin strips (about ¼ inch). In a large skillet over medium‑high heat, add a splash of olive oil and sear the chicken for 2‑3 minutes per side until lightly golden. You’re looking for a caramelized crust, not a fully cooked interior; the oven will finish the job.
Prepare the sweet‑chili‑garlic glaze: combine 1/3 cup sweet chili sauce, 2 tbsp soy sauce, 3 minced garlic cloves, 1 tbsp honey, and 1 tsp grated ginger in a small saucepan. Bring to a gentle simmer, stirring constantly, until the mixture thickens slightly (about 3‑4 minutes). The scent that rises should be intoxicating – a perfect blend of sweet, salty, and garlicky.
When the dough has risen, gently punch it down and turn it onto a parchment‑lined baking sheet dusted with cornmeal. Using your hands or a rolling pin, stretch the dough into a 12‑inch circle, leaving a slightly thicker edge for that perfect crust. The dough should be thin enough to see through to the parchment, but sturdy enough to hold the toppings without tearing.
Brush the dough lightly with olive oil, then spread a thin layer of the sweet‑chili‑garlic glaze, leaving a small border. Add the seared chicken strips evenly across the surface, then sprinkle 1 cup shredded mozzarella and half a cup of shredded cheddar for extra depth. Scatter the red onion slices, and if you like a little heat, dust with red pepper flakes.
Transfer the pizza to a pre‑heated oven at 475°F (245°C). Bake for 12‑15 minutes, or until the crust is golden brown, the cheese is bubbly, and the edges are crisp. Keep an eye on the cheese; you want it browned in spots, not burnt. The moment the crust lifts slightly from the parchment, you know it’s ready.
Remove the pizza from the oven and immediately scatter fresh cilantro over the top. Let it rest for 2‑3 minutes – this short pause lets the cheese set just enough for clean slices. Slice, serve, and watch as the glossy glaze catches the light, promising that first bite you’ve been dreaming about.
That's it — you did it. But hold on, I've got a few more tricks that'll take this to another level...
Insider Tricks for Flawless Results
The Temperature Rule Nobody Follows
Most home cooks bake pizza at 350‑400°F, which yields a soft crust. Crank that heat up to 475°F or even 500°F if your oven tolerates it. The high temperature creates steam inside the dough, puffing it up and giving you that coveted airy interior while the outside crisps instantly. I once tried a lower temp and ended up with a soggy base that sagged under the weight of the toppings. Trust me, the heat makes all the difference.
Why Your Nose Knows Best
Your sense of smell is the ultimate timer. When the crust starts to smell nutty and the cheese releases a toasty, caramelized scent, you’re within seconds of perfect doneness. If you hear a faint crackle from the edges, that’s the sound of the crust forming those crunchy little “feet” that hold the pizza together. Don’t rely solely on the clock; let your nose be the guide.
The 5‑Minute Rest That Changes Everything
After pulling the pizza from the oven, allow it to sit for five minutes before cutting. This short rest lets the cheese settle and the glaze thicken just enough to avoid a soggy slice. A friend once tried to cut immediately and ended up with cheese sliding off the crust like a waterfall. That’s why a brief pause is essential for a clean, satisfying bite.
The Secret of Pre‑Searing the Chicken
If you skip the quick sear, the chicken releases too much moisture during baking, making the crust soggy. A fast, high‑heat sear locks in juices and creates a caramelized crust that stays crisp even after the oven’s heat. It also adds a deep umami flavor that the glaze alone can’t achieve.
Using a Pizza Stone vs. Baking Sheet
A pizza stone absorbs and radiates heat evenly, mimicking a brick oven. If you have one, preheat it for at least 30 minutes before baking. The result is a bottom that’s crisped to perfection, with a slight chew that’s impossible to achieve on a regular baking sheet. If you don’t own a stone, a heavy cast‑iron skillet works as a decent stand‑in.
Creative Twists and Variations
This recipe is a playground. Here are some of my favorite ways to switch things up:
Tropical Heat
Swap the chicken for grilled shrimp, add a splash of pineapple juice to the glaze, and finish with sliced mango and a pinch of toasted coconut. The result is a sweet‑heat island vibe that pairs beautifully with a cold lager.
Veggie‑Lover’s Dream
Replace the chicken with sliced bell peppers, zucchini, and baby corn. Boost the glaze with a tablespoon of miso paste for depth, and sprinkle toasted sesame seeds after baking. Even the most carnivorous friends will be impressed.
Smoky BBQ Fusion
Add a teaspoon of smoked paprika to the glaze and drizzle a thin line of BBQ sauce over the finished pizza. Top with thinly sliced red onion and a handful of chopped cilantro for a smoky, sweet, and tangy masterpiece.
Cheese‑Heavy Indulgence
Mix in a blend of smoked mozzarella, provolone, and a sprinkle of parmesan. The extra cheese creates a gooey, stretchy layer that pulls away in glorious ribbons, perfect for those who love a cheesy pull.
Spicy Sriracha Kick
Add a drizzle of sriracha to the glaze and increase the red pepper flakes. Top with pickled jalapeños for an extra punch that will make your taste buds dance.
Herb‑Infused Finale
Finish with a mixture of fresh basil, mint, and oregano after baking. The fresh herbs add a fragrant, garden‑fresh finish that brightens the sweet‑chili base.
Storing and Bringing It Back to Life
Fridge Storage
Allow the pizza to cool completely, then slice and store the pieces in an airtight container. It will keep for up to 3 days. When ready to eat, reheat in a skillet over medium heat, covering with a lid for 2‑3 minutes to melt the cheese while retaining crispness.
Freezer Friendly
Wrap the whole pizza tightly in plastic wrap, then foil, and freeze for up to 2 months. To reheat, let it thaw in the fridge overnight, then bake at 425°F for 10‑12 minutes. The crust will retain its snap, and the glaze will regain its glossy sheen.
Best Reheating Method
For the ultimate reheated slice, place it on a preheated pizza stone or cast‑iron pan, add a tiny splash of water (about a teaspoon) to the pan, and cover for a minute. The steam revives the crust while the cheese melts back to its original stretchiness. No soggy microwave nightmares here.