I’m going to be blunt: the moment I first tasted these Caramel Apple Cupcakes, I knew I had stumbled onto a culinary holy grail. Picture this—an autumn‑laden kitchen, the scent of cinnamon curling around the countertops like a warm blanket, and a frantic craving for something that feels both nostalgic and brand‑new. I was battling a soggy batch of store‑bought cupcakes that tasted like cardboard, and in a desperate moment I threw together a caramel‑apple mixture with a dash of sea salt, hoping for a miracle. Spoiler alert: the miracle arrived, and it was louder than a brass band in a library. I dare you to taste this and not go back for seconds.
The first bite is a symphony of textures: the tender crumb of the cupcake, the buttery melt‑in‑your‑mouth frosting, and those juicy apple pieces that burst with a faint tartness, all draped in a glossy caramel sauce that clings like a lover’s embrace. You can almost hear the crackle of caramel as it hits the hot cupcake, a sound that says “we’re about to elevate your dessert game.” Most recipes get this completely wrong—either they drown the cupcake in syrup or they forget the crucial caramel‑to‑apple balance. This version, however, respects each component, letting the apple’s natural acidity cut through the sweet, making every mouthful feel like a perfectly timed high‑five.
What really sets this recipe apart is the secret technique I’m about to reveal: I fold the caramel into the batter at a precise temperature, ensuring it stays silky and doesn’t harden into a rock. This little trick transforms the cupcakes from “nice” to “hands down the best version you’ll ever make at home.” And let’s not forget the finishing touch—a drizzle of salted caramel that glistens like morning dew on a pumpkin patch. If you’ve ever struggled with soggy cupcakes or overly sweet desserts, you’re not alone, and I’ve got the fix right here.
Okay, ready for the game‑changer? I’m going to walk you through every single step—by the end, you’ll wonder how you ever made it any other way. Picture yourself pulling these out of the oven, the whole kitchen smelling incredible, the caramel sheen catching the light, and a crowd of friends crowding the counter for a taste. This isn’t just a recipe; it’s a performance, a story, a memory in the making. So grab your apron, preheat that oven, and let’s dive deep into the magic of Caramel Apple Cupcakes.
What Makes This Version Stand Out
- Taste: The caramel‑apple duo hits a perfect sweet‑tart balance, with a whisper of sea salt that makes the flavor pop like fireworks.
- Texture: A fluffy, tender crumb meets a buttery frosting, while the apple bits add a juicy bite that contrasts the silky caramel.
- Simplicity: Despite the gourmet vibe, the ingredient list is pantry‑friendly and the steps are straightforward enough for a beginner.
- Uniqueness: Folding caramel at a specific temperature prevents it from crystallizing, a trick most recipes overlook.
- Crowd Reaction: Expect gasps, exclamations, and the inevitable “Can I have the recipe?” from anyone within a ten‑foot radius.
- Ingredient Quality: Using fresh, crisp apples and a high‑quality caramel sauce elevates the whole experience.
- Cooking Method: A gentle bake at 350°F ensures the cupcakes rise evenly without a dry top.
- Make‑Ahead Potential: These cupcakes freeze beautifully, so you can prep them ahead of a holiday gathering.
Inside the Ingredient List
The Flavor Base
All‑purpose flour is the backbone of any cupcake, providing structure while allowing the batter to rise gracefully. I use 1½ cups, which translates to a light, airy crumb without turning the cupcake dense. If you substitute cake flour, expect an even softer texture, but you’ll need to reduce the amount by about 10 % to avoid a crumbly result. Pro tip: sift the flour with the leavening agents to incorporate air and prevent lumps.
Granulated sugar not only sweetens but also contributes to the tender crumb by breaking down gluten strands during creaming. One cup is the sweet spot—enough to satisfy your sweet tooth without overwhelming the delicate apple flavor. If you prefer a deeper caramel note, swap half the white sugar for brown sugar; the molasses will echo the caramel sauce beautifully.
Unsalted butter, softened to room temperature, is the source of richness that makes each bite melt in your mouth. Two sticks (½ cup) is ideal; too much butter can cause the cupcakes to spread, while too little makes them dry. For a dairy‑free twist, use a high‑quality coconut oil, but remember it will add a subtle coconut aroma.
The Texture Crew
Baking powder and baking soda work together to give the cupcakes their rise. One teaspoon of baking powder and a half‑teaspoon of baking soda create a balanced lift without a metallic aftertaste. If you’re using low‑sodium baking powder, increase the amount by ¼ teaspoon to compensate.
A pinch of salt (about ½ tsp) is the unsung hero; it amplifies the sweetness and balances the caramel’s richness. I like to use sea salt for a subtle crunch that pops when you bite into the frosting.
Ground cinnamon adds warmth and ties the apple flavor to the classic fall palate. One teaspoon is enough to perfume the batter without turning it into a spice bomb. Feel free to experiment with nutmeg or allspice for a more complex profile.
The Unexpected Star
Fresh apples are the soul of this recipe. I dice one large Granny Smith apple (about one cup) for a tart contrast that cuts through the caramel’s sweetness. If you prefer a sweeter bite, swap half the Granny Smith for a Fuji or Honeycrisp. The key is to keep the pieces small—about ¼‑inch dice—so they distribute evenly and don’t sink to the bottom.
Caramel sauce, the eponymous star, should be a high‑quality store‑bought or homemade version. I use ½ cup of a buttery, salted caramel that stays pourable at room temperature. If the caramel is too thick, warm it gently in the microwave for 10‑second bursts until it reaches a silky consistency.
The Final Flourish
Milk (½ cup) adds moisture and helps bind the dry ingredients, ensuring a tender crumb. Whole milk yields a richer flavor, but any milk—dairy or plant‑based—will do. A splash of vanilla extract (1 tsp) rounds out the flavor profile, giving the cupcakes that comforting, home‑baked aroma.
Everything's prepped? Good. Let’s get into the real action—mixing, folding, baking, and drizzling—so you can experience the full spectrum of flavors and textures that make these cupcakes unforgettable.
The Method — Step by Step
Preheat your oven to 350°F (175°C) and line a 12‑cup muffin tin with paper liners. While the oven warms, whisk together the flour, baking powder, baking soda, salt, and cinnamon in a large bowl. This dry mixture will be the canvas for our flavor masterpiece, and whisking ensures even distribution of leavening agents, preventing any “pocket of bitter soda” moments later.
In a separate bowl, cream the softened butter with the granulated sugar until the mixture is pale, fluffy, and smells like a bakery on a Sunday morning. This process incorporates air, which is crucial for a light crumb. I recommend using a hand mixer on medium speed for about 3‑4 minutes—don’t rush it, because that glossy, pale texture is the first sign that you’re on the right track.
Add the eggs one at a time, beating well after each addition, then stir in the vanilla extract. The batter should look glossy and slightly thick, a sign that the emulsification is perfect. If the mixture looks curdled, keep beating; the butter and sugar will bring it back together.
Now comes the caramel showdown: gently warm the caramel sauce until it’s just warm (around 110°F). This is the moment of truth. Drizzle the warm caramel into the butter‑sugar‑egg mixture, then fold it in with a spatula using a gentle “cut‑and‑turn” motion.
Kitchen Hack: If the caramel starts to thicken while you’re folding, give it a quick 5‑second zap in the microwave to bring it back to a pourable state.Gradually add the dry ingredients to the wet mixture, alternating with the milk, beginning and ending with the flour mixture. This technique—often called “the alternating method”—prevents the batter from becoming over‑mixed, which could lead to tough cupcakes. Stop mixing as soon as you see a uniform batter; a few streaks are okay.
Fold in the diced apples, making sure they’re evenly distributed. The apple pieces should be suspended throughout the batter, not settled at the bottom. If you notice the batter is too thick, a splash of extra milk (no more than 2 Tbsp) will loosen it without compromising structure.
Scoop the batter into the prepared muffin tin, filling each liner about three‑quarters full. This leaves room for the cupcakes to rise without spilling over. As a final visual cue, the batter should have a slightly glossy surface—if it looks dry, you’ve under‑mixed; if it looks runny, you’ve over‑mixed.
Bake for 20‑25 minutes, or until a toothpick inserted into the center comes out clean with just a few moist crumbs. The edges should start pulling away from the pan, a visual sign that the structure has set.
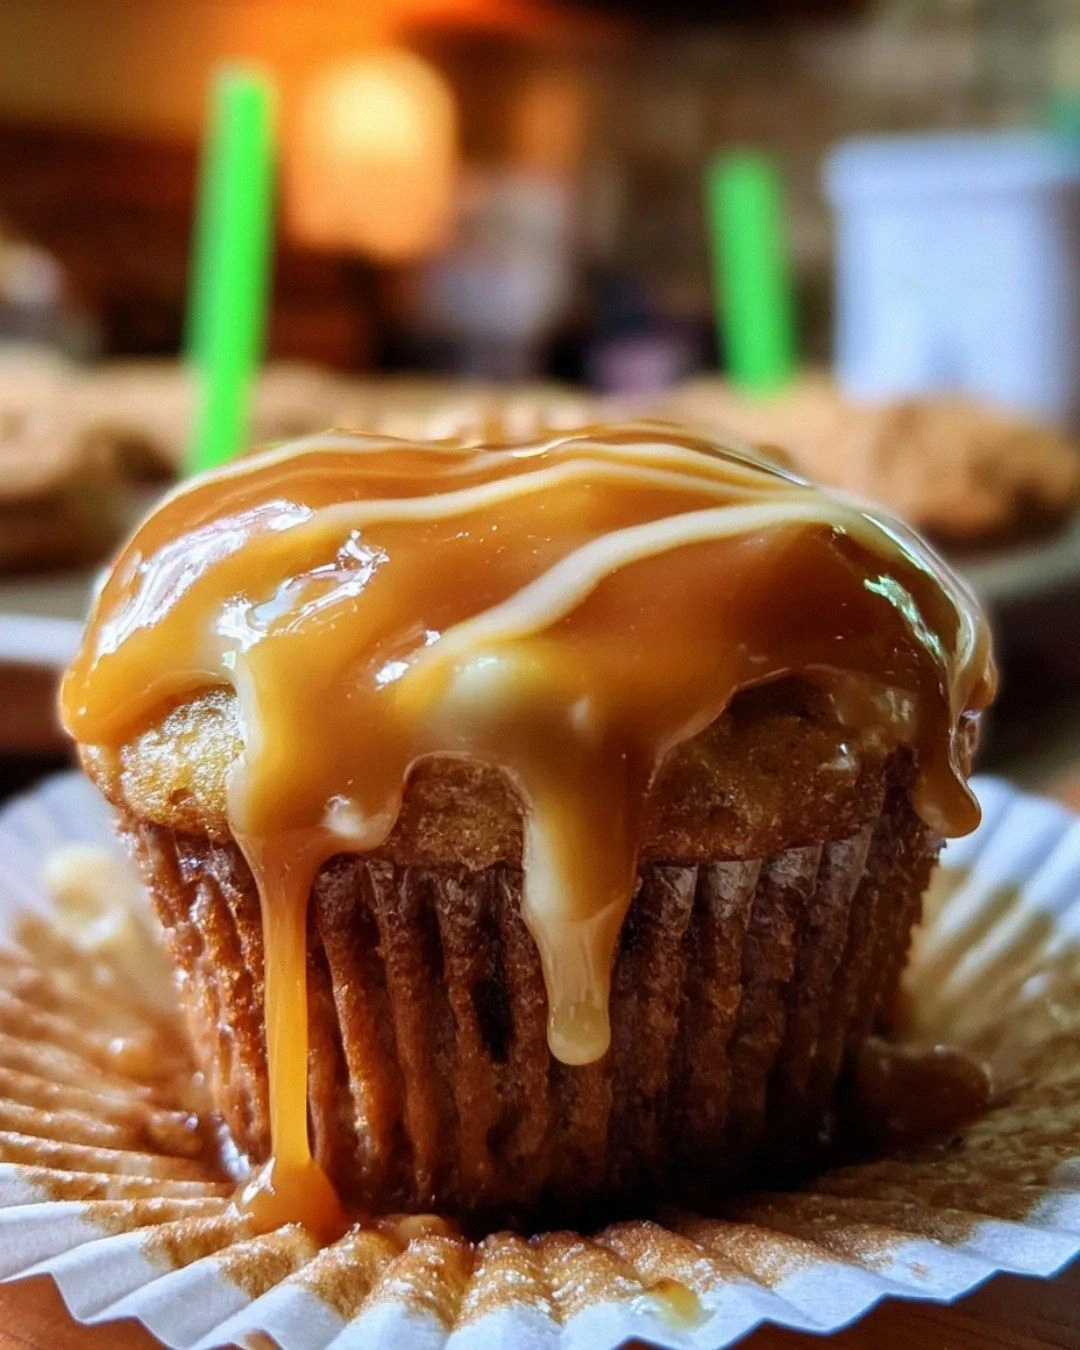
Watch Out: Opening the oven door too early can cause the cupcakes to collapse; trust the timer and resist the urge to peek.While the cupcakes cool in the tin for 5 minutes, melt a second batch of caramel (another ½ cup) and stir in a pinch of flaky sea salt. This salted caramel glaze will be the glossy crown on each cupcake. Once the cupcakes have cooled enough to handle, drizzle the warm glaze in a circular motion, letting it pool slightly at the base before it sets.
Allow the glaze to set for about 10 minutes, then serve immediately or store in an airtight container. The caramel will firm up just enough to give a satisfying snap when you bite, while the interior remains soft and buttery. That sizzle when the caramel hits the warm cupcake? Absolute perfection.
That's it — you did it. But hold on, I've got a few more tricks that'll take this to another level, because a great cupcake deserves an equally great finishing touch.
Insider Tricks for Flawless Results
The Temperature Rule Nobody Follows
Never bake cupcakes straight from the fridge. Let the batter sit at room temperature for 10‑15 minutes before pouring it into the tin. This small pause equalizes the temperature, ensuring a uniform rise and preventing the dreaded “sunken middle.” I once tried to skip this step during a rushed brunch, and the cupcakes emerged with a flat, pancake‑like top—lesson learned.
Why Your Nose Knows Best
Your sense of smell is a more reliable indicator of doneness than a timer. When the cupcakes are about 5 minutes from the suggested bake time, start sniffing the kitchen. You’ll notice a sweet, buttery aroma mingling with a faint caramel perfume. If that scent hits you strongly, it’s time to test with a toothpick; if not, give them another minute or two.
The 5‑Minute Rest That Changes Everything
After removing the cupcakes from the oven, let them rest in the tin for exactly five minutes before transferring to a wire rack. This brief rest allows steam to redistribute, preventing the cupcakes from becoming soggy at the bottom. I once transferred them immediately, and the bases turned into a gummy mess—never again.
Salted Caramel Glaze Timing
The glaze should be applied while the cupcakes are still warm but not piping hot. Warm cupcakes absorb the glaze better, creating a glossy coat that doesn’t slide off. If you wait until they’re completely cool, the glaze will bead up and look patchy, ruining the visual appeal.
The Apple Prep Secret
After dicing the apples, toss them in a splash of lemon juice and a pinch of cinnamon. The lemon prevents browning, while the extra cinnamon amplifies the flavor inside the batter. Let the apple pieces sit for a couple of minutes before folding them in; this ensures they stay moist and don’t dry out during baking.
Creative Twists and Variations
This recipe is a playground. Here are some of my favorite ways to switch things up:
Maple‑Brown Sugar Swirl
Replace half the granulated sugar with brown sugar and add a tablespoon of pure maple syrup to the wet mixture. The result is a deeper, caramel‑like undertone that pairs beautifully with the apple. Perfect for a cozy fall brunch.
Nutty Crunch Delight
Stir in ¼ cup of toasted pecans or walnuts into the batter, and sprinkle a few extra on top before glazing. The nuts add a satisfying crunch that contrasts the soft crumb, and the toasted flavor adds a layer of complexity.
Spiced Rum Infusion
Add a tablespoon of dark spiced rum to the milk before mixing it in. The rum intensifies the caramel notes and gives the cupcakes an adult‑only twist—great for holiday parties where you want a subtle “boozy” surprise.
White Chocolate Drizzle
Melt white chocolate and drizzle it over the caramel glaze once it’s set. The creamy sweetness of white chocolate balances the salty caramel, creating a sophisticated flavor duo that feels like a dessert boutique’s signature item.
Vegan Version
Swap butter for coconut oil, use almond milk instead of dairy, and replace eggs with a flax‑egg (1 Tbsp ground flaxseed + 3 Tbsp water). The texture remains fluffy, and the caramel’s richness compensates for the missing dairy, making it a crowd‑pleasing vegan treat.
Storing and Bringing It Back to Life
Fridge Storage
Place the cooled cupcakes in an airtight container and store them in the refrigerator for up to 4 days. The caramel glaze may thicken, but a quick re‑heat in the microwave (10 seconds) revives the glossy sheen. For added freshness, line the container with a paper towel to absorb excess moisture.
Freezer Friendly
Wrap each cupcake individually in plastic wrap, then place them in a zip‑top freezer bag. They’ll keep for up to 2 months. When you’re ready to enjoy, thaw them overnight in the fridge, then give them a 20‑second microwave blast to bring back that melt‑in‑your‑mouth texture.
Best Reheating Method
To resurrect a refrigerated cupcake, preheat your oven to 300°F (150°C), place the cupcake on a baking sheet, and add a tiny splash (about 1 tsp) of water or milk on the top. Cover loosely with foil and heat for 5‑7 minutes. The added moisture steams the interior back to perfection while the caramel glaze re‑softens without becoming runny.