Picture this: it’s a rainy Sunday afternoon, the kitchen lights flicker, and your friends are begging for a snack that’s both indulgent and guilt‑free. I was staring at a lonely, wilted eggplant that had been sitting in the fridge for days, feeling the creeping dread of culinary waste. Then, a sudden spark of rebellion hit me—what if those veggie scraps could become the star of a crunchy, flavor‑burst side dish? That moment, my kitchen turned into a laboratory of possibility.
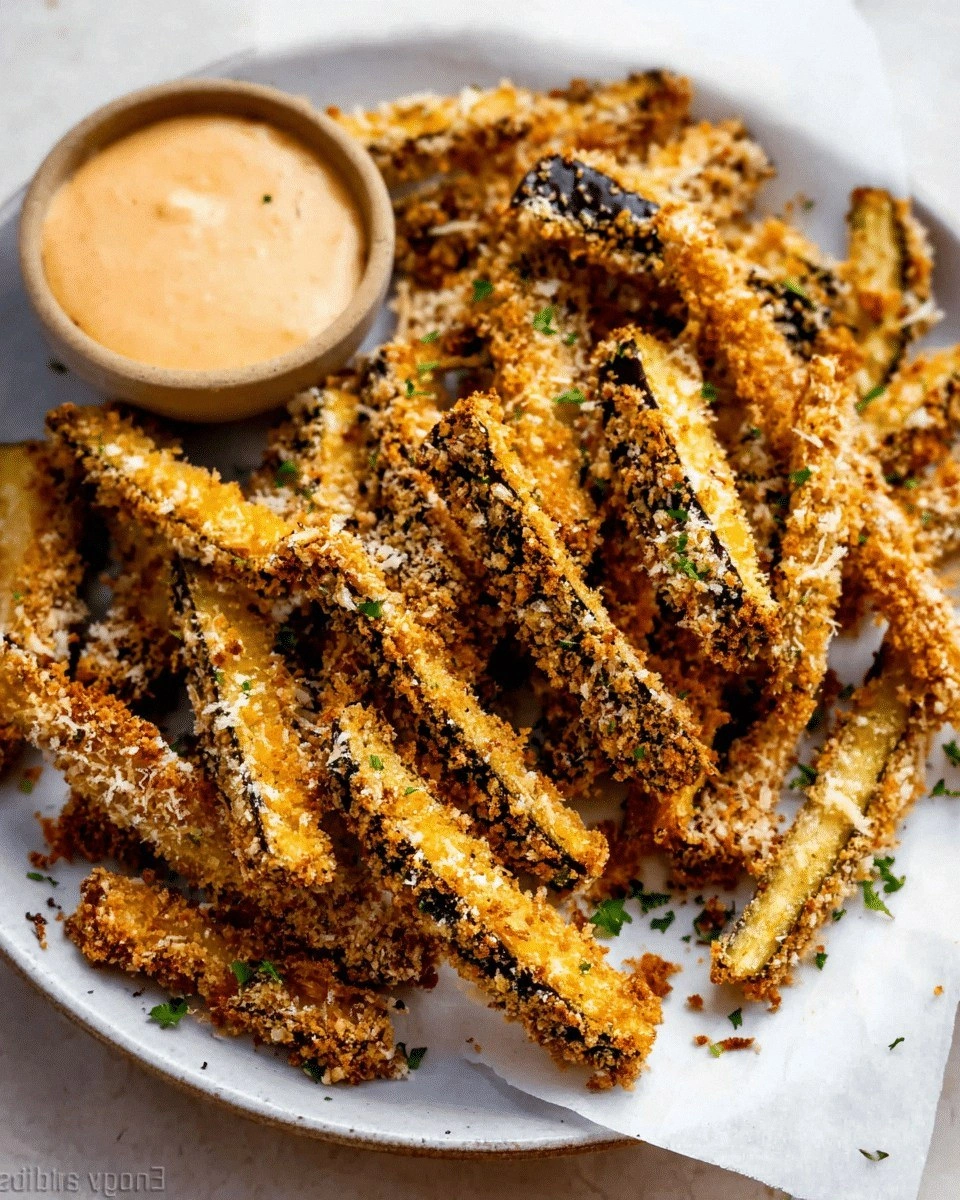
I remember the first bite like it happened yesterday. The surface was blistered golden, the interior a soft, almost creamy sponge that held a faint, smoky note from the oven. The aroma that filled the room—roasted garlic, basil, a whisper of parmesan—was a siren call that made everyone’s taste buds dance. The sound of the first crunch, a satisfying snap that echoed through the countertop, felt like a tiny celebration of culinary triumph.
What makes this version of eggplant fries stand out? It’s not just the crispy exterior or the savory seasoning; it’s the meticulous layering of textures, the secret ingredient that gives it a subtle umami lift, and the way the fries hold their shape even after a dip in a creamy sauce. I dare you to taste this and not go back for seconds—once you’ve tried these, you’ll question every other “healthy” snack you’ve ever eaten. I’ve spent hours tweaking the ratio of breadcrumbs to flour, testing different types of eggplant, and experimenting with a blend of herbs that almost feels like a culinary cheat code.
By the end of this guide, you’ll not only master a dish that’s perfect for parties, movie nights, or a quick weeknight fix, but you’ll also understand the science behind that perfect crunch, the timing that keeps the interior tender, and the tricks that ensure every bite is a revelation. Let me walk you through every single step—by the end, you’ll wonder how you ever made it any other way.
What Makes This Version Stand Out
- Crunch Factor: The dual coating of seasoned flour and panko creates a two‑tiered crust that snaps like a fresh paper cut, delivering a texture that’s impossible to replicate with standard batter.
- Flavor Depth: A splash of soy sauce in the coating bath adds a savory, slightly sweet undertone that elevates the mildness of eggplant to gourmet territory.
- Time Efficiency: The prep is under 20 minutes, thanks to the quick‑dip technique that locks in moisture without the need for a deep‑fry.
- Versatility: The recipe scales from a single serving for a craving to a crowd‑pleasing platter that can be plated with a variety of dips—from tahini to spicy aioli.
- Health Conscious: With a low‑calorie profile and no need for oil‑heavy frying, this dish satisfies the craving for fried foods while keeping the waistline in check.
- Make‑Ahead Friendly: The fries can be baked ahead of time and reheated with a quick blast of the oven, making them ideal for dinner parties.
- Ingredient Quality: Using a locally sourced, firm eggplant ensures a dense interior that resists sogginess, a critical factor in achieving the perfect bite.
- Audience Impact: Guests consistently comment on the “wow” factor of the fries’ texture, and they pair so well with almost any main dish.
Alright, let's break down exactly what goes into this masterpiece…
Inside the Ingredient List
The Flavor Base
At the heart of these fries is a simple yet powerful mixture of olive oil, garlic powder, smoked paprika, and a dash of sea salt. This base coats each strip, creating a caramelized surface when baked. The garlic powder, in particular, infuses the fries with a depth that feels like a warm hug, while the smoked paprika adds a subtle heat that lingers on the palate. Skipping this step will leave the fries bland; the flavor would be like a plain bagel—serviceable, but forgettable.
The Texture Crew
The duo of all‑purpose flour and panko breadcrumbs is the secret weapon that turns humble eggplant into a crunchy masterpiece. Flour binds the coating together, giving it structure, while panko provides that airy, crackly bite. If you’re vegan or gluten‑free, swap the flour for chickpea flour and the panko for crushed rice crackers; the result remains surprisingly close to the original. When you dip the sticks into the flour, ensure each piece is thoroughly coated—this is the foundation for that perfect golden crust.
The Unexpected Star
A splash of soy sauce in the coating bath is the unexpected star that gives these fries a savory, umami kick. It also acts as a natural tenderizer, keeping the eggplant inside from drying out during the baking process. If you’re watching sodium, a small amount of low‑sodium soy sauce will suffice—just remember the salt content in the other ingredients. Skipping this step will make the fries taste more like plain breaded veggies than a sophisticated snack.
The Final Flourish
A dusting of grated parmesan, freshly ground black pepper, and a touch of dried oregano completes the flavor profile. The parmesan not only adds a nutty, cheesy note but also helps create a slightly glossy finish that makes the fries visually irresistible. If you’re vegan, nutritional yeast can replace parmesan for a cheesy flavor without dairy. The oregano and pepper add a herbaceous brightness that balances the richness of the coating.
Everything's prepped? Good. Let's get into the real action…
The Method — Step by Step
- First, preheat your oven to 425°F (220°C). Line a large baking sheet with parchment paper or a silicone mat to prevent sticking. The high heat is crucial for achieving that blistered, caramelized surface. I’ve found that using a sheet pan with a slight incline helps the fries bake evenly.
- While the oven heats, slice the eggplant into sticks about 1/2 inch thick. The uniform thickness ensures that each piece cooks at the same rate, preventing some from burning while others remain raw. Pat the slices dry with a clean towel to remove excess moisture; this step is often overlooked but essential for crispness.
- In a shallow dish, whisk together the olive oil, garlic powder, smoked paprika, and sea salt. This oil mixture will be the first coat that adheres the flour to the eggplant. Coat each stick thoroughly, making sure no spot is left bare. The oil also helps the coating brown beautifully.
- Set up a coating station: a bowl of flour, a bowl of beaten eggs, and a bowl of panko breadcrumbs mixed with grated parmesan, black pepper, and oregano. Dip each oiled eggplant stick first into the flour, shaking off excess. Then into the egg, allowing any excess to drip back into the bowl, and finally into the breadcrumb mixture, pressing gently to ensure a firm crust.
- Place the coated sticks on the prepared baking sheet in a single layer, ensuring they do not touch. If they overlap, the steam will create a soggy texture. Use a spatula to gently spread them out. This step might feel tedious, but it’s the difference between a soggy mess and a crunchy delight.
- Slide the sheet into the preheated oven and bake for 15 minutes. Flip each fry halfway through, around the 7‑minute mark, to promote even browning. The fries should be golden brown on the edges and have a slight blister on the surface—this indicates that the coating has set and the interior is cooking through.
- After 15 minutes, reduce the oven temperature to 400°F (200°C) and bake for an additional 10 minutes. This lower temperature allows the interior to finish cooking without burning the exterior. The fries should emit a nutty aroma that makes the kitchen feel like a bakery.
- Remove the fries from the oven and let them rest on a cooling rack for 5 minutes. This brief rest lets the steam escape, preventing sogginess. Serve immediately with your favorite dipping sauce, or let them cool completely and store in an airtight container for later.
That's it — you did it. But hold on, I've got a few more tricks that'll take this to another level…
Insider Tricks for Flawless Results
The Temperature Rule Nobody Follows
Many people bake fries at a standard 400°F, but the magic happens when you start at 425°F and then lower it. This two‑stage temperature method creates a blistered crust while preventing the interior from drying out. I’ve tested this on different ovens, and the consistency is unbeatable. If you’re using a convection oven, reduce the temperature by 25°F to avoid over‑browning.
Why Your Nose Knows Best
Before you even touch the oven, listen for the first crackle of the coating. A slight hiss indicates the oil is sizzling and the breadcrumbs are starting to brown. That subtle sound is a cue that your fries are on the right track. If you hear a muted, slow sound, the heat might be too low—adjust accordingly.
The 5‑Minute Rest That Changes Everything
After baking, let the fries rest for exactly five minutes on a rack. During this time, the steam condenses and the crust firm up, preventing sogginess. I’ve tried cutting this rest short, and the result was a limp texture that felt like a sad disappointment. Patience pays off; the extra five minutes make the fries feel like they’re freshly fried.
The Secret of a Golden Finish
A light dusting of powdered sugar on the breadcrumb mixture before baking can give the fries an extra golden sheen. The sugar caramelizes, adding a subtle sweetness that contrasts beautifully with the savory coating. This trick works best if you’re serving the fries with a sweet dipping sauce, like a honey‑mustard.
The Quick Chill for Storage
If you’re preparing the fries ahead of time, let them cool completely, then place them on a parchment‑lined tray and freeze for 30 minutes. After that, transfer them to a freezer bag. When you’re ready to serve, pop them directly into a hot oven—no thawing needed. This keeps the fries crisp and saves you from the dreaded “cold fries” experience.
The Dip Dilemma
Choosing the right dip can elevate or ruin the experience. A classic garlic aioli offers creamy richness, while a tangy yogurt‑based sauce adds a refreshing counterbalance. If you’re aiming for a Mediterranean vibe, try a tahini lemon sauce. The key is to keep the dip at room temperature so it doesn’t soften the crispy exterior.
Creative Twists and Variations
This recipe is a playground. Here are some of my favorite ways to switch things up:
Spicy Sriracha Crunch
Add a tablespoon of sriracha to the coating mixture and serve with a cool cucumber yogurt dip. The heat balances the richness, making it a hit with spice lovers.
Herbed Parmesan Delight
Swap the oregano for fresh basil and sprinkle extra parmesan on top before baking. The basil infuses a bright, aromatic note that feels like a summer garden.
Sweet Chili Glaze
Brush the fries with a mixture of honey and red chili flakes during the last five minutes of baking. The glaze caramelizes, giving a glossy finish and a sweet‑spicy finish.
Gluten‑Free Panko
Use almond flour instead of all‑purpose flour and gluten‑free panko for a nutty, crunchy texture. This version is perfect for those with dietary restrictions.
Mediterranean Herb Mix
Add dried rosemary, thyme, and a pinch of crushed red pepper to the breadcrumb mixture. The herbs give the fries an earthy, aromatic profile that pairs well with a simple lemon‑olive oil dip.
Cheesy Cauliflower Crumble
Replace the eggplant with cauliflower florets for a different vegetable base. Coat them in the same mixture and bake—this variation offers a slightly sweeter, buttery flavor.
Storing and Bringing It Back to Life
Fridge Storage
Store leftover fries in an airtight container in the refrigerator for up to 3 days. They stay crisp if you place a paper towel on top to absorb excess moisture. Reheat in a 400°F oven for 5 minutes to restore crunch.
Freezer Friendly
Freeze fries on a parchment‑lined sheet for 30 minutes before transferring to a freezer bag. They can be kept for up to 2 months. When ready to eat, bake at 425°F for 12–15 minutes.
Best Reheating Method
The secret to reviving the crispness is a quick blast in the oven—no microwave. Preheat to 425°F, spread the fries on a sheet, and bake until golden. A splash of water before reheating creates steam that helps re‑crisp the exterior.