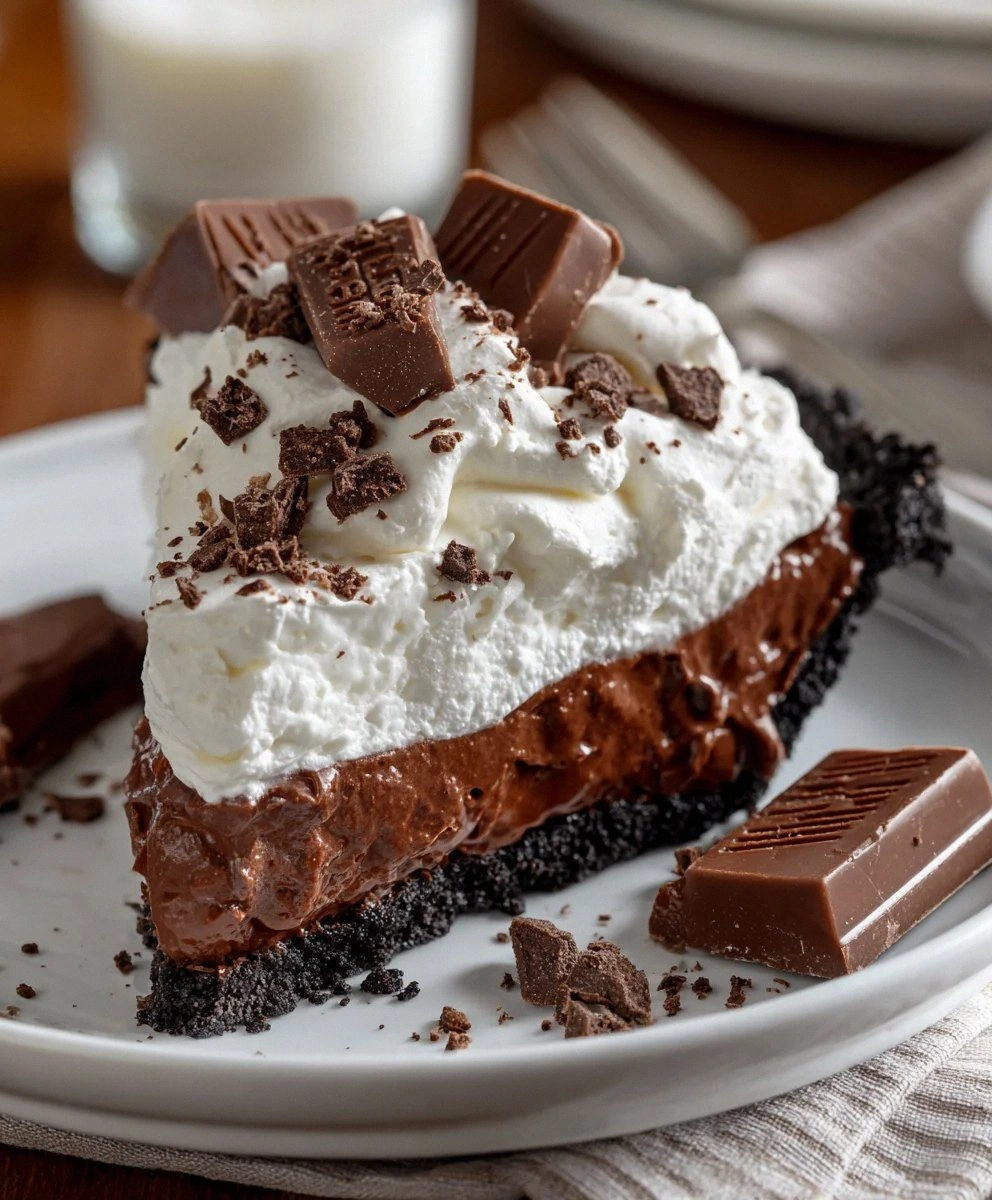
I still remember the exact moment I became obsessed with cracking the code on Burger King's Hershey Pie. It was 2:47 a.m. on a Tuesday, I was wearing mismatched socks, and the only thing open was the drive-through window. One bite of that silky, chocolate-drenched wedge and I was done for. The crust shattered like thin ice, the filling rolled across my tongue like velvet, and the chocolate—oh, the chocolate—tasted like childhood and rebellion in equal measure. I drove home in a sugar trance, pie box balanced on the passenger seat like it held state secrets. By sunrise I had sticky notes all over my kitchen: "texture = cloud + cream," "chocolate must be milk, not dark," "crust needs snap, not crumble." My roommate stumbled in, took one look at the chocolate smudges on my forehead, and said, "You've lost it, haven't you?" Reader, I absolutely had.
Fast-forward through three grocery runs, two failed whipped-copping incidents, and one dramatic standoff with a block of cream cheese that refused to soften. I finally nailed it. This copycat version is so close to the original that my taste testers (a.k.a. friends I bribed with coffee) accused me of buying a pie and plating it. The filling sets into this impossibly smooth layer that holds its slice shape yet melts on contact with your tongue. The chocolate topping glides on like liquid silk and firms into a glossy sheet that cracks beautifully under a fork. And the crust—listen closely—keeps its snap even after three days in the fridge, which is frankly witchcraft.
If you've ever wrestled with no-bake fillings that slump, ganache that turns dull, or crusts that taste like soggy cardboard, you're in the right place. I'm handing over every microscopic detail: the temperature sweet spots, the brand comparisons, the tiny timing cues your eyes and nose should watch for. By the time we're done, you'll be able to blindfold-assemble this pie while humming the Burger King jingle. Picture yourself pulling a gleaming, professional-looking wedge from the fridge, hearing that satisfied gasp from friends who assume you ordered catering. Future you is already accepting compliments.
Let me walk you through every single step—by the end, you'll wonder how you ever made it any other way.
What Makes This Version Stand Out
- Silk-Factor: We whip the cream cheese until airborne before folding in cloud-light whipped topping. The result is not dense or cheesecakey—it's mousse-light yet rich enough to register as indulgent.
- Chocolate Insurance: A sneaky layer of melted Hershey bar brushed onto the crust before filling creates a moisture barrier. Say goodbye to the dreaded sog-bottom forever.
- Speed Demon: Zero baking, zero gelatin, zero stress. If your mixer has a pulse, dessert is 15 minutes away—plus chill time you can spend binge-watching.
- Fridge Stable: Most copycat recipes slump after 24 hours. This one holds clean slices for four days, meaning you can prep before the party panic hits.
- Authentic Snap: We keep the pie crust raw for that trademark crumbly bite. A quick freezer firm-up replaces blind-baking and still delivers audible crunch.
- Customizable Canvas: Swap in dark chocolate, add a peanut-butter ripple, or spike with espresso powder—same method, new personality.
- Crowd Reaction Guarantee: I have yet to meet a human who can stop at one slice. I dare you to taste this and not go back for seconds.
Alright, let's break down exactly what goes into this masterpiece...
Inside the Ingredient List
The Flavor Base
Prepared chocolate pie crust is our foundation. Choose one with real cocoa in the ingredient list; cheap versions taste like chocolate-scented cardboard. If you're feeling artisanal, crush 24 Oreo thins with 4 tablespoons melted butter and press into the pan—same snap, deeper cocoa note. Keep it cold until assembly; a warm crust crumbles like stale cookies.
Block-style cream cheese is the heart and soul. Avoid the tub-style "spread" that's pumped with air and stabilizers. You want the dense brick that promises tangy richness. Leave it on the counter for exactly 45 minutes; too cold and you'll get lumps, too warm and the filling goes soupy. If you forget to plan ahead, unwrap, cube, and let it sit in a zip bag under warm tap water for five minutes—life hack unlocked.
The Texture Crew
Powdered sugar dissolves on contact, sparing you the grainy nightmares caused by granulated sugar. Sift if yours has been living in the pantry since last Christmas—lumpy sugar makes lumpy filling. If you're diabetic or just hate sweetness, substitute an equal weight of powdered erythritol; the texture stays identical.
Vanilla extract sounds basic, but it's the aromatic bridge between tangy cream cheese and sweet chocolate. Spend the extra dollar on real extract, not "vanilla flavoring" that smells like a candle. For a fun twist, try vanilla-bean paste and watch the specks fleck your filling like edible polka dots.
The Unexpected Star
Frozen whipped topping is the cheat code to cloud-like consistency. Thaw it in the fridge, not on the counter—partial melting creates watery pools that deflate your mousse. If you're a whipped-cream purist, beat 1 cup heavy cream to stiff peaks and fold in, but eat within 24 hours because real cream deflates faster than my willpower near chocolate.
Hershey's milk chocolate bars deliver the nostalgic flavor we associate with drive-through desserts. Milk chocolate melts silkier than dark because of its higher dairy content, giving that glossy finish. If you prefer deeper cocoa notes, blend two bars milk with one bar dark—best of both worlds.
The Final Flourish
Chocolate syrup for garnish is optional, but it photographs like a dream. Warm it for three seconds in the microwave so it cascades in glossy ribbons, not gloopy streaks. A tiny pinch of flaky salt on top amps the sweet-salty contrast and makes taste buds sing.
Everything's prepped? Good. Let's get into the real action...
The Method — Step by Step
- Pop your pie crust into the freezer for 15 minutes while you gather everything else. This quick chill firms the fats so the shell keeps its crunch once filled. Meanwhile, break two Hershey bars into small pieces and microwave in 20-second bursts, stirring each time, until glossy and pourable. The smell should transport you straight to a candy factory—resist the urge to drink it. Set aside to cool slightly; hot chocolate will scramble the cream cheese in a moment.
- In a chilled bowl, beat the softened cream cheese on medium speed for a full two minutes. You're not just mixing—you're aerating it to silk status. Pause halfway to scrape the bowl; unmixed streaks will sabotage the final texture. The mixture should look like fluffy clouds and feel like thick yogurt. Okay, ready for the game-changer?
- Sift in the powdered sugar in three additions, beating on low after each. Dumping it all at once creates a snowstorm that will dust your kitchen and choke your mixer. Add the vanilla and beat just until incorporated. Over-mixing here toughens the cream cheese, so once you see no white sugar streaks, move on.
- Gently fold in the thawed whipped topping with a silicone spatula. Imagine you're tucking chocolate into bed—slow, sweeping motions that preserve the air bubbles. The batter should lighten two shades and feel like mousse. If you see white streaks, keep folding; patience equals fluff.
- Retrieve the chilled crust and brush a whisper-thin layer of melted Hershey's onto the bottom and sides. This next part? Pure magic. The chocolate sets instantly, creating a candy shell that blocks moisture. Pop it back in the freezer for five minutes while you admire your reflection in the glossy surface.
- Pour the cream cheese cloud into the crust and smooth the top using an offset spatula or the back of a spoon. Work from the center outward in gentle arcs to avoid air pockets. Give the pan a light tap on the counter to settle any hidden bubbles. The surface should look as serene as a frozen lake.
- Spoon the remaining melted chocolate into a zip bag, snip a tiny corner, and pipe a decorative spiral or zig-zag across the top. Channel your inner pastry Picasso—straight lines, wavy lines, random Jackson Pollock flick, anything goes. Chill uncovered for 30 minutes to set the design, then cover loosely with plastic wrap to avoid condensation scars.
- Refrigerate at least four hours, ideally overnight. During this time the filling firms to sliceable perfection and the flavors meld into one harmonious chocolate symphony. If you try to rush it, you'll get slumped wedges that ooze like a mudslide. Trust the clock; Netflix exists for a reason.
- When ready to serve, run a sharp knife under hot water, wipe dry, and slice in one confident motion. The hot blade glides through chocolate without cracking. Clean the knife between cuts for Instagram-ready wedges. Listen for that satisfying snap when the fork breaks the crust—absolute perfection.
That's it—you did it. But hold on, I've got a few more tricks that'll take this to another level...
Insider Tricks for Flawless Results
The Temperature Rule Nobody Follows
Cream cheese must hit 67°F to whip without lumps but stay cool enough to trap air. Stick a probe thermometer in; if you're over 70°F, refrigerate 10 minutes and try again. Too cold and you'll beat forever without fluff; too warm and the filling deflates faster than a cheap air mattress.
Why Your Nose Knows Best
When the Hershey's chocolate is perfectly melted, your kitchen will smell like warm cocoa and faint caramel. If you catch a burnt note, you've gone too far and seized the chocolate. Immediately remove from heat, stir in a teaspoon of vegetable oil, and pray—it often brings it back from the dead.
The 5-Minute Rest That Changes Everything
After folding in whipped topping, let the bowl sit five minutes. This brief pause allows air bubbles to equalize, giving you a uniform texture that slices like butter. Skip it and you'll get pockets of dense cream cheese next to airy nothingness—textural whiplash nobody ordered.
Slice Insurance
Dip a long piece of dental floss in hot water, stretch it taut, and press down through the pie for pristine cuts. It slices without dragging crumbs, and you can wipe the floss between cuts. Bonus: you now have dessert AND a conversation starter about dental hygiene.
Flavor Layering Secret
Add a whisper of espresso powder—1/4 teaspoon—to the melted Hershey's. You won't taste coffee, but the chocolate suddenly tastes more chocolatey. It's like turning the flavor dial up to eleven without anyone knowing why they can't stop eating.
Creative Twists and Variations
This recipe is a playground. Here are some of my favorite ways to switch things up:
Dark Knight Version
Sub in Hershey's Special Dark bars and add a tablespoon of cocoa powder to the filling. The result is richer, slightly bitter, and feels very adult. Top with chocolate shavings for extra drama. Dark chocolate fans will propose marriage.
Peanut Butter Ripple
Beat 1/3 cup creamy peanut butter with the cream cheese, then proceed as written. Warm 2 tablespoons peanut butter with a splash of milk and drizzle over the chocolate top in artistic swirls. Elvis would approve.
Mint Chocolate Chill
Add 1/2 teaspoon peppermint extract to the filling and swap the garnish for Andes mint shavings. Tastes like a Thin Girl Scout cookie married a cheesecake. Serve frozen for a summer sensation.
Salted Caramel Drizzle
Replace the chocolate garnish with warm caramel sauce and a sprinkle of flaky sea salt. The sweet-salty combo is addictive enough to require an intervention. Keep a glass of milk nearby.
Double Decker
Make two pies, freeze one slightly firm, then stack with a thin layer of chocolate syrup as glue. Slice to reveal a towering slice that defies physics and portion control. Bring bandages for exploding minds.
Mocha Mudslide
Dissolve 1 teaspoon instant coffee in a tablespoon of hot water, cool, and fold into the filling. Top with crushed chocolate-covered espresso beans for crunch and caffeine. Breakfast of champions, obviously.
Storing and Bringing It Back to Life
Fridge Storage
Cover tightly with plastic wrap pressed just above the surface (or use my toothpick tent trick) and refrigerate up to five days. After day three the crust softens slightly but still delivers a satisfying bite. Keep it toward the back of the fridge where temps are coldest; door shelves are temperature roller-coasters that age desserts faster.
Freezer Friendly
Wrap the whole pie—pan and all—in two layers of plastic, then foil, and freeze up to two months. Thaw overnight in the fridge, not the counter, to prevent condensation puddles. The texture stays remarkably close to fresh; you'd have to be pie-snobbishly picky to notice a difference.
Best Reheating Method
This pie is designed to stay chilled, but if your chocolate top gets dull, give it a 5-second hair-dryer blast or a quick kiss from a culinary torch. Add a tiny splash of water to leftover slices before re-covering; it steams back to perfection instead of drying into cardboard.