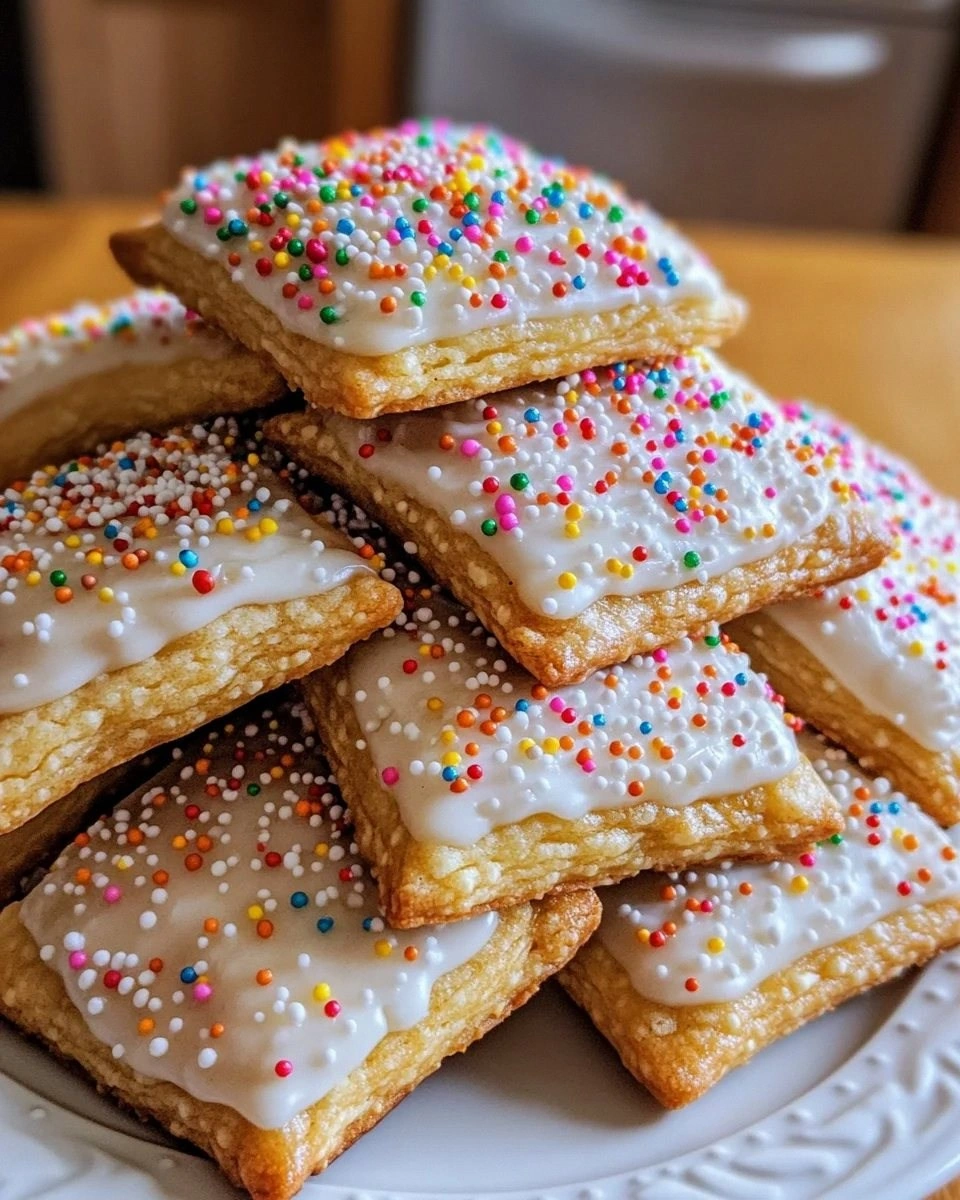
I swear, the first time I tried to bake a simple cookie I ended up with a charcoal slab that could have been used as a doorstop. The smoke alarm sang its protest, my roommate stared at me like I’d just summoned a culinary demon, and I thought, “Okay, maybe I’m not cut out for baking.” Then, on a rainy Sunday, a friend dared me to recreate the nostalgic pop‑tart‑in‑a‑cookie that we used to steal from the school cafeteria. I accepted the challenge, but this time I was armed with a better mindset, a trusty stand mixer, and a secret weapon: brown sugar that caramelizes like a dream.
Picture this: a kitchen bathed in warm amber light, the scent of butter melting into a buttery pool, and the faint crackle of sugar hitting a hot pan. The dough feels soft yet slightly tacky under your fingertips, like a well‑kissed hand. When you roll it out, the edges are perfectly even, and the aroma of vanilla and toasted brown sugar starts to swirl around you, making the whole house feel like a bakery on a Saturday morning. As you press the cookie shapes together, the filling oozes out just enough to peek through, promising a gooey surprise that’s both crisp and chewy at the same time.
What makes this version a game‑changer? Most pop‑tart cookie recipes either skip the caramelized brown sugar or over‑sweeten the filling, leaving you with a cloying mess. I’ve cracked the code by balancing the deep molasses notes of dark brown sugar with a tangy cream‑cheese frosting that cuts through the richness like a cool breeze on a hot day. The result is a cookie that’s crunchy on the outside, soft in the middle, and has a filling that feels like a miniature, perfectly baked tart—no soggy bottoms, no burnt edges.
I’m about to walk you through every single step—by the end, you’ll wonder how you ever made a “regular” cookie at all. There’s a little twist involving a splash of lemon juice that will surprise you, and a technique for shaping the dough that ensures each bite looks like a miniature castle tower. Ready? Let’s get our hands dirty and build a snack that will have everyone begging for seconds.
What Makes This Version Stand Out
- Flavor Depth: The dark brown sugar caramelizes during baking, creating a toffee‑like backbone that pairs perfectly with the tangy cream‑cheese filling.
- Texture Harmony: A crisp, buttery edge meets a soft, pillowy center, while the filling stays creamy without ever turning runny.
- Simplicity: Only ten pantry staples are required, and the method uses everyday tools—no fancy equipment needed.
- Uniqueness: The lemon‑infused cream cheese frosting adds a subtle brightness that most pop‑tart cookies lack.
- Crowd Reaction: Guests often declare this the “best cookie ever” and immediately ask for the recipe—again and again.
- Ingredient Quality: Using real butter and high‑quality brown sugar makes a world of difference in flavor and aroma.
- Cooking Method: A short, high‑heat bake locks in moisture while creating that coveted caramelized crust.
- Make‑Ahead Potential: The cookies keep for days, and the frosting can be pre‑made and stored, making assembly a breeze.
Inside the Ingredient List
The Flavor Base
All‑purpose flour forms the structural backbone of our castle walls. I always recommend sifting the flour to aerate it; this prevents dense spots and ensures a light crumb. If you skip the sift, you might end up with a gummy texture that feels more like a rubber band than a cookie. Swap tip: For a gluten‑free version, use a 1‑to‑1 blend of rice flour and tapioca starch.
Brown Sugar: The star of the show, dark brown sugar brings a deep, molasses‑rich flavor that plain white sugar can’t touch. Its moisture content helps keep the cookies tender. If you accidentally grab light brown sugar, the flavor will be milder but still delicious.
Unsalted Butter: Butter provides that melt‑in‑your‑mouth richness and helps the cookies spread just enough to get those golden edges. Use real butter, not margarine, for authentic flavor. When softened, it should be pliable but not greasy—think “soft‑serve ice cream” consistency.
The Texture Crew
Baking powder is the subtle lift that keeps the interior from becoming a dense slab. Too much, and you’ll get a cake‑like crumb; too little, and the cookies stay flat. A pinch of salt amplifies the sweetness and balances the caramel notes.
Egg: The egg acts as a binder, giving the dough elasticity and a glossy finish. If you’re allergic, a flax egg (1 tbsp ground flaxseed + 3 tbsp water) works well, though the texture will be slightly different.
The Unexpected Star
Cream Cheese: Adding cream cheese to the filling creates a tangy contrast that cuts through the sweetness. It also adds a silky mouthfeel that mimics the custard in a classic pop‑tart. Make sure the cheese is at room temperature; otherwise, you’ll get lumps in the frosting.
Lemon Juice: Just a teaspoon of lemon juice brightens the cream‑cheese frosting, preventing it from feeling cloying. The acidity also stabilizes the frosting, keeping it from weeping.
The Final Flourish
Strawberry jam (or any jam of your choice) provides that signature fruit burst we all love in a pop‑tart. I opt for a low‑sugar jam to keep the overall sweetness in check. If you’re feeling adventurous, try raspberry, apricot, or even a spicy mango‑chili jam for a twist.
Everything's prepped? Good. Let’s get into the real action and start building those castle‑like cookies.
The Method — Step by Step
Preheat your oven to 375°F (190°C) and line two baking sheets with parchment paper. While the oven heats, whisk together the flour, baking powder, and salt in a large bowl. This dry mix ensures the leavening agent is evenly distributed, preventing pockets of flatness.
In a separate bowl, cream the softened butter with the dark brown sugar and granulated sugar until the mixture is light, fluffy, and smells like a caramel shop at dawn. This usually takes about 3‑4 minutes with a handheld mixer on medium speed. Pro tip: Scrape the sides often to incorporate every buttery nugget.
Kitchen Hack: Add a splash of vanilla extract at this stage; it amplifies the caramel notes without overpowering them.Beat in the egg until fully incorporated, then stir in the vanilla extract. The dough should come together in a slightly sticky mass. If it feels too wet, sprinkle in a tablespoon of flour and continue mixing—don’t over‑mix, or you’ll develop gluten and lose that tender crumb.
Wrap the dough in plastic wrap and chill for at least 30 minutes. This rest period allows the flour to hydrate and the butter to firm up, which is essential for clean cuts later. Watch Out: Skipping this step often leads to cookies that spread too thin and lose their “castle” shape.
Meanwhile, prepare the filling. In a medium bowl, beat the softened cream cheese until smooth. Add powdered sugar, lemon juice, and a pinch of salt, then whisk until the frosting is light and airy. Transfer the frosting to a piping bag fitted with a large round tip.
On a lightly floured surface, roll the chilled dough to about 1/4‑inch thickness. Using a 3‑inch round cutter, cut out circles. For each cookie, pipe a dollop of cream‑cheese frosting in the center, then add a teaspoon of jam on top of the frosting. Be careful not to over‑fill; the dough will seal around the filling like a moat around a castle.
Place a second dough circle on top of each filled circle. Gently press the edges together with your fingertips or a fork to seal. If any gaps appear, use a small amount of water on a brush to seal them—this prevents leaking during baking.
Watch Out: Over‑pressing can cause the filling to burst out, turning your castle into a gooey mess.Transfer the assembled cookies onto the prepared baking sheets, spacing them about 2 inches apart. Brush the tops lightly with a beaten egg mixed with a splash of water; this gives the cookies a glossy, golden finish.
Bake for 12‑15 minutes, or until the edges are a deep amber and the tops have a slight sheen. The cookies should feel firm to the touch, but the centers will still be soft. If you listen closely, you’ll hear a faint crackle as the sugar caramelizes—trust that sound.
Remove the cookies from the oven and let them cool on the sheet for 5 minutes before transferring to a wire rack. This rest allows the filling to set, making it easier to slice without spilling. Once completely cool, you’ll see the glossy tops and the faint outline of the jam peeking through—a true visual cue that they’re ready to devour.
That's it — you did it. But hold on, I've got a few more tricks that'll take this to another level. The next section will show you how to fine‑tune every detail, from the perfect bake to the ultimate presentation.
Insider Tricks for Flawless Results
The Temperature Rule Nobody Follows
Always start with a fully preheated oven. If the oven temperature is even a few degrees low, the butter will melt too quickly, causing the cookies to spread excessively. I keep an instant‑read thermometer in the kitchen; a quick check confirms the oven is truly at 375°F before the dough even touches the heat.
Why Your Nose Knows Best
When the cookies are about halfway through baking, you’ll notice a sweet, caramel perfume filling the kitchen. That’s your cue that the brown sugar is reaching its peak caramelization. Trust that scent; if you wait until the edges are dark, you’ll end up with a burnt flavor.
The 5‑Minute Rest That Changes Everything
After the cookies come out of the oven, let them rest on the baking sheet for exactly five minutes before moving them. This short pause lets the steam finish cooking the interior gently, preventing a dry crumb. A friend once tried to rush this step and the cookies crumbled like dry sand—lesson learned.
Seal the Deal with Water
If you notice any tiny gaps after sealing the top and bottom circles, dip a clean pastry brush in water and lightly brush the edges before pressing. The water acts like edible glue, ensuring a tight seal that keeps the jam from leaking.
Cool‑Down Trick for a Shiny Finish
While the cookies are cooling, lightly mist them with a spray bottle of water (just a fine mist). The moisture creates a subtle glaze as it evaporates, giving the tops a professional‑level sheen without any extra egg wash.
Creative Twists and Variations
This recipe is a playground. Here are some of my favorite ways to switch things up:
Chocolate‑Covered Delight
After the cookies have cooled, dip half of each top in melted dark chocolate and sprinkle with sea salt. The bitter chocolate contrasts the sweet caramel, creating a sophisticated flavor profile that will wow coffee‑drinkers.
Nutty Crunch
Fold finely chopped toasted pecans or walnuts into the dough before chilling. The nuts add a buttery crunch that complements the soft interior, perfect for those who love texture variety.
Citrus Burst
Swap the strawberry jam for a lemon curd and add a teaspoon of orange zest to the cream‑cheese frosting. The bright citrus cuts through the richness and gives the cookies a sunny, summer vibe.
Spiced Autumn
Incorporate a pinch of ground cinnamon, nutmeg, and a dash of pumpkin puree into the dough. Pair with an apple‑cinnamon jam for a cozy, fall‑inspired treat that feels like a warm hug.
Savory Sweet Fusion
Add a thin layer of caramelized onions and a sprinkle of sharp cheddar inside the sandwich. This bold sweet‑savory combo works surprisingly well as an appetizer for brunch.
Storing and Bringing It Back to Life
Fridge Storage
Place the cooled cookies in an airtight container with a paper towel at the bottom to absorb excess moisture. They stay fresh for up to five days, and the fridge keeps the cream‑cheese frosting from softening too much.
Freezer Friendly
Layer cookies between parchment sheets and seal them in a zip‑top bag. They freeze beautifully for up to three months. When ready to eat, let them thaw at room temperature for 20 minutes, then give them a quick 5‑minute bake at 300°F to revive the crisp edges.
Best Reheating Method
To bring back that fresh‑out‑of‑the‑oven crunch, preheat your oven to 325°F, place the cookies on a baking sheet, and add a tiny splash (about a teaspoon) of water to the tray. Cover loosely with foil and heat for 6‑8 minutes. The steam revitalizes the interior while the heat restores the caramelized crust.