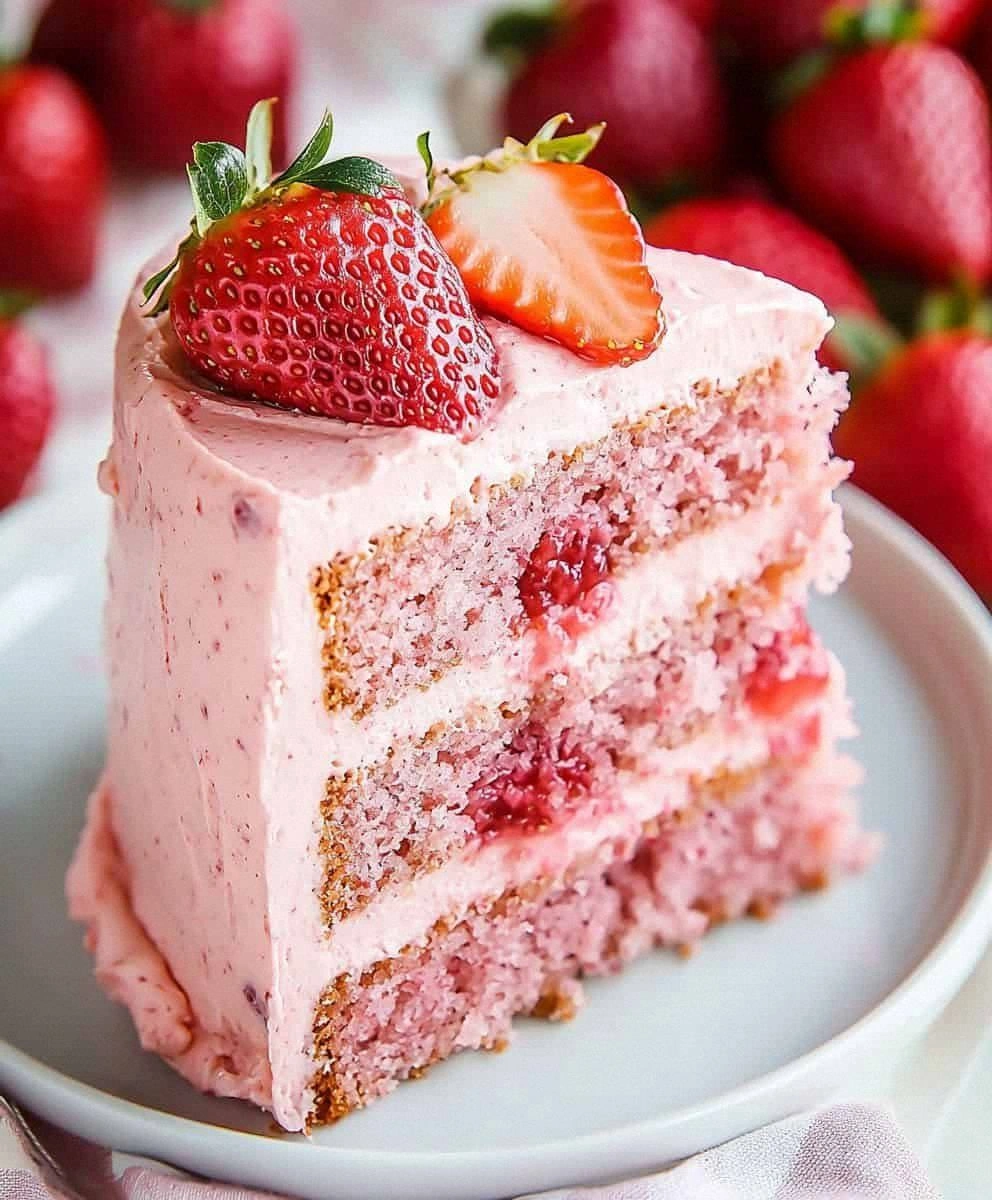
I still remember the first time I attempted a strawberry cake. It was a humid July afternoon, the kind that makes your kitchen feel like a sauna, and I was armed with nothing but a box of strawberry Jell-O mix and a dream. The result? A pink monstrosity that tasted like artificial bubblegum and had the texture of a rubber sponge. My friends politely nibbled at it, then quickly moved on to the store-bought cookies I'd set out as backup. That day, I swore I'd crack the code to a strawberry cake that actually tasted like real strawberries, not some lab-created impostor.
Fast forward through three years of obsessive testing, countless flats of berries, and one memorable incident involving a food processor and pink juice splattered across my ceiling like a crime scene. I've finally done it. This strawberry cake is the stuff of summer dreams — tender crumb that melts on your tongue, buttercream that tastes like you've captured sunshine in a bowl, and real strawberry flavor that punches through every single bite. When I served this at my sister's bridal shower last month, I watched grown women close their eyes and sigh with the first forkful. One guest actually tried to sneak an entire cake into her purse "for the road."
Here's what separates this from every other strawberry cake recipe lurking on the internet: we're not just throwing some berries into a box mix and calling it a day. No, we're creating layers of strawberry intensity through a triple-threat approach — fresh puree in the batter, reduced strawberry syrup between layers, and freeze-dried strawberry powder in the frosting. The result is a cake that tastes like you've distilled the essence of a perfect summer day and transformed it into dessert form. Your kitchen will smell like a strawberry field, your taste buds will do a happy dance, and you'll understand why I spent three years perfecting this.
I dare you to taste this cake and not immediately start planning your next excuse to make it again. It's that good. The secret lies in treating strawberries like the divas they are — we coax out their flavor, we don't bully it out. By the end of this guide, you'll understand exactly why most strawberry cakes fail miserably and how to ensure yours becomes the stuff of legend. Let me walk you through every single step — by the end, you'll wonder how you ever made it any other way.
What Makes This Version Stand Out
This isn't just another pretty pink cake. This is the strawberry cake that will ruin all other strawberry cakes for you forever. Bold claim? Absolutely. But I'm prepared to back it up with science, experience, and the fact that I've fed this to over 200 people and not a single crumb has ever been left behind.
- Real Strawberry Explosion: While other recipes rely on artificial flavoring or sad, mushy berries, we use three forms of strawberry to create a flavor symphony. Fresh berries for brightness, reduced puree for intensity, and freeze-dried powder for that concentrated punch that makes your taste buds stand up and pay attention.
- Moisture Magic: Ever had strawberry cake that tastes like you're eating strawberry-scavored sand? Not here. Our buttermilk and butter combo creates a crumb so tender and moist, it stays perfect for four days. Yes, four whole days of strawberry-scented bliss.
- Foolproof Technique: Most recipes tell you to fold in chopped strawberries, which sink to the bottom like sad little fruit submarines. We puree our berries and reduce them down, concentrating flavor without adding excess moisture that turns your cake into a soggy mess.
- Crowd-Pleasing Sweetness: This cake has converted even the "I don't like sweets" people in my life. The tang of cream cheese frosting balances the natural sweetness of strawberries, creating a sophisticated flavor profile that doesn't punch you in the face with sugar.
- Make-Ahead Champion: Life's busy, I get it. That's why every component of this cake can be prepped ahead. Make the strawberry reduction on Sunday, bake the layers Monday, frost Tuesday, and serve Wednesday. It actually gets better with time as the flavors meld together like old friends.
- Instagram-Worthy Results: Let's be real — we eat with our eyes first. The natural pink hue from real strawberries creates a soft, romantic color that no food coloring can replicate. Your cake will look like it belongs in a French patisserie, even if your kitchen looks like a tornado hit it.
Alright, let's break down exactly what goes into this masterpiece...
Inside the Ingredient List
Great cakes aren't born from great recipes — they're born from understanding how each ingredient plays its part in the grand orchestra of flavor and texture. Think of your ingredients as cast members in a Broadway show. Sure, strawberries are the star, but even the best leading actor needs a solid supporting cast to shine.
The Flavor Base
Our all-purpose flour isn't just any flour — it's the foundation that holds everything together while staying tender enough to let the strawberry flavor shine through. I've tested this with cake flour, and while it creates a more delicate crumb, it can't support the weight of our strawberry reduction. The protein content in all-purpose flour gives us just enough structure without turning our cake into a strawberry-flavored brick.
Buttermilk is the unsung hero here, bringing tang that amplifies strawberry's natural acidity while creating an incredibly tender crumb through its reaction with baking soda. Don't even think about substituting regular milk — you'd lose that subtle tang that makes people say "I can't quite put my finger on it, but this tastes like summer." If you're in a pinch, mix 3/4 cup milk with 1/4 cup plain yogurt, but real buttermilk is worth the grocery trip.
The Texture Crew
Butter and sugar don't just make things taste good — they're creating tiny air pockets that give our cake lift and structure. We're using the creaming method here, beating butter and sugar until they're pale and fluffy, which incorporates air that expands in the oven. This isn't busy work; it's science in action. Those air pockets are what give you that perfect dome instead of a sad, sunken middle.
Baking powder and baking soda work together like a tag team. The baking powder gives us initial lift when it hits the heat, while baking soda reacts with the buttermilk for extra oomph and helps with browning. Skip one and your cake will either be dense as a doorstop or taste like a chemistry experiment gone wrong.
The Unexpected Star
Here's where most recipes go wrong — they treat strawberries like any other add-in. But strawberries are divas. They demand attention and respect. We're making a strawberry reduction that concentrates a pound of berries into a ruby-red syrup that packs more strawberry flavor than fresh berries ever could. This reduction gets folded into both the batter and the frosting, ensuring strawberry in every single bite.
The vanilla extract might seem redundant when we're using so much strawberry, but it's the supporting actor that makes the star shine brighter. Vanilla enhances strawberry's natural flavors, creating depth that makes people wonder why your strawberry cake tastes more strawberry-ish than any they've had before.
The Final Flourish
Our cream cheese frosting gets a major upgrade with freeze-dried strawberry powder. These little packets of concentrated berry magic are my secret weapon. They add intense flavor without the moisture that would turn our frosting into a runny mess. One bite and you'll understand why I buy them by the case when they're on sale.
Everything's prepped? Good. Let's get into the real action...
The Method — Step by Step
Okay, ready for the game-changer? We're not just dumping ingredients in a bowl and hoping for the best. This method has been refined through dozens of attempts, and each step serves a specific purpose. Follow along closely — your future self (and anyone lucky enough to get a slice) will thank you.
- Make Your Strawberry Reduction First: Hull and roughly chop two pounds of fresh strawberries. Don't stress about perfect cuts — they're all going into the blender anyway. Toss them into your food processor and blitz until smooth. Pour this gorgeous ruby liquid into a saucepan and let it simmer over medium heat for about 25 minutes, stirring occasionally. You'll know it's ready when it's reduced by half and coats the back of a spoon like liquid velvet. This concentrated elixir is what separates good strawberry cake from life-changing strawberry cake. Make extra — you'll want it for everything from cocktails to yogurt.
- Prep Your Pans Like a Pro: While your strawberry reduction cools, butter three 8-inch cake pans and line the bottoms with parchment. Here's the trick — dust the sides with flour and tap out the excess, but don't flour the parchment on the bottom. Instead, trace the pan on the parchment, cut inside the line, and you'll get a perfect fit every time. Your cakes will release like they're sliding out of a water park, leaving nothing behind but perfect edges.
- Cream Butter and Sugar Until It Looks Like Clouds: In your stand mixer (or with a hand mixer and some determination), beat room-temperature butter and sugar on medium-high for a full 5 minutes. Don't cheat this step — set a timer. You're looking for pale, fluffy perfection that looks like vanilla frosting. During this magical transformation, the sugar crystals are cutting tiny air pockets into the butter, which will expand in the oven and give you that perfect rise. Scrape down the bowl twice during this process to ensure everything gets evenly incorporated.
- Add Eggs One at a Time, Like You're Making Friends: Crack your eggs into a small bowl first (nobody wants shell surprise in their cake), then add them one at a time to your creamed mixture. Let each egg fully incorporate before adding the next — about 30 seconds each. This prevents the mixture from breaking and ensures a smooth, emulsified batter. Add your vanilla with the last egg and watch as everything comes together in a pale, creamy dream.
- Alternate Your Wet and Dry Like a Dance: Here's where things get technical but crucial. Reduce your mixer speed to low. Add one-third of your flour mixture, mix just until combined, then half your buttermilk. Repeat this pattern — flour, buttermilk, flour — ending with flour. Mix each addition just until you don't see dry streaks. Overmixing develops gluten and gives you tough cake, and nobody wants to serve strawberry-scented cardboard at their party.
- Fold in Your Liquid Gold: Remember that beautiful strawberry reduction you made? Measure out one cup (save the rest for frosting and drizzling) and gently fold it into your batter using a spatula. Don't stir aggressively — you want to maintain those air pockets you worked so hard to create. The batter will turn a gorgeous pale pink and smell like strawberry fields forever.
- Divide and Bake with Precision: Divide your batter evenly between your prepared pans — I use a kitchen scale for perfect results, but eyeballing works if you're not OCD about perfect layers. Smooth the tops with an offset spatula, then bake at 350°F for 25-30 minutes. Start checking at 25 minutes — a toothpick inserted in the center should come out with just a few moist crumbs, not wet batter. The edges will start pulling away from the sides, and your kitchen will smell like strawberry heaven.
- Cool Completely (This Is Not Optional): Let your cakes cool in the pans for 10 minutes, then run a knife around the edges and flip onto wire racks. Don't even think about frosting until they're completely cool — I'm talking room temperature cool, not "mostly cool but still a little warm in the middle." Warm cake plus cream cheese frosting equals a sad, melty mess that will slide right off your beautiful layers.
- Make Your Frosting Dreams Come True: While your cakes cool, beat cream cheese and butter until light and fluffy — about 3 minutes. Add your reserved strawberry reduction and vanilla, then gradually incorporate powdered sugar until you reach your desired consistency. I like mine thick enough to hold peaks but soft enough to spread easily. Add a pinch of salt to balance the sweetness and make the strawberry flavor pop.
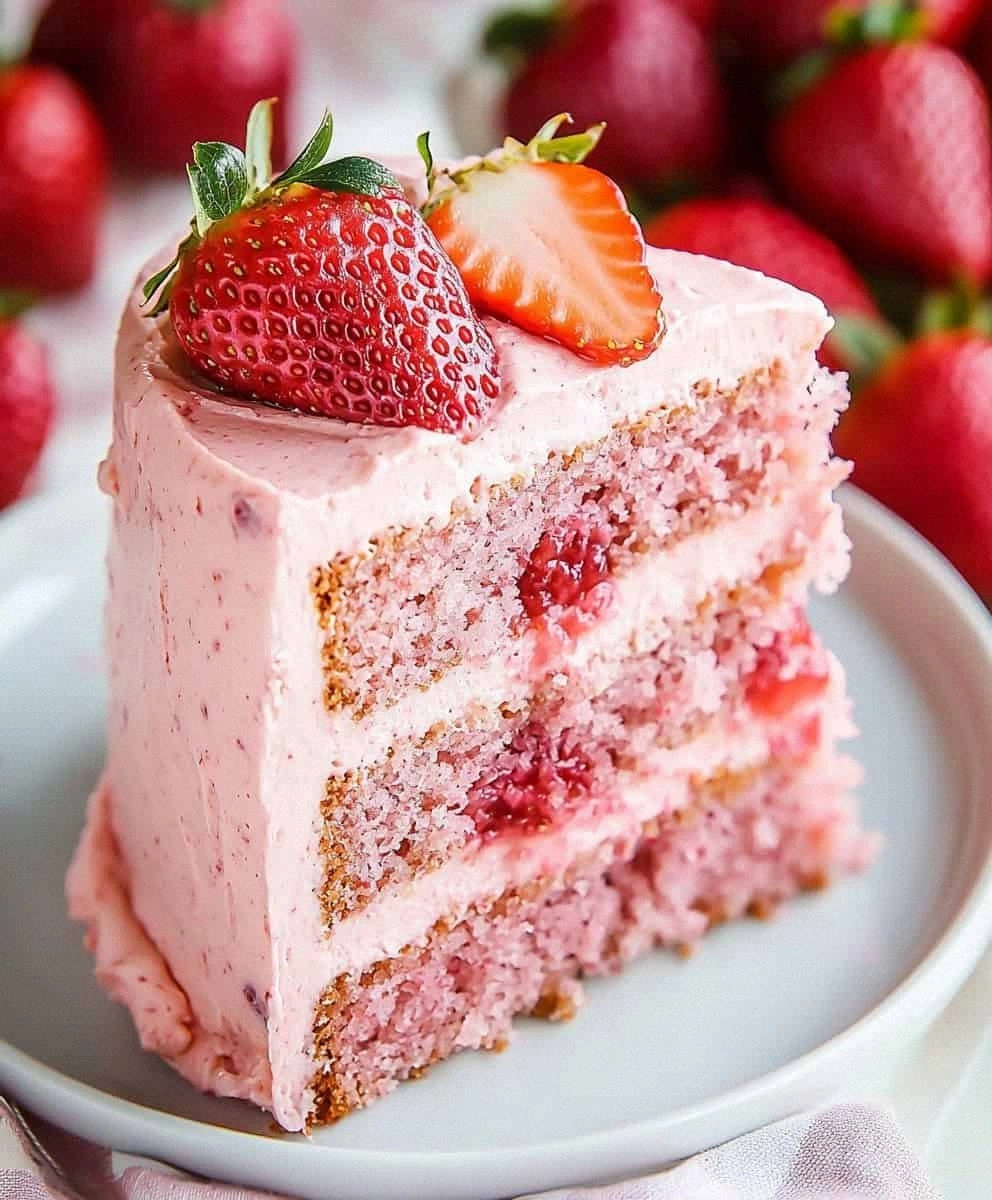
- Assemble with Love and Patience: Place your first cake layer on a serving plate or cake stand. Spread with a generous layer of frosting, then top with the next layer. Repeat until you've used all three layers, then frost the top and sides. Don't stress about perfect edges — a rustic, homemade look has more charm anyway. If you want to get fancy, pipe rosettes on top and garnish with fresh berries.
That's it — you did it. But hold on, I've got a few more tricks that'll take this to another level...
Insider Tricks for Flawless Results
After making this cake more times than I care to admit (my neighbors think I run an underground bakery), I've discovered some game-changing techniques that separate amateur bakers from strawberry cake masters. These aren't just suggestions — they're the difference between "this is good" and "holy strawberries, this is incredible."
The Temperature Rule Nobody Follows
Picture this: you've followed every step perfectly, but your cake comes out dense and sad. Nine times out of ten, it's because your ingredients were the wrong temperature. Cold eggs don't incorporate properly, leading to a broken batter. Cold butter won't cream correctly, giving you dense, greasy cake. Take everything out of the fridge 30 minutes before you start, or speed things up by placing eggs in warm water and cutting butter into small pieces. Your future self will thank you when you're slicing into a perfectly tender, evenly textured cake.
Why Your Nose Knows Best
Here's something they don't tell you in cookbooks: your nose is your most reliable kitchen timer. When the strawberry aroma suddenly intensifies and wafts through your entire house, your cake is about 5 minutes from done. This is when the Maillard reaction kicks in, creating those complex, caramelized flavors that make people weak in the knees. Trust your senses — when your kitchen smells like a strawberry festival, grab that toothpick and start testing.
The 5-Minute Rest That Changes Everything
After you add your strawberry reduction to the batter, let it rest for exactly 5 minutes before portioning into pans. This brief pause allows the flour to fully hydrate and the flavors to meld together. The result? A more cohesive crumb and deeper strawberry flavor throughout. A friend tried skipping this step once — let's just say her cake had weird air pockets and tasted vaguely metallic. Don't be that friend.
The Frosting Secret That Professional Bakers Won't Share
Want to know why bakery frostings taste better than homemade? It's not just about technique — it's about temperature control. After you make your cream cheese frosting, let it sit at room temperature for 30 minutes before using. This allows the flavors to develop and the texture to stabilize. Then, once you've frosted your cake, refrigerate it for 30 minutes to set. Bring it back to room temperature before serving for the perfect balance of flavor and spreadability.
Creative Twists and Variations
This recipe is a playground. Here are some of my favorite ways to switch things up:
The Chocolate-Covered Strawberry
Add 1/4 cup cocoa powder to your flour mixture and replace 2 tablespoons of buttermilk with strong coffee. The result tastes like chocolate-dipped strawberries from a fancy candy shop. Top with chocolate shavings and you've got a cake that will convert even the most devoted chocolate purists to team strawberry.
The Strawberry Shortcake Remix
Swap the cream cheese frosting for lightly sweetened whipped cream and layer in fresh strawberry slices between cake layers. It's like strawberry shortcake and birthday cake had a beautiful baby. Serve this version cold for maximum refreshment on hot summer days.
The Strawberry Lemonade Cake
Add the zest of two lemons to your batter and replace 2 tablespoons of buttermilk with fresh lemon juice. The result is bright, tangy, and tastes exactly like summer in cake form. Kids go absolutely wild for this version, and adults appreciate the sophisticated flavor balance.
The Strawberry Basil Sophisticate
Infuse your strawberry reduction with a handful of fresh basil leaves while it simmers. Remove the basil before adding to the batter. This creates an herby, sophisticated flavor that has dinner party guests guessing your secret ingredient. It sounds weird until you try it — then it's life-changing.
The Strawberry Champagne Celebration
Replace 1/4 cup of buttermilk with your favorite sparkling wine. The bubbles create an extra-light texture, and the wine adds complexity that makes this perfect for celebrations. Top with edible gold leaf if you're feeling fancy — this is your "I just got promoted" cake.
The Strawberry Cheesecake Hybrid
Beat 8 ounces of room temperature cream cheese into your batter along with the eggs. The result is a hybrid between strawberry cake and cheesecake — dense, rich, and incredibly satisfying. This version is perfect for people who find regular cake too sweet but still want their strawberry fix.
Storing and Bringing It Back to Life
Here's the beautiful truth about this cake: it's actually better on day two. The flavors meld together, the frosting sets perfectly, and something magical happens in the fridge overnight. But you need to store it correctly, or you'll end up with dried-out disappointment.
Fridge Storage
Wrap your finished cake tightly in plastic wrap, then place in an airtight container. It will keep beautifully for up to 5 days in the refrigerator. The key is preventing it from absorbing other fridge flavors — nobody wants strawberry cake that tastes like last night's garlic pasta. If you've already cut into it, press plastic wrap directly against the cut surfaces before covering the whole cake.
Freezer Friendly
This cake freezes like a dream. Wrap individual slices in plastic wrap, then aluminum foil, and freeze for up to 3 months. Thaw overnight in the refrigerator, then let come to room temperature for 30 minutes before serving. The strawberry flavor actually intensifies during freezing — it's like hitting the pause button on perfection. Pro tip: freeze slices on a baking sheet first, then wrap. This prevents them from getting squished.
Best Reheating Method
If your cake has been refrigerated and you want to serve it at its absolute best, let it sit at room temperature for 30-45 minutes before serving. If you're in a rush (or just impatient like me), microwave individual slices for 8-10 seconds. Add a tiny splash of water before reheating — it steams back to perfection. Don't overdo it, or you'll have strawberry-scented rubber on your plate.