When I finally got my kitchen to stop sounding like a drum kit, I was ready for a sweet rescue. I had just pulled a batch of chocolate chip cookies that looked like they’d been baked in a volcano, and my taste buds were screaming for something that would balance sweet and salty in a way that made my tongue sing. I dared myself to create a cookie that could survive the chaos of a busy kitchen, yet still feel like a decadent treat. And that’s exactly what this recipe does.
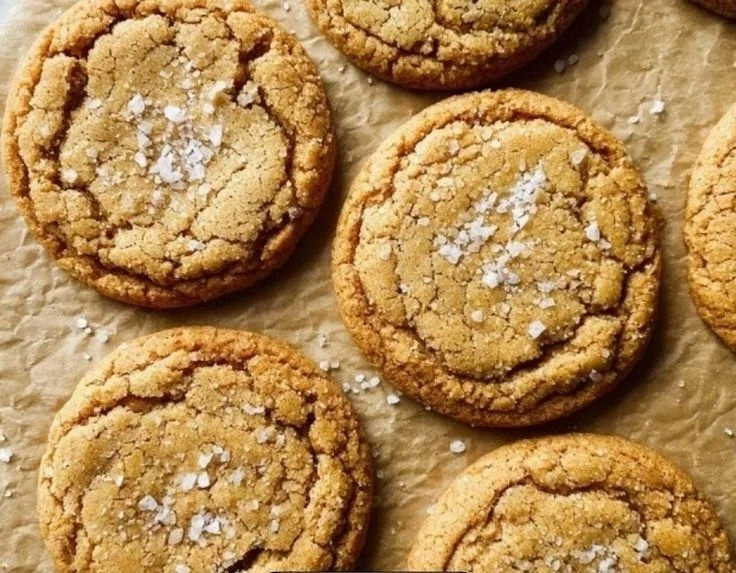
Picture a buttery dough that glistens like a freshly poured honey glaze, the scent of caramelized brown sugar drifting through the air, and the sound of a spoon scraping the bowl as you fold in a splash of liquid gold. The first bite is a soft, chewy center that gives way to a crisp edge that shatters like thin ice, releasing a burst of cinnamon and vanilla that lingers. The salt from the fleur de sel lifts every flavor, turning each bite into a moment of pure indulgence. If you can taste the contrast between the sweetness of honey and the subtle sting of sea salt, you’ll know you’ve reached cookie nirvana.
What makes this version stand out is not just the combination of honey and fleur de sel, but the careful balance of textures and the simple yet powerful techniques that elevate it. I’ve spent years tweaking cookie recipes, and this one is the culmination of that obsession. It’s the kind of cookie that makes you wonder why you ever settled for the ordinary. I dare you to taste this and not go back for seconds.
Let me walk you through every single step — by the end, you'll wonder how you ever made it any other way.
What Makes This Version Stand Out
- Taste: The honey adds a natural depth that sweetens without overpowering, while the fleur de sel delivers a subtle brine that lifts the entire flavor profile. The result is a cookie that feels indulgent yet balanced, a true dance of sweet and salty.
- Texture: The combination of softened butter and oil creates a tender crumb that remains chewy even after cooling, while the thin, crisp edges give a satisfying snap that signals quality baking.
- Ingredient Quality: Using light brown sugar and real honey instead of refined sugar or artificial sweeteners gives the cookies a complex caramel undertone that you can’t get from a standard recipe.
- Uniqueness: Most honey cookie recipes call for butter alone, but adding a tablespoon of oil keeps the dough moist and prevents it from drying out, a trick I discovered in a late‑night kitchen experiment.
- Crowd Reaction: Friends who tried these cookies described them as “the perfect snack for movie nights” and “a new favorite to pair with coffee.”
- Make‑ahead Potential:
- Simplicity: With just a few pantry staples, you can produce a batch that feels like a gourmet treat. No special equipment or exotic ingredients.
Inside the Ingredient List
The Flavor Base
Butter is the backbone of any cookie, providing richness and a mouth‑watering aroma. Using unsalted butter allows you to control the salt content precisely. The ½ cup of butter, softened to room temperature, ensures it blends seamlessly with the liquid ingredients, creating a smooth batter that spreads evenly.
Oil, in this case 2 tablespoons of canola or vegetable oil, adds moisture and keeps the cookies chewy. It also helps the dough hold its shape during baking, preventing the edges from becoming too hard. If you’re going dairy‑free, coconut oil works beautifully, imparting a subtle tropical note.
The Texture Crew
Light brown sugar is the sweetener of choice for this cookie. It not only sweetens but also contributes to a caramelized flavor that’s richer than white sugar. If you’re out of light brown sugar, mix white sugar with a tablespoon of molasses to mimic the same depth.
The ¼ cup of honey is the star that gives the cookie its distinctive sweet profile. Honey’s natural sugars caramelize during baking, creating a slightly sticky interior that contrasts with the crisp edges. Maple syrup can replace honey for a different flavor profile, though it will alter the final texture slightly.
The Unexpected Star
The large egg is a binder that helps the dough hold together and provides a slight lift. If you’re vegan, a flax egg (1 tablespoon ground flaxseed mixed with 2.5 tablespoons water) can replace the egg without compromising texture.
Vanilla extract, 1 teaspoon, adds aromatic complexity that balances the sweetness of honey and sugar. Almond extract is an excellent alternative if you want a nutty undertone, but vanilla remains the classic choice.
The Final Flourish
All-purpose flour, 2¼ cups, is the structure of the cookie. It gives the dough its body and holds the other ingredients together. A gluten-free blend can replace it if you need a gluten-free version, but the texture will differ slightly.
Baking soda, 2 teaspoons, is the leavening agent that creates lift, giving the cookies a light, airy interior. It also reacts with the acidic honey to produce a subtle rise. Make sure the baking soda is fresh for the best results.
Salt, ½ teaspoon, is essential for flavor. It brings out the sweetness in the sugar and honey and balances the overall taste. A pinch of sea salt can replace the salt if you prefer a different mineral profile.
Cinnamon, 1½ teaspoons, adds warmth and depth. It’s the spice that turns a simple cookie into a comforting treat, evoking autumn mornings and cozy evenings.
Fleur de Sel, for sprinkling, is the finishing touch that elevates the cookie’s flavor. Sprinkle it on top right before baking to create a subtle contrast of salty and sweet. If you can’t find fleur de sel, sea salt works well as a substitute.
Everything's prepped? Good. Let's get into the real action...
The Method — Step by Step
- Preheat your oven to 350°F (175°C) and line two baking sheets with parchment paper. While the oven warms, bring the butter to room temperature until it’s soft but not melted. This step is crucial; if the butter is too hard, it will create uneven texture. In a large bowl, combine the butter, oil, brown sugar, and honey. Beat with an electric mixer on medium speed until the mixture becomes light, fluffy, and pale. The sound of the mixer is the prelude to the cookie’s final form.
- Add the egg and vanilla extract to the butter mixture. Beat until the egg is fully incorporated and the batter is smooth. This is the moment of truth—if the mixture is too runny, the cookies will spread too much. Keep an eye on the consistency; it should be thick enough to hold its shape when scooped.
- In a separate bowl, whisk together the all‑purpose flour, baking soda, salt, and cinnamon. Gradually add this dry mixture to the wet batter, stirring gently until just combined. Over‑mixing will develop gluten and make the cookies tough. The dough should be sticky but manageable; if it’s too dry, add a tablespoon of water or milk.
- Fold in the pinch of fleur de sel, distributing it evenly throughout the dough. The salt will elevate the honey’s natural sweetness and create that signature salty finish. If you prefer a milder salt taste, use less fleur de sel; if you like a stronger salty punch, add a bit more.
- Using a tablespoon or a small cookie scoop, drop rounded balls of dough onto the prepared baking sheets, spacing them about 2 inches apart. The spacing allows the cookies to spread slightly without merging. This step is where you can get creative—try using a different shape if you’re feeling adventurous.
- Bake for 12–14 minutes, or until the edges turn golden brown and the centers are set but still soft. The aroma will fill your kitchen, and the sound of the cookies baking is music to any baker’s ears. The cookies should smell toasty and caramelized, a cue that they’re ready.
- Let the cookies cool on the baking sheet for 5 minutes before transferring them to a wire rack to cool completely. This short cooling period allows the cookies to set properly and prevents them from breaking apart. Once cooled, you can sprinkle a little extra fleur de sel on top for an extra burst of flavor.
- If you want extra crunch, bake the cookies an additional 2 minutes. Watch the edges closely; they should be just a shade darker. A quick extra bake will give the cookies a slightly crispier texture without drying them out.
- Store the cooled cookies in an airtight container at room temperature for up to a week. For longer storage, freeze the dough in individual portions and bake as needed. The cookies stay fresh and flavorful, making them a great snack for any occasion.
That's it — you did it. But hold on, I've got a few more tricks that'll take this to another level.
Insider Tricks for Flawless Results
The Temperature Rule Nobody Follows
Oven temperature is often miscalibrated. A good trick is to use an oven thermometer to confirm that your oven is truly at 350°F. A few degrees off can change the cookie’s texture dramatically. If your oven runs hot, lower the temperature by 10–15°F to avoid burning the edges.
Why Your Nose Knows Best
Before you take the cookies out of the oven, listen for the faint scent of caramel. That smell signals that the sugars have caramelized just right. If you’re baking in a small kitchen, you can open the door slightly to let the aroma spread without over‑exposing the cookies.
The 5‑Minute Rest That Changes Everything
Letting the cookies sit on the sheet for 5 minutes after baking allows the interior to set while the edges finish crisping. This short rest prevents the cookies from breaking when you transfer them to the rack. It also gives the honey a chance to thicken slightly, enhancing the chewy center.
The Secret of Even Spacing
Using a small ice‑cream scoop or a tablespoon ensures each cookie is the same size, which guarantees uniform baking. If you use a larger scoop, the cookies may bake unevenly, leading to some over‑baked and some under‑baked spots.
The Flour‑Free Alternative
If you need a gluten‑free version, replace the all‑purpose flour with a 1:1 gluten‑free blend. Add a teaspoon of xanthan gum to provide structure. The cookies will have a slightly different texture but remain just as delicious.
Creative Twists and Variations
This recipe is a playground. Here are some of my favorite ways to switch things up:
Chocolate Swirl
Fold in ¼ cup of melted dark chocolate into the dough before baking. The chocolate creates a decadent swirl that pairs beautifully with the honey sweetness. Serve with a splash of espresso for an extra kick.
Nutty Crunch
Add ½ cup of toasted almonds or walnuts to the dough. The nuts provide a satisfying crunch and a nutty aroma that complements the cinnamon. These cookies are perfect for a cozy afternoon snack.
Spiced Up
Replace the cinnamon with a pinch of ginger, cloves, and allspice for a warm, exotic flavor. This variation is great for holiday gatherings, adding a festive twist to a classic treat.
Citrus Zest
Add the zest of one orange or lemon to the batter for a bright, citrusy note. The zest cuts through the sweetness, creating a refreshing balance that’s perfect for summer.
Vegan Delight
Swap the butter for coconut oil, use a flax egg, and replace honey with maple syrup. The result is a vegan cookie that still delivers on flavor and texture, making it inclusive for all dietary preferences.
Salted Caramel Drizzle
Drizzle melted caramel and a pinch of sea salt over the cooled cookies. This indulgent topping adds a glossy finish and an extra burst of caramel flavor that elevates the entire cookie experience.
Storing and Bringing It Back to Life
Fridge Storage
Store the cooled cookies in an airtight container at room temperature for up to one week. The airtight seal keeps the cookies from drying out. If you notice the cookies becoming slightly hard, add a slice of apple to the container for a few hours; the moisture will soften them.
Freezer Friendly
For longer storage, wrap individual cookies in parchment paper and place them in a freezer bag. They’ll stay fresh for up to three months. When you’re ready to eat, simply pop a cookie out and let it thaw at room temperature for 10 minutes.
Best Reheating Method
Reheat cookies in a preheated oven at 300°F (150°C) for 3–4 minutes to restore warmth and crispness. If you prefer a softer center, microwave on low for 10 seconds. Add a tiny splash of water before reheating to create steam, which brings the chewy interior back to life.