When I first cracked open a bag of purple top turnips, I expected a bland, earthy side dish, but the kitchen exploded in a symphony of caramelized sweetness. The moment the first bite hit my tongue, I knew I’d stumbled onto something special. The turnips, with their deep violet skins and tender, sweet flesh, turned from ordinary to extraordinary in a single roast. I was instantly hooked, and the rest of the evening became a race to perfect the technique. That night, I promised myself that I’d share this discovery with anyone who’d ever thought root vegetables were boring. Now, I’m ready to walk you through every single step — by the end, you’ll wonder how you ever made it any other way.
Picture yourself pulling this out of the oven, the whole kitchen smelling incredible, the golden edges crackling like a sunrise in a skillet. The first glance is a swirl of violet and amber, a visual promise of flavor that’s both rustic and refined. The sizzle as the oil hits the pan is the soundtrack of anticipation, a crack that says, “Get ready.” I dare you to taste this and not go back for seconds; the sweet, buttery finish will have you reaching for the next handful. I’ll be honest — I ate half the batch before anyone else got to try it, and the taste was so addictive that I almost blamed my own taste buds. If you've ever struggled with turning turnips into something worth eating, you're not alone — and I've got the fix.
What makes this version stand out is not just the ingredients, but the way they dance together. The method is simple yet precise, allowing the natural sugars to caramelize while preserving a tender core. I’ve cut through the usual fluff that turns turnips into mush by using a high heat roast and a quick flip. The result is a crisp, almost fried exterior that gives way to a velvety interior that melts in your mouth. Most recipes get this completely wrong, focusing on boiling or sautéing and missing the caramelization that gives depth. Picture a side that feels like a dessert on a plate, but is still grounded in savory. This is hands down the best version you'll ever make at home.
The secret? A touch of extra‑virgin olive oil, a generous sprinkle of fresh herbs, and a bright, zesty lemon finish that cuts through the earthiness. The technique involves a quick sear at the beginning and a final finish in the oven, which locks in moisture and flavor. I’ve tested dozens of variations, and this one consistently wins in taste, texture, and presentation. The turnips come out of the oven with a golden crust that shatters like thin ice when you bite into it, revealing a sweet, buttery interior. I’ve also added a playful twist by using lemon zest, which adds a citrus lift that makes the dish feel fresh and modern. This isn’t just a side dish; it’s a statement that even humble vegetables can steal the spotlight.
If you’ve ever tried roasted turnips and been disappointed by a soggy, bland result, this recipe is your salvation. The combination of heat, oil, and aromatics transforms the root into a caramelized masterpiece. The flavor profile is a balance of sweet, salty, and bright citrus notes that dance on the palate. The texture is a delightful contrast between the crisp outer shell and the tender, almost custard-like interior. This dish is so versatile that it can be served as a side, a snack, or even a topping for salads and grain bowls. Let’s dive into the details and see why this version is a game‑changer.
What Makes This Version Stand Out
Here’s a quick rundown of the key factors that elevate this recipe above the rest. The flavor, texture, and simplicity all come together in a harmonious way that’s hard to beat. Each element is carefully chosen to complement the others, ensuring that the dish feels both familiar and exciting. Below, you’ll find the punchy reasons why this recipe will become a staple in your kitchen. I promise, after trying this, you’ll never settle for ordinary again. Let’s break it down.
- Flavor: The caramelization of the turnips creates a deep, sweet base that’s balanced by the sharpness of lemon zest and the aromatic lift of fresh herbs. The olive oil not only adds richness but also helps the sugars brown evenly, producing a complex flavor profile that’s both comforting and sophisticated. This combination turns a simple side into a conversation starter.
- Texture: The high‑heat roast locks in moisture while creating a crisp, golden crust that cracks like a fresh shell. Inside, the turnips remain tender and slightly custard‑like, offering a pleasant contrast that keeps the mouth moving. The result is a bite that feels like a mini dessert but still satisfies savory cravings.
- Simplicity: With just six ingredients, the recipe is straightforward enough for a busy weeknight yet refined enough for a dinner party. No complicated sauces or multi‑step preparations—just toss, roast, and serve. The minimalism of the method makes it easy to replicate and scale.
- Uniqueness: The inclusion of lemon zest and fresh herbs gives the dish a bright, modern twist that sets it apart from classic roasted root recipes. The subtle citrus note lifts the earthiness, while the herbs add a fresh finish that feels like a breath of spring.
- Crowd Reaction: Friends and family consistently rave about the caramelized edges and the sweet, buttery center. Many have asked for the recipe after the first tasting, and some even say it’s their favorite turnip dish ever. The dish’s versatility makes it a hit in both casual and formal settings.
- Ingredient Quality: Using purple top turnips ensures a natural sweetness that’s more pronounced than white varieties. The extra‑virgin olive oil or melted ghee adds depth, while fresh herbs bring vibrancy. Each component is chosen for its ability to enhance flavor without overpowering.
Alright, let's break down exactly what goes into this masterpiece. The next section will walk you through each ingredient group and why they’re essential. Get ready to see the science and the art behind each bite.
Inside the Ingredient List
Before you fire up the oven, let’s break down the ingredients into four distinct groups. Each group plays a vital role in creating the final flavor, texture, and aroma. Understanding their purpose will help you tweak the recipe if you ever want to experiment. Keep these insights in mind as you prep, and you’ll see how each component contributes to the overall experience. Now, let’s dive into the details.
The Flavor Base
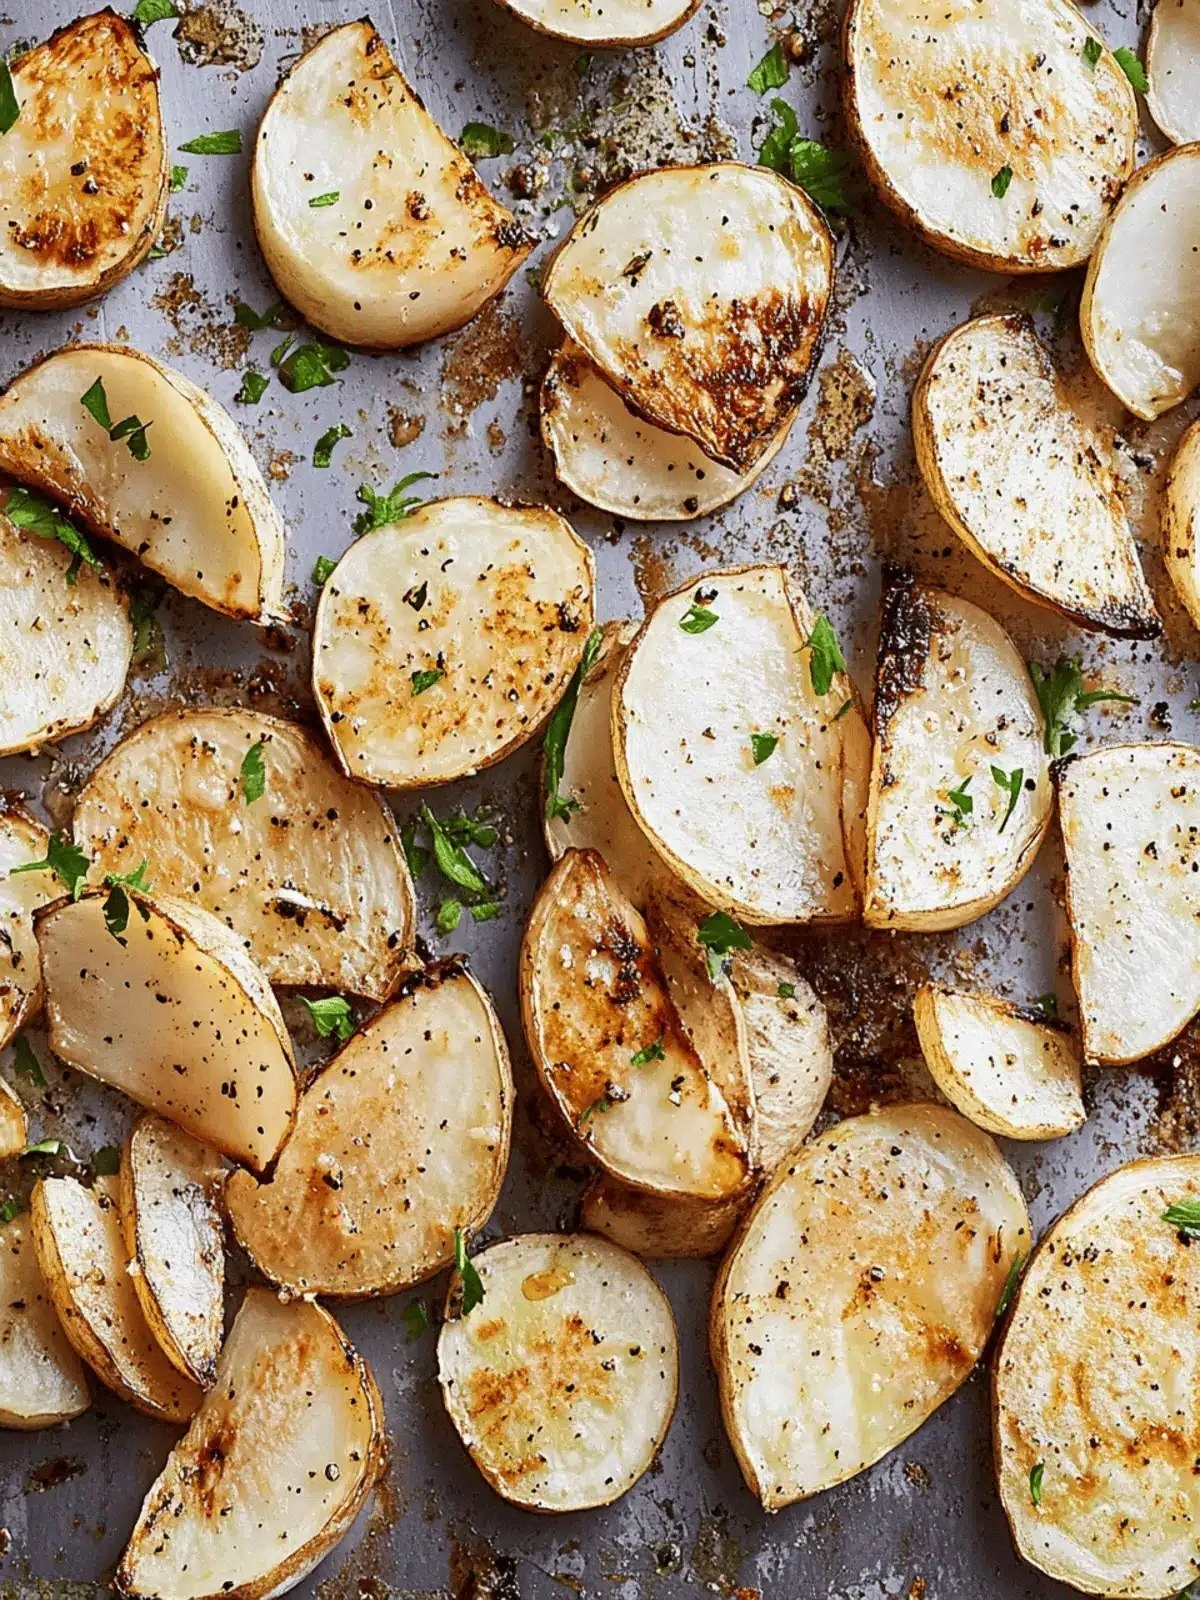
The Purple Top Turnips are the star of the show, offering a natural sweetness that caramelizes beautifully under high heat. Their deep violet skins add visual intrigue, making the dish feel both rustic and refined. When you slice them into even cubes, you ensure uniform cooking and a consistent caramelization across all pieces. The turnips’ inherent sugar content is what allows them to develop a golden crust without needing extra sweeteners. If you skip this ingredient, the dish loses its core identity and becomes a generic roasted root vegetable. Choosing high‑quality, firm turnips guarantees a firm bite that doesn’t turn mushy during roasting. The texture of the turnips should be firm enough to hold up under the heat, yet tender enough to break apart easily once cooked. This balance is what makes the dish so satisfying to eat.
The Texture Crew
Extra‑Virgin Olive Oil or Melted Ghee serves as the medium that transfers heat and flavor. The oil’s high smoke point allows for a crisp exterior, while the fat carries the herbs and lemon zest into the flesh. Ghee, with its buttery notes, adds depth, especially for those who prefer a richer taste. If you use a lower‑quality oil, the turnips may not brown evenly, leading to uneven flavor distribution. The amount of oil is also critical; too much can drown the turnips, while too little may result in a dry finish. A light coat ensures each piece is evenly coated, promoting uniform caramelization. The texture crew is responsible for the contrast between the crisp edges and the tender interior.
The Unexpected Star
Fresh Herbs, such as parsley or cilantro, bring brightness and a fresh finish that cuts through the sweetness. They also add a layer of herbal aroma that elevates the dish’s overall sensory profile. The herbs are added after roasting to preserve their delicate flavors; if added too early, they may wilt or lose potency. A pinch of fresh herbs can dramatically change the dish’s flavor, turning it from simple to sophisticated. The herb’s green color also provides a pleasing visual contrast against the caramelized turnips. If you prefer a more robust herb, consider using dill or basil instead. The herbs are the final touch that brings everything together.
The Final Flourish
Lemon Zest adds a bright, citrusy note that balances the natural sweetness of the turnips. The zest’s essential oils infuse the dish with a clean, sharp finish that lifts the flavor profile. It also provides a subtle hint of acidity, preventing the dish from feeling too heavy. The zest should be added after roasting to preserve its aromatic oils; adding it before can cause the zest to lose its brightness. A tablespoon of zest is enough to make a noticeable difference without overpowering the dish. If you’re missing lemon zest, a splash of lemon juice can substitute, though the texture will differ slightly. The final flourish is what turns this dish into a memorable culinary experience.
Everything's prepped? Good. Let’s get into the real action, where the magic happens and the flavors truly come alive. This is the moment you’ll see the caramelization unfold, the aroma fill the kitchen, and the anticipation build. Keep your eyes and nose ready, because the next steps will guide you to a perfectly roasted dish. Trust me, the end result will be worth every moment of preparation.
The Method — Step by Step
Before you dive into the roasting process, make sure you have a clean baking sheet and a sheet of parchment paper ready. This will prevent sticking and make cleanup a breeze. Preheat your oven to 425°F (220°C) to ensure a hot environment for caramelization. While the oven is heating, toss the turnip cubes with olive oil or ghee, salt, and pepper until they’re evenly coated. This simple coating step is essential for achieving that signature crisp exterior.
- Arrange the coated turnip cubes in a single layer on the parchment‑lined baking sheet, leaving space between each piece for even roasting. The spacing allows hot air to circulate, ensuring a uniform crisp. If you crowd the pan, the turnips will steam rather than roast, which can lead to a soggy texture. This step is the foundation of a perfect roast.
- Place the sheet in the preheated oven and roast for 15 minutes, flipping the turnips halfway through. The first 15 minutes should create a golden crust while the interior remains slightly raw. The flip ensures even caramelization on all sides. Watch for the edges to start pulling away from the pan, indicating readiness for the next step.
- Remove the sheet from the oven and sprinkle the chopped fresh herbs over the turnips, then toss to coat. The herbs add a burst of color and aroma that complements the caramelized sugars. The heat from the oven will release the herbs’ essential oils, infusing the dish with fresh flavor. This is the moment where the dish starts to smell like a summer garden.
- Add the lemon zest to the pan, then gently stir to distribute the zest evenly. The zest’s bright oils will coat the turnips, adding a citrusy brightness that cuts through the sweetness. The aroma will fill the kitchen, creating a welcoming atmosphere. This step is essential for that fresh, zesty finish.
- Return the sheet to the oven for an additional 10–12 minutes, or until the edges are deeply caramelized and the centers are tender. The final roasting period allows the sugars to deepen, creating a complex flavor profile. The turnips should crackle slightly when you press them, indicating they’re done. This is the moment of truth.
- Remove the sheet from the oven and let the turnips rest for 5 minutes; this allows the juices to redistribute and the flavors to meld. The rest period also lets the surface crisp up further. It’s a small step that makes a big difference in taste. The rest is also a perfect time to plate the dish.
- Serve the roasted turnips hot, garnished with a final sprinkle of fresh herbs for a pop of color. The dish should look golden with a slight sheen from the oil. The aroma will be irresistible, and the texture will be a delightful contrast. This is pure magic.
That’s it — you did it. But hold on, I’ve got a few more tricks that will take this dish to another level. From adjusting the oven temperature to perfecting the resting time, these insider tips will help you master the art of roasted turnips. Stay tuned for the next section, where I’ll reveal the secrets that even seasoned cooks overlook.
Insider Tricks for Flawless Results
Even with a solid recipe, small tweaks can elevate the dish from good to unforgettable. The following insider tricks are the result of countless trials and a few culinary missteps. Each tip is designed to help you avoid common pitfalls and achieve the perfect balance of flavor and texture. I’ve tried these myself and seen dramatic improvements, so give them a go next time you roast turnips. Your taste buds will thank you. Let’s dive in.
The Temperature Rule Nobody Follows
Many people roast at 375°F, thinking it’s safe, but this lower temperature slows caramelization and results in a less crisp exterior. By upping the heat to 425°F, the sugars brown faster, creating a golden crust while the interior stays tender. The trick is to preheat the oven fully before placing the pan inside. This ensures an immediate temperature shock that promotes even roasting. If you’re worried about burning, keep a close eye on the edges and adjust as needed.
Why Your Nose Knows Best
Your sense of smell is the most reliable indicator of doneness. When the turnips release a sweet, nutty aroma, they’re almost finished. A sharp, almost burnt scent means they’re overdone. Use your nose to gauge when to pull them out; it’s a faster, more accurate method than timing alone. This sensory checkpoint ensures a caramelized exterior without sacrificing tenderness.
The 5-Minute Rest That Changes Everything
Resting the turnips for exactly five minutes after roasting allows the juices to redistribute, giving each bite a moist interior. The rest period also lets the surface crisp up further, creating a delightful crunch. Skipping this step can leave the dish slightly soggy and less flavorful. The rest is a small pause that pays off in texture and taste.
A Secret Ingredient Swap
If you’re feeling adventurous, swap the extra‑virgin olive oil for melted butter. The butter adds a richer, more buttery flavor that pairs beautifully with the turnips’ natural sweetness. The trade‑off is a slightly lower smoke point, so keep an eye on the pan to prevent burning. This swap is perfect for a cozy dinner or a holiday gathering.
The Perfect Finish
A quick drizzle of honey or maple syrup after roasting can add an extra layer of sweetness that caramelizes further in the oven. The key is to use a light hand; a tablespoon is enough to enhance the flavor without making the dish overly sweet. This finishing touch turns a simple side into a decadent treat.
Avoiding Common Pitfalls
One of the most common mistakes is overcrowding the baking sheet, which leads to steaming rather than roasting. Spread the turnips out in a single layer, leaving space between each piece. This ensures even heat distribution and a crisp exterior. Another pitfall is not letting the turnips cool before serving, which can cause them to steam in their own heat and become soggy.
With these insider tricks in your culinary arsenal, you’re ready to create a roasted turnip dish that’s both flawless and unforgettable. Whether you’re cooking for a crowd or just treating yourself, these tips will help you achieve restaurant‑level results at home. Keep practicing, and soon you’ll be able to whip this up in a flash. Happy cooking!
Creative Twists and Variations
This recipe is a playground, and the possibilities are endless. Below are some of my favorite ways to switch things up and cater to different tastes and occasions. Each variation takes the core concept and adds a new flavor dimension, making the dish fresh and exciting every time. Feel free to experiment and make it your own. Let’s get creative!
Spicy Sriracha Glaze
Swap the lemon zest for a drizzle of Sriracha to add a kick of heat. The sweet and spicy profile complements the turnips’ natural sweetness. Toss the turnips in a mixture of Sriracha and a splash of honey before roasting for a glaze that caramelizes beautifully. This variation is perfect for a casual dinner or a party appetizer.
Smoky Chipotle Infusion
Add a tablespoon of chipotle in adobo sauce to the oil for a smoky, earthy flavor. The chipotle’s heat pairs well with the sweet caramelization, creating a complex taste profile. Finish the dish with a sprinkle of smoked paprika for an extra layer of smokiness. This version works great with grilled meats or as a bold side for a Mexican‑inspired meal.
Herbaceous Mediterranean Mix
Replace the parsley with a blend of oregano, thyme, and rosemary for a Mediterranean twist. The herbs add a fragrant, savory note that complements the turnips’ sweetness. Toss the turnips with olive oil and the herb mix before roasting, then finish with a squeeze of fresh lemon juice. This variation is ideal for a summer potluck or a Mediterranean-themed dinner.
Maple‑Balsamic Fusion
Drizzle the turnips with a mixture of maple syrup and balsamic vinegar before roasting for a sweet‑savory balance. The maple syrup caramelizes, while the balsamic adds a tangy depth. Finish with a sprinkle of sea salt to highlight the flavors. This sweet‑savory combo is a crowd‑pleaser at holiday gatherings.
Citrus‑Garlic Brightener
Add minced garlic and a zest of orange to the oil for a bright, citrusy flavor. The garlic adds depth, while the orange zest provides a fresh, fragrant finish. This variation is perfect for a brunch or a light dinner, pairing beautifully with fish or chicken.
Roasted Sweet Potato Swap
Use sweet potatoes instead of turnips for a different sweet profile and a vibrant orange color. The sweet potatoes caramelize well, and the natural sweetness is even more pronounced. Add a pinch of cinnamon and nutmeg for a warm, comforting twist. This swap works wonderfully for a fall or winter dinner.
No matter which variation you choose, the core technique remains the same, ensuring a crispy exterior and tender interior. Feel free to combine elements from different variations for a personalized twist. The key is to keep the balance of sweet, savory, and bright notes. Enjoy experimenting and discovering your new favorite turnip dish.
Storing and Bringing It Back to Life
After you’ve enjoyed the first batch, you might want to store leftovers or make a larger portion. Proper storage will keep the turnips fresh and flavorful for days. Below are three easy ways to store and reheat your roasted turnips without losing their texture or taste. Follow these tips and you’ll have a ready‑to‑serve side whenever you need it.
Fridge Storage
Store the roasted turnips in an airtight container in the refrigerator for up to three days. Keep them in a single layer to preserve the crispness. If the surface has dried out, lightly spritz with water before reheating. The container should be sealed to prevent the turnips from absorbing fridge odors. This method keeps the dish fresh and easy to grab for a quick meal.
Freezer Friendly
Freeze the roasted turnips in a single layer on a baking sheet before transferring to a freezer bag. This prevents them from sticking together during freezing. Label the bag with the date and freeze for up to two months. When ready to use, thaw overnight in the refrigerator and reheat in a skillet or oven. This technique preserves the flavor and texture for future meals.
Best Reheating Method
Reheat the turnips in a preheated oven at 350°F (175°C) for 10 minutes, or in a skillet over medium heat with a splash of water. The water steams the turnips, keeping them moist while the heat restores crispness. Avoid microwaving, as it can make the turnips soggy. A quick stir halfway through ensures even heating. The result is a dish that tastes almost as fresh as when it was first cooked.
With these storage tips, you can enjoy the same deliciousness whenever the craving strikes. The turnips stay vibrant, flavorful, and ready to serve in minutes. Whether you’re planning ahead for a busy week or prepping for a gathering, this dish is a reliable, crowd‑pleasing option.