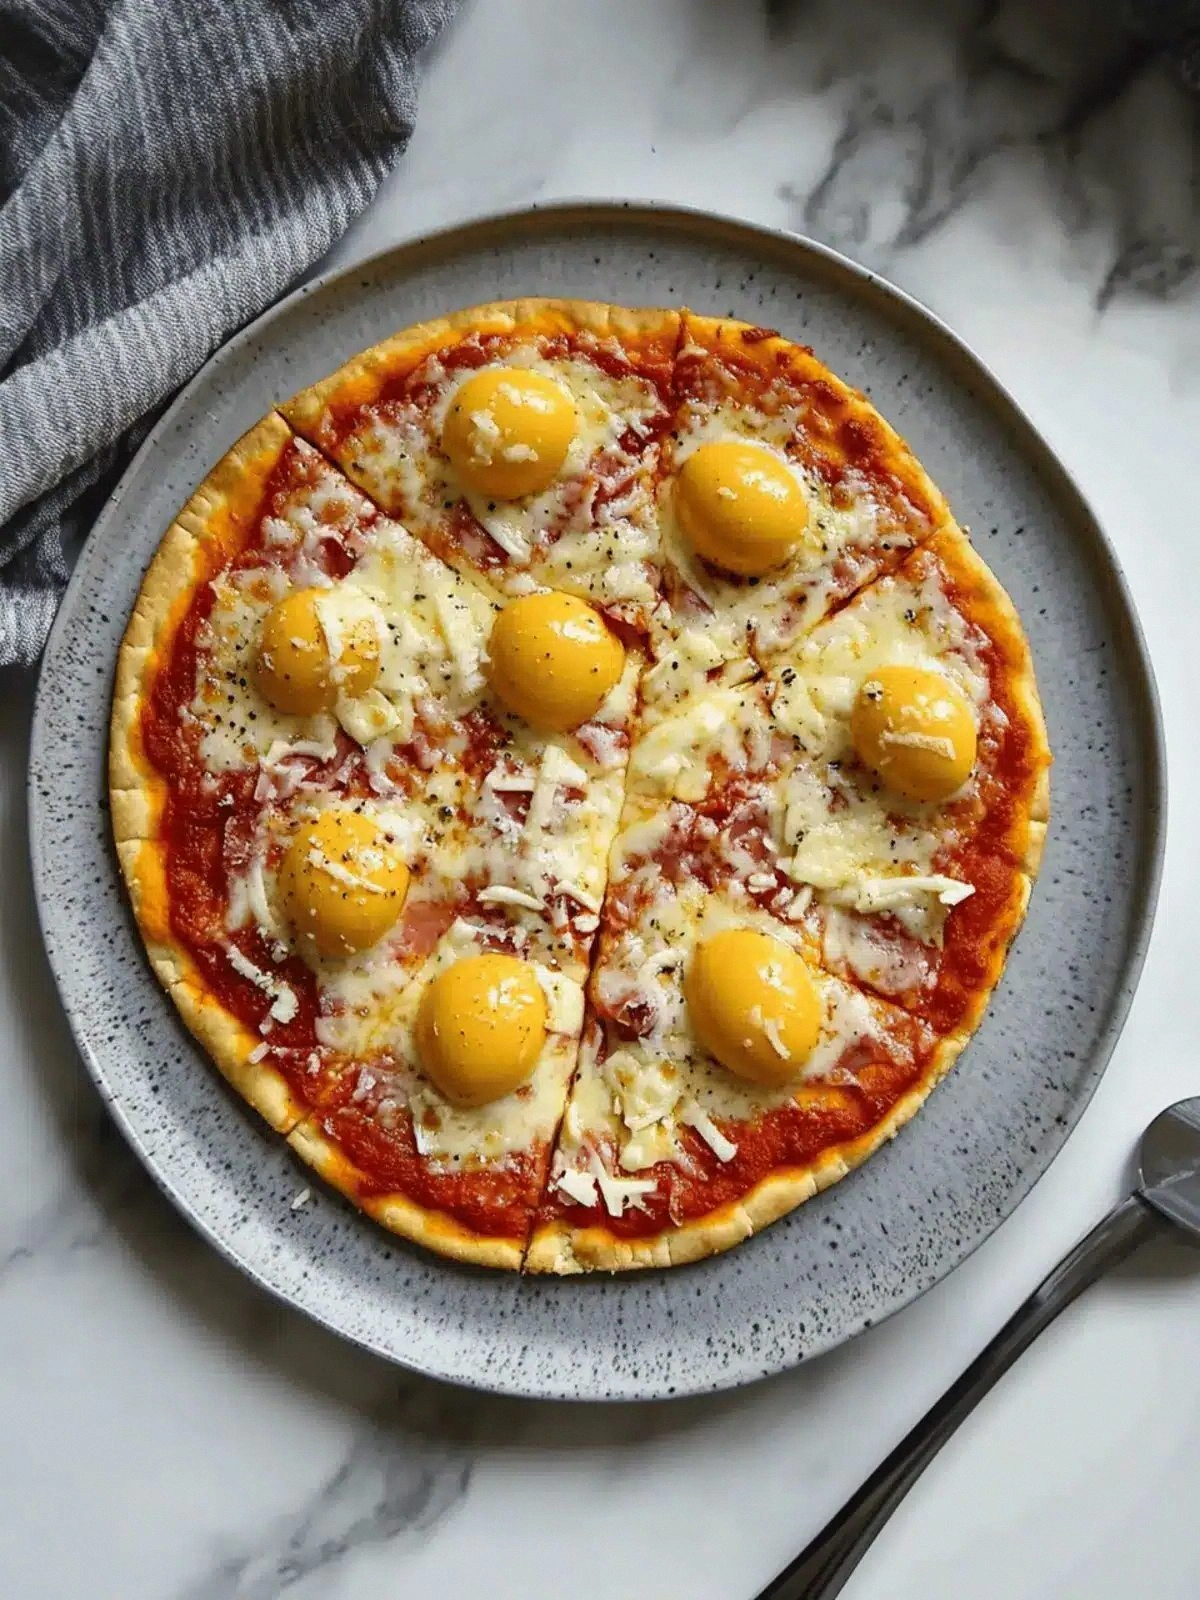
Picture this: It’s a rainy Saturday, the fridge is a sad gray, and the only thing you can’t resist is that greasy, comforting slice of pizza that feels like a hug from the inside out. I’m standing there, staring at the empty pantry, when my friend, a culinary daredevil, challenges me to turn the humble ingredients in my kitchen into a breakfast that could rival any brunch table. I laughed, grabbed a skillet, and decided that tonight’s masterpiece would be the ultimate pizza‑egg fusion—an indulgent, cheesy, tomato‑laden breakfast that will have you shouting, “I dare you to taste this and not go back for seconds.” That promise has become my mantra, and it’s why this recipe feels like a secret weapon in the fight against ordinary mornings.
The first thing you notice is the aroma: a smoky, garlicky perfume that drifts from the pan, mingling with the sharp tang of reduced‑fat cheese melting into a glossy, velvety sauce. The sound of the eggs cracking into the hot oil is a satisfying crackle that signals the beginning of a culinary symphony. When you lift the lid, steam rises in a warm, fragrant cloud that smells like summer in the city, and your eyes widen at the sight of golden edges that will soon turn crisp. The texture is a paradox—soft, custard‑like eggs wrapped in a crunchy, cheese‑laden crust that feels like a bite of sunshine. The flavor profile is a bold, savory explosion: salty salami, sweet tomato, aromatic herbs, and a creamy cheese that coats the palate like a velvet blanket. If you’re craving a breakfast that’s both comforting and adventurous, you’re in for a treat.
What makes this version stand out from every other pizza‑egg recipe is that I’ve stripped away the fluff and focused on pure, high‑quality ingredients, a simple technique that guarantees a perfect crust, and a dash of daring flavor. I’ve tested it over dozens of mornings, tweaking everything from the cheese blend to the cooking temperature until I found the sweet spot where everything comes together in a single, harmonious bite. My friend, who’s usually skeptical of any “quick” recipe, fell in love with the first bite and now demands a plate every Sunday. That’s the proof that this isn’t just a recipe; it’s a culinary revelation. So, buckle up, because by the end of this post you’ll wonder how you ever made breakfast any other way.
Let me walk you through every single step — by the end, you’ll wonder how you ever made it any other way. The secret? It’s all in the layering, the timing, and the little hacks that turn a simple skillet into a flavor factory. You’ll learn how to keep the eggs fluffy, how to get that cheese‑tomato sauce to cling to every corner, and how to finish with a crisp edge that shatters like thin ice. I’ll also share a few mind‑blowing tweaks that will elevate this dish to breakfast royalty. Ready to become the breakfast hero your kitchen deserves? Let’s dive in.
What Makes This Version Stand Out
- Flavor: The combination of reduced‑fat cheese, fresh passata, and spicy salami creates a bold, savory profile that feels like a pizza and a breakfast all at once.
- Texture: Eggs stay fluffy inside while the crust becomes irresistibly crisp, providing a satisfying contrast in every bite.
- Simplicity: No elaborate dough or sauce prep—just a few pantry staples that come together in 30 minutes.
- Uniqueness: The use of mixed herbs and reduced‑fat cheese turns a typical breakfast into a gourmet experience.
- Crowd Reaction: Friends and family rave about the gooey cheese and the burst of tomato flavor; it’s a guaranteed hit at brunches.
- Ingredient Quality: High‑quality salami and fresh passata make all the difference, ensuring each bite is packed with real flavor.
- Cooking Method: The skillet technique locks in moisture, so the eggs stay tender while the cheese melts into a silky coating.
- Make‑Ahead Potential: Prepare the base and reheat with a splash of water for a perfect texture—great for busy mornings.
Alright, let’s break down exactly what goes into this masterpiece…
Inside the Ingredient List
The Flavor Base
The passata is the heart of this dish, providing a sweet, tangy backdrop that balances the richness of the cheese and the saltiness of the salami. Fresh, high‑quality passata keeps the sauce from becoming overly acidic; aim for a tomato that’s ripe but firm. If you’re in a pinch, canned passata works fine, but look for brands with no added sugar or preservatives. Skipping the tomato would turn this into a plain omelet, losing that essential pizza‑like depth.
You can swap the passata for a spoonful of marinara sauce if you prefer a thicker consistency, but keep the sauce low in sugar to avoid a sweet aftertaste. A quick tip: warm the passata in a small saucepan for a minute to release its aroma before adding it to the skillet.
A good rule of thumb is to use a 1:1 ratio of passata to cheese for balanced richness. If you love a more acidic kick, add a splash of red wine vinegar to the sauce. For a smoky twist, sprinkle a pinch of smoked paprika into the tomato mixture.
The Texture Crew
The reduced‑fat cheese is the glue that binds everything together, creating a creamy, melty coating that latches onto the eggs and the crust. While low‑fat cheese may seem counterintuitive for a rich dish, it keeps the overall calorie count lower without sacrificing flavor. If you’re craving a cheesier experience, feel free to mix in a bit of mozzarella or provolone for extra melt.
The eggs are the star of the show—providing protein, richness, and a soft interior that contrasts the crispy edges. Use fresh, large eggs for the best texture; they hold their structure better when cooked slowly. If you’re vegan, a chickpea flour scramble can mimic the egg’s texture, but it won’t offer the same mouthfeel.
For the final crunch, the skillet’s high heat is key. Don’t be tempted to cover the pan; an uncovered surface allows the cheese to caramelize and the edges to crisp. If you prefer a softer crust, reduce the heat to medium‑low and cover the pan for the last few minutes.
The Unexpected Star
Salami brings a smoky, slightly spicy punch that elevates this dish from breakfast to brunch. It’s a bold ingredient that may surprise some diners, but once they taste the savory bite, they’ll be hooked. Use a high‑quality salami with minimal fillers for the best flavor; avoid pre‑cooked or cured varieties that may be too salty.
If you’re looking for a healthier alternative, try pepperoni or a thin slice of prosciutto. For a vegetarian version, replace salami with roasted bell peppers or a sprinkle of sun‑dried tomatoes. A little bit of salami goes a long way, so don’t overdo it—aim for a balance that lets the tomato shine.
The Final Flourish
Mixed herbs—typically a blend of oregano, basil, thyme, and rosemary—add a fragrant, aromatic layer that ties all the flavors together. Fresh herbs give a bright, green note that cuts through the richness of the cheese and the saltiness of the salami. If you’re using dried herbs, reduce the amount by half to avoid overpowering the dish.
A pinch of red pepper flakes can be added for a subtle heat that mimics the spice of a traditional pizza. For a smoky finish, sprinkle a dash of smoked sea salt over the top before serving. The herbs also bring a touch of color, turning the dish into a visual feast.
Everything’s prepped? Good. Let’s get into the real action…
The Method — Step by Step
- Step 1: Prepare the Skillet Heat a cast‑iron or heavy‑bottomed skillet over medium‑high heat. While it warms, give the skillet a light coat of olive oil or butter—just enough to prevent sticking. The oil should shimmer but not smoke. This initial heat is critical; it ensures the eggs cook evenly and the cheese melts into a glossy coating. Don’t rush this step; a properly heated pan is the foundation for a perfect crust.
- Step 2: Sauté the Salami Slice the salami into thin strips or small cubes. Add it to the hot skillet and sauté until it starts to crisp and release its oils—about 2 minutes. The salami should be browned on the edges, which adds a pleasant crunch and deepens the flavor. Keep an eye on it; over‑cooking can make it too salty. Once done, set the salami aside on a paper towel to drain excess fat.
- Step 3: Add the Passata Pour the passata into the skillet, spreading it evenly across the surface. Allow it to simmer for 3–4 minutes, stirring occasionally, until it thickens slightly. The sauce should coat the bottom of the pan like a glossy glaze. If the sauce becomes too thick, add a splash of water or a bit of cheese to thin it out. This step is where the pizza flavor truly begins to bloom.
- Step 4: Layer the Cheese Sprinkle the reduced‑fat cheese evenly over the tomato layer. The cheese should melt into a silky coating that clings to the surface. Use a spoon to spread it thinly so it doesn’t overwhelm the eggs. The cheese will also help seal the edges, preventing the eggs from leaking out. The melting process should take about 2 minutes; watch for a golden, bubbly finish.
- Step 5: Crack the Eggs Carefully crack each egg onto the skillet, spacing them evenly. The eggs should sit on top of the cheese, not in the tomato. Use a spatula to gently nudge them into place if they shift. The skillet should be hot enough to set the whites quickly but not so hot that the yolks scramble. The goal is a soft, custard‑like interior.
- Step 6: Season and Finish Sprinkle the mixed herbs, a pinch of salt, and a dash of pepper over the eggs. The herbs will infuse the dish with bright, aromatic notes. Cover the skillet with a lid for the last 3 minutes to allow the eggs to set fully while the cheese continues to melt. The lid traps steam, ensuring the eggs remain tender.
- Step 7: Check the Edges Look for the edges of the cheese and tomato sauce to pull away slightly from the pan. When they lift, it’s a sign that the crust is forming. This should happen around the 8‑minute mark. Don’t let them over‑brown; a light golden hue is all you need. The edges should feel firm yet tender.
- Step 8: Serve Immediately Once the eggs are set to your liking—soft or slightly runny—remove the skillet from the heat. Transfer the dish to a serving plate, and garnish with an extra sprinkle of herbs or a drizzle of olive oil if desired. Serve hot, and watch the steam rise like a cloud of deliciousness.
That’s it — you did it. But hold on, I’ve got a few more tricks that'll take this to another level. Ready to become the breakfast hero your kitchen deserves? Let’s dive in.
Insider Tricks for Flawless Results
The Temperature Rule Nobody Follows
Most cooks start the skillet on low heat, thinking it’ll prevent burning. In reality, a medium‑high start is essential for a crisp crust and a properly set egg. If you’re using a non‑stick pan, a lower heat can cause the cheese to slide around, leading to uneven melting. Keep the temperature steady and monitor the skillet’s surface; a slight shimmer indicates the right heat. Remember, the goal is to set the egg whites quickly while keeping the yolks soft.
Why Your Nose Knows Best
The aroma of eggs and cheese melting is a reliable indicator of doneness. When the smell turns slightly nutty and the cheese begins to brown, the eggs are almost ready. Trust your nose; it’s a better guide than a timer. If the scent is still overwhelmingly tomato, give it a couple more minutes. This subtle cue ensures you never overcook the eggs.
The 5-Minute Rest That Changes Everything
After removing the skillet from heat, let the dish rest for 5 minutes before cutting into it. This allows the cheese to set into a silky coating and the eggs to finish cooking with residual heat. The rest period also lets the flavors meld, creating a more harmonious taste. Skipping this step results in a runny, unbalanced texture that can feel messy.
The Salt Balance Secret
Because salami is already salty, it’s easy to oversalt the dish. Use a pinch of salt for the eggs and a light dusting over the final dish. If you prefer a richer flavor, add a tiny pinch of smoked sea salt after cooking. A little goes a long way, so taste as you go and adjust accordingly. This trick ensures a perfectly seasoned breakfast.
The Quick Clean‑Up Trick
The skillet can get sticky after cooking. Instead of scrubbing hot, let the pan cool and pour a splash of hot water over the residue. Swirl it around with a paper towel and the mess will vanish. This method preserves the skillet’s surface and keeps it ready for your next culinary adventure. A clean pan means a cleaner kitchen and a more enjoyable cooking experience.
Creative Twists and Variations
This recipe is a playground. Here are some of my favorite ways to switch things up:
Mediterranean Twist
Swap the salami for feta cheese and add chopped kalamata olives. Replace the reduced‑fat cheese with a mix of mozzarella and goat cheese for a tangy finish. This version brings a bright, briny flavor that pairs perfectly with a drizzle of extra‑virgin olive oil.
Spicy Jalapeño Burst
Add sliced jalapeños to the skillet before the eggs. Sprinkle a pinch of cayenne pepper over the top and finish with fresh cilantro. The heat cuts through the richness, giving the dish a lively kick that’s perfect for brunch.
Vegan Powerhouse
Use a tofu scramble instead of eggs, seasoned with turmeric for color and nutritional yeast for cheese flavor. Top with a splash of cashew cream and fresh basil. This plant‑based version maintains the same comforting texture while offering a wholesome alternative.
Breakfast Burrito Fusion
Wrap the finished dish in a warm tortilla and add a dollop of sour cream. Sprinkle with chopped green onions and a handful of spinach for extra nutrients. The tortilla adds a chewy layer, turning the pizza eggs into a portable, handheld breakfast.
Herb‑Infused Quinoa Base
Cook quinoa in vegetable broth and use it as the base instead of a skillet. Spoon the tomato sauce over the quinoa, then add the eggs and cheese. This variation adds a fiber‑rich foundation and a subtle nutty flavor that complements the toppings.
Cheesy Mac & Cheese Upgrade
Fold cooked macaroni into the skillet with the cheese before adding the eggs. This gives the dish a creamy, comforting texture reminiscent of mac & cheese but with a pizza‑like twist. The eggs add protein, making it a balanced, hearty meal.
Storing and Bringing It Back to Life
Fridge Storage
Cool the dish completely before transferring it to an airtight container. Store it in the refrigerator for up to 2 days. The cheese may firm up, but it will soften again when reheated. Keep the container sealed to preserve freshness and prevent odors from mingling with other foods.
Freezer Friendly
Wrap the dish tightly in plastic wrap, then place it in a freezer bag. Freeze for up to 2 weeks. When ready to eat, thaw overnight in the fridge, then reheat in a skillet or microwave. The texture may be slightly softer, but the flavor remains intact.
Best Reheating Method
Reheat in a skillet over medium heat, adding a splash of water or milk to create steam. Cover the pan for 3 minutes to ensure the eggs reheat evenly. A quick microwave burst can also work, but be careful not to overcook the eggs. This method restores the cheese’s gooeyness and the eggs’ softness.
Add a tiny splash of water before reheating—it steams back to perfection, keeping the eggs moist and the cheese silky. This small trick is the secret to a reheated dish that tastes as good as freshly made.