Look, I was going to bake cookies. I swear. The oven was preheated, the flour was measured, and then—disaster. My toddler chose that exact moment to reenact a Jackson Pollock painting on the living-room wall using strawberry yogurt. By the time I’d finished hosing down the child, the couch, and—somehow—the ceiling, the oven had been sitting empty for 45 minutes and the thought of scooping, rolling, and babysitting trays of cookies made me want to curl up inside the pantry and fake my own disappearance. Enter the no-bake peanut butter kiss: a five-ingredient, ten-minute, shamelessly delicious concoction that saved my sanity, my evening, and—if we’re being dramatic—my will to parent.
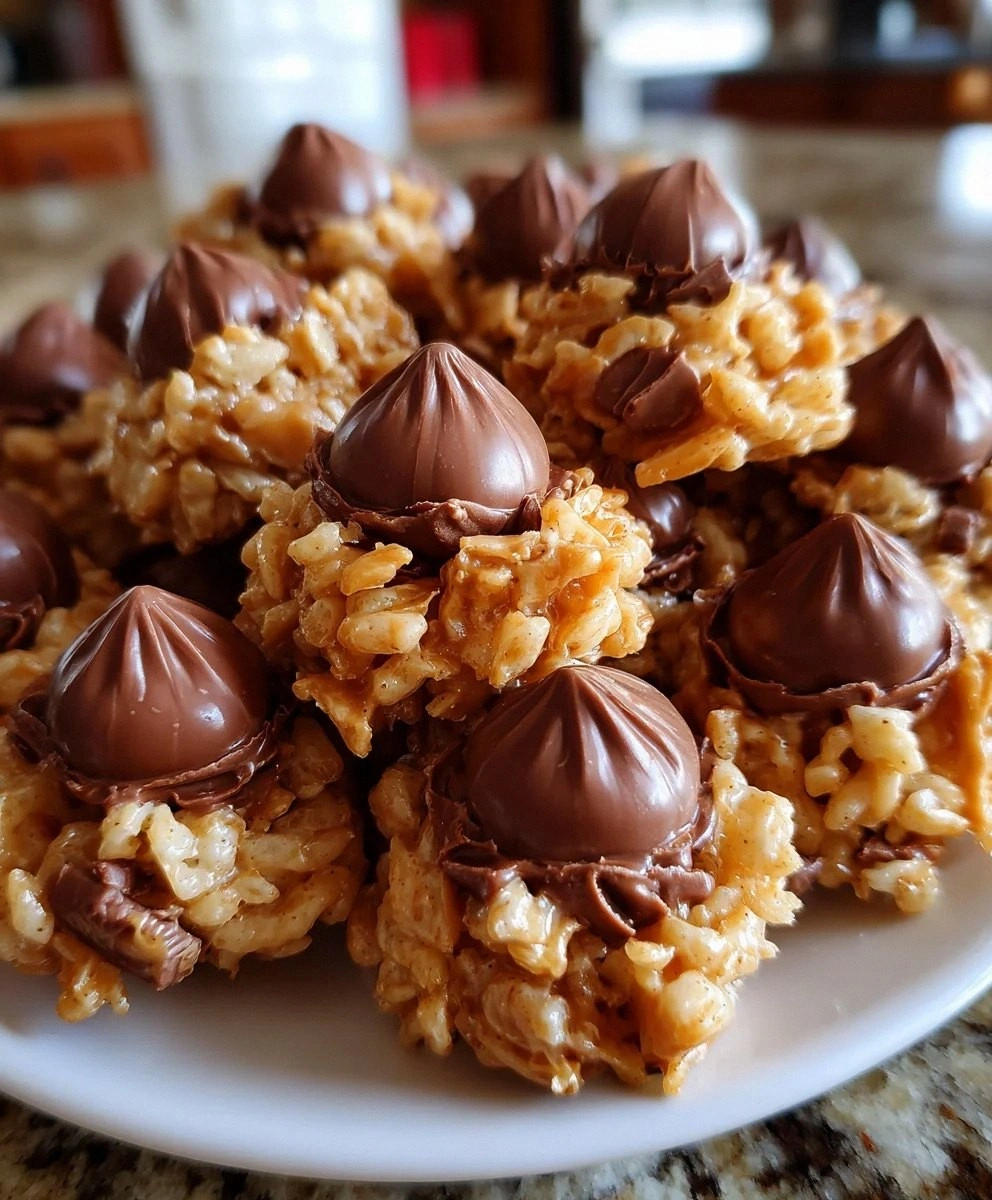
Picture this: one pot, a wooden spoon, and the kind of aroma that drifts through the house like a warm hug from the inside out. Brown sugar melts into a glossy river, peanut butter swirls in like silk, and corn syrup pulls the whole thing into a taffy-like ribbon that smells so good your neighbors will start loitering near your mailbox. Crisped-rice cereal tumbles in, each piece crackling like a tiny firework, before you press the sticky cloud into a pan and crown every square with a Hershey’s Kiss that softens just enough to leave a chocolate thumbprint of perfection. No oven, no mixer, no piping bags, no chilling, no praying that your cookies don’t spread into one amorphous Frisbee. Just pure, unfiltered peanut-butter-chocolate bliss.
But here’s the real kicker: most no-bake bars taste like you gave up on life—cloyingly sweet, grainy, and weirdly waxy. Not these. The brown sugar cooks just long enough to develop a faint caramel note, the peanut butter stays front-and-center instead of being bulldozed by sugar, and the cereal keeps its snap so you get that crave-worthy contrast of chewy, crunchy, and melty. I dare you to taste one and not go back for seconds. Actually, I double-dog dare you, because I ate half the batch before anyone else even knew they existed, and I need someone to commiserate with me in the comments about how self-control is officially extinct.
Stay with me here—this is worth it. By the end of this post you’ll know exactly why the corn syrup can’t be swapped for honey (unless you enjoy cement), why the cereal must be fresh (stale rice bubbles are a crime), and why the Kiss goes on exactly 90 seconds after the bars leave the stove (any earlier and you’ll get chocolate smears; any later and they won’t fuse). Let me walk you through every single step—by the end, you’ll wonder how you ever made it any other way.
What Makes This Version Stand Out
- Flavor Depth: We take the sugar mixture to the very edge of caramelization—just until it smells like toasted marshmallows—so the bars taste like peanut-butter brûlée instead of pure sugar shock.
- Texture Symphony: Chewy center, crispy edges, and a chocolate cap that snaps like thin ice when you bite through it. Most recipes give you either jaw-breaking bricks or fall-apart sand; we hit the sweet (literally) spot.
- One-Pot Wonder: Everything happens in a single saucepan. You don’t even need to butter the spatula— the residual oils from the peanut butter do the work for you.
- Pantry Staples: Five ingredients, zero specialty items. If you don’t already have these in your kitchen, you can grab them at a gas station on a road trip and still nail it.
- Speed Demon: Ten minutes from “I need dessert” to “get in my mouth.” I timed it during a conference call and still managed to mute myself before the happy groans leaked out.
- Make-Ahead Magic: They keep for a week in the fridge and freeze like a dream. I stash a batch in the glove box cooler for beach days and emerge as the hero who produces homemade treats from what looks like thin air.
Alright, let’s break down exactly what goes into this masterpiece...
Inside the Ingredient List
The Flavor Base
Brown sugar is the secret weapon here. It brings molasses notes that white sugar can’t fake, plus a hint of acidity that keeps the sweetness from tasting flat. Don’t even think about subbing in coconut sugar unless you want your bars to taste like a hippie candle. Light brown works best—dark brown can bully the peanut butter flavor, and we’re not here for that power struggle.
The Binding Brigade
Light corn syrup is the unsung hero. It prevents crystallization so your bars stay chewy instead of turning into a gritty brick that could double as a doorstop. If you’re tempted to reach for honey “because it’s natural,” prepare yourself for a sticky mess that never fully sets and a dominant floral taste that screams “I ruined dessert.” Maple syrup is even worse—it’s like pouring pancake breakfast all over your candy. Stick with the corn syrup; your dentist will forgive you.
The Star Attraction
Creamy peanut butter, the headliner, must be the regular commercial kind—think Jif, Skippy, or the store brand that proudly lists “sugar” as the second ingredient. Natural peanut butter separates into an oily tantrum that refuses to bind, leaving you with a greasy puddle floating on top of sad rice cereal. If you’re allergic to fun, you can use almond butter, but you’ll lose that nostalgic PB&J vibe that makes everyone feel eight years old again.
The Crunch Crew
Crisped rice cereal is more than filler; it’s the textural hype man. Open a fresh box—stale cereal tastes like cardboard that’s been left in a sauna. If you only have the off-brand “puffed rice” that dissolves on contact with milk, march yourself back to the store. You need the snap, crackle, and pop that only properly toasted rice can deliver.
The Chocolate Crown
Hershey’s Kisses are non-negotiable. Their shape is engineered to melt just enough to hug the bar without sliding off like a drunk tourist on a ski lift. Dark chocolate kisses work if you want to feel fancy, but the classic milk chocolate version melts into that nostalgic, fudgy pool we all remember from childhood Christmas cookies. Buy the 12-ounce bag—half will disappear before you even start.
Everything’s prepped? Good. Let's get into the real action...
The Method — Step by Step
- Start by lining an 8-inch square pan with parchment paper, leaving two generous wings that overhang the sides like floppy puppy ears. This is your extraction device later—treat it kindly. Lightly butter the exposed sides of the pan so the edges don’t weld themselves into a concrete slab. Don’t skip this; I once tried “grease-free” because I was feeling rebellious and had to chisel the corners out with a steak knife while my kids placed bets.
- In a heavy-bottomed saucepan, combine brown sugar and corn syrup over medium heat. Stir constantly with a wooden spoon or heat-proof spatula for about two minutes until the mixture looks like liquid bronze and smells like toasted marshmallows at a campfire. This is the moment of truth: too pale and the bars taste raw; too dark and you’ve wandered into bitter caramel territory. Your nose knows—when the scent hits your face like a warm flannel blanket, you’re golden.
- Slide the pan off the heat, whisk in the peanut butter until the mixture looks like satin ribbon, glossy enough to make you want a scarf made of it. The residual heat will melt the PB perfectly; no need to keep it on the burner and risk scorching the sugars. If you see tiny flecks that look like seized chocolate, panic not—that’s just the proteins in the peanut butter reacting. Keep stirring; they’ll dissolve into the glossy sea.
- Working quickly but calmly, dump in the crisped rice cereal. Fold like you’re mixing clouds: scoop from the bottom, lift, and turn. The goal is to coat every puff without crushing them into sad rice dust. If the phone rings, ignore it—this is not the time to discuss your extended car warranty. The mixture cools fast and once it stiffens you’ll be wrestling a taffy monster.
- Scrape the sticky cloud into your prepared pan. Using a sheet of wax paper or the buttered back of a spoon, press down firmly and evenly. Channel your inner yoga instructor: breathe, center, compress. Too gentle and the bars fall apart; too Hulk-smash and you’ll crack the cereal. You want a dense, level surface that looks like a Rice-Krispies trampoline.
- Wait exactly 90 seconds. Set a timer; this isn’t a subjective “ish” moment. You want the surface just warm enough to soften the Kiss but not so hot it melts into a puddle. Unwrap your chocolates like you’re peeling tiny foil presents—feel free to pop one into your mouth for quality control, I won’t tell. Place them kiss-tip up in neat rows, spacing them about an inch apart so every square gets its chocolate crown.
- Let the pan rest on a wire rack for 15 minutes so the chocolate can set without fogging up from trapped steam. Then refrigerate for 30 minutes to firm everything into sliceable perfection. If you’re in a Florida summer with no AC, slide the pan into the freezer for 10 minutes instead. Humidity is the enemy of crisp cereal; treat it like the villain in a telenovela.
- Lift the slab out using the parchment wings and place on a cutting board. Use a sharp chef’s knife warmed under hot water and dried—this gives you clean cuts without shattering the Kiss. Slice into 16 squares for polite company, or nine if you’re feeding teenagers who believe sharing is a crime. That first snap when the knife breaks through the chocolate into the chewy-crispy layers? Pure ASMR.
- Serve stacked like Jenga blocks on a platter, or wrap individually in wax paper for lunchbox gold. They travel well to picnics, potlucks, and clandestine movie-theater snacking. I stash a few in my coat pocket for winter walks; body heat softens the peanut butter just enough to feel like fresh fudge without the mess.
That’s it—you did it. But hold on, I’ve got a few more tricks that’ll take this to another level...
Insider Tricks for Flawless Results
The Temperature Rule Nobody Follows
Your sugar mixture should hit 235 °F—soft-ball stage—before you pull it off the heat. No candy thermometer? No problem. Drop a tiny blob into cold water; it should form a pliable ball you can flatten between your fingers. If it dissolves, keep cooking. If it snaps, you’ve crossed into hard-crack territory and your bars will set like peanut-butter glass. I learned this the hard way during a power outage when I eyeballed it and produced a pan that could have patched asphalt.
Why Your Nose Knows Best
Smell is a more reliable indicator than sight. When the brown sugar-corn syrup bubbles thicken and the aroma shifts from plain sweet to deep caramel with a whisper of smoke, yank the pot off the burner. That whisper is the difference between “meh” and “I need to sit down.” If you wait for color alone you’ll overshoot; the mixture keeps cooking from residual heat like a stubborn steak.
The 5-Minute Rest That Changes Everything
After pressing the mixture into the pan, walk away for five minutes before topping with Kisses. This lets the surface cool just enough to prevent the chocolate from blooming yet stays warm enough for gentle adhesion. I used to rush and ended up with ghostly white chocolate freckles that looked like my dessert had dandruff. Patience, young padawan.
The Double-Batch Dilemma
Don’t double the recipe in one pot. The volume traps steam and the cereal goes soggy faster than you can say “structural integrity.” Instead, make two separate batches back-to-back; the second one comes together even faster because you’re now a seasoned pro. If you absolutely must feed a horde, use a wide Dutch oven to maximize surface area and evaporate excess moisture.
Fridge vs. Counter Culture
These bars are best stored in an airtight container at room temp for up to five days. The fridge dries them out and the cereal goes stale. However, if your kitchen hovers above 75 °F, refrigerate and accept a slightly firmer chew. Simply let them sit out for ten minutes before serving and they’ll regain their bounce like a gymnast on a trampoline.
Creative Twists and Variations
This recipe is a playground. Here are some of my favorite ways to switch things up:
Salted Caramel Pretzel Crush
Swap half the cereal for lightly crushed mini pretzels and sprinkle the top with flaky sea salt. The sweet-salty combo is like baseball games and summer carnivals rolled into one. Use dark-chocolate Kisses to amp up the sophistication or keep it classic milk chocolate for pure nostalgia.
White Chocolate Raspberry Ribbon
Stir in a tablespoon of freeze-dried raspberry powder to the peanut-butter mixture for a pop of tartness. Crown with white-chocolate Kisses and drizzle with melted raspberry jam thinned with a splash of water. It looks like Neapolitan marble and tastes like PB&J gone to finishing school.
Espresso Mocha Buzz
Dissolve a teaspoon of instant espresso powder into the hot sugar mixture before adding peanut butter. Top with dark-chocolate Kisses and dust the finished bars with cocoa powder. The bitter coffee edge balances the sweetness and gives you a gentle caffeine nudge that says “you can survive the rest of this day.”
Coconut-Lime Tropical Escape
Replace ¼ cup of the peanut butter with coconut cream and fold in toasted unsweetened coconut along with the cereal. Press a dried pineapple bit on top of each Kiss for a tiny edible umbrella vibe. Close your eyes and you’re on a beach where calories don’t count and emails can’t find you.
Spicy Mexican Hot-Chocolate
Add ¼ teaspoon cayenne and ½ teaspoon cinnamon to the sugar mixture. Top with chocolate Kisses rolled in a whisper of chili powder. The heat sneaks up like a plot twist, and the cinnamon makes your kitchen smell like Día de los Muertos. My neighbors hovered so long I started charging admission.
Peanut-Free Classroom Hero
Use sunflower-seed butter and add an extra pinch of salt to mimic peanut butter’s savory notes. Swap Kisses for mini marshmallows pressed into the top so kids with allergies can still feel included. Teachers will erect statues in your honor.
Storing and Bringing It Back to Life
Fridge Storage
Room-temp is king, but if you must refrigerate, layer the bars between sheets of wax paper in an airtight container. They’ll keep for a week but will firm up. Let them sit on the counter for ten minutes before serving and they’ll relax into chewy glory again.
Freezer Friendly
Wrap each square in plastic wrap, then aluminum foil, and freeze for up to three months. Thaw overnight in the fridge or 30 minutes at room temp. Pro move: eat them half-frozen for a peanut-butter ice-cream vibe that will make you feel like you’re getting away with something illegal.
Best Reheating Method
There is no reheating—this is a no-bake treat, remember? But if your chocolate has bloomed or the cereal has absorbed moisture, you can refresh them. Pop the pan into a 200 °F oven for 3 minutes, just until the chocolate regains its shine, then cool completely. It’s like a spa day for candy.