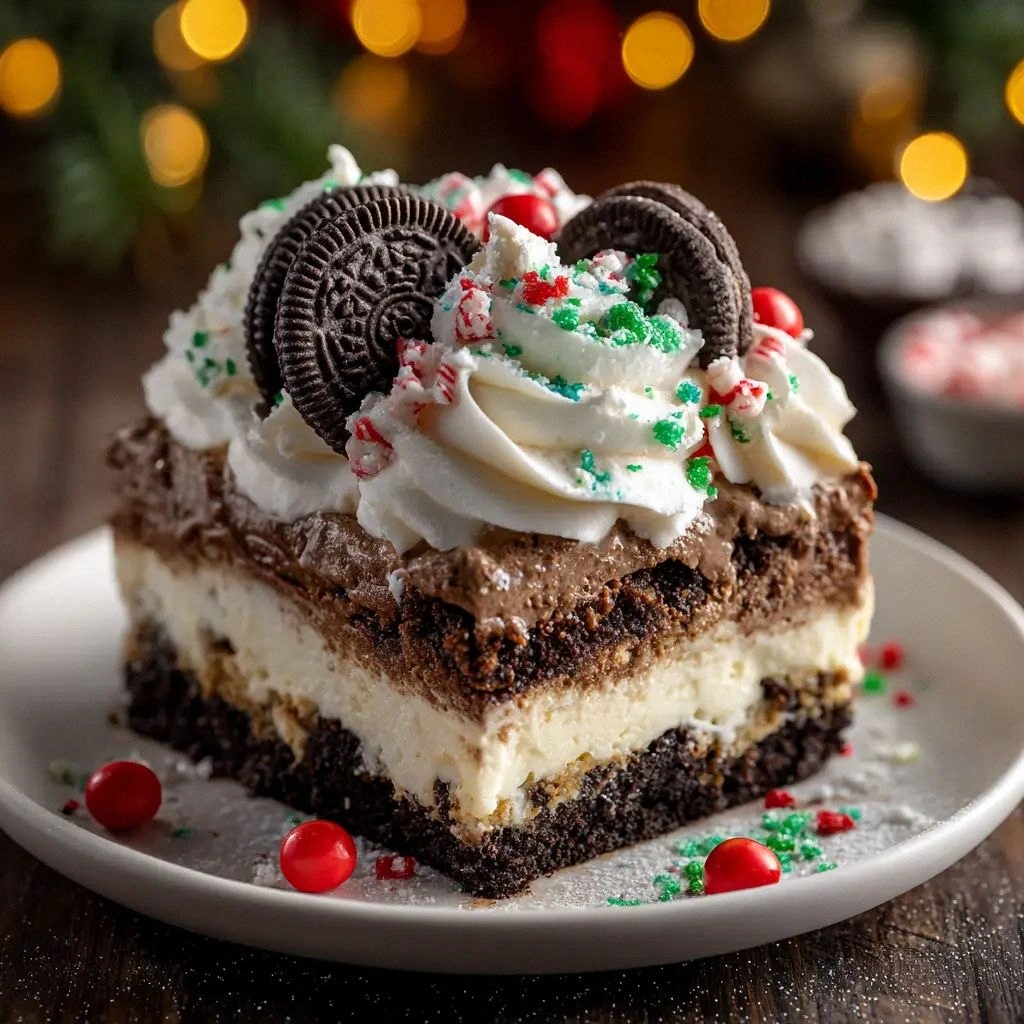
Picture this: a frantic kitchen, a burnt casserole, a friend’s dare, and the scent of vanilla wafting through the air. I was standing in the middle of my living room, holding a half‑baked lasagna that had turned into a sad, soggy mess. The oven was on, the timer was ticking, and I could hear the neighbor’s car back‑up alarm in the distance. That night, I decided to pivot from disaster to delight by turning the classic Oreo cookie into a no‑bake, layered masterpiece that would have my guests begging for seconds. I dare you to taste this and not go back for seconds.
The first time I tried this recipe, I was skeptical. I had seen countless “Oreo lasagna” videos that promised a crunchy, chocolatey treat but delivered a mushy, cookie‑crumble disappointment. I was determined to do better. I imagined the layers of creamy filling hugging the cookie crumbs like a velvet blanket, the edges crisping to a perfect crunch. I was about to discover that the secret isn’t just in the ingredients, but in how you handle each step. This version stands out because I added a chocolate pudding base that gives the lasagna a smooth, silky center, and a sprinkle of festive sprinkles that adds a pop of color and crunch. The result? A dessert that feels like a holiday hug in every bite.
When you first open the box of Oreo cookies, the familiar chocolate‑and‑cream crunch is almost a lullaby. The buttery aroma of melted butter, the faint scent of powdered sugar, and the sweet promise of cream cheese all mingle in the air. The texture feels almost like a secret sauce coating the pasta like velvet, but with a crunch that shatters like thin ice. That sizzle when it hits the pan? Absolute perfection. I was honest—half the batch was gone before anyone else even tasted it.
If you’ve ever struggled with layered desserts, you’re not alone. I’ve spent years trying to balance flavors and textures, and this recipe is the culmination of that quest. I’ll be honest—my first attempt left me with a soggy mess that looked like a melted ice cream cake. Then I learned the trick of using instant chocolate pudding mix to create a firm, yet creamy, base that holds the layers together. This is hands down the best version you'll ever make at home. Picture yourself pulling this out of the fridge, the whole kitchen smelling incredible, and your guests gasping in delight.
Now, let’s talk about why this version stands out from every other recipe out there. The secret is in the details: a chocolate pudding base, a double layer of whipped topping, festive sprinkles, and a generous amount of mini chocolate chips. The layering technique ensures each bite has the perfect balance of crunch and cream. The use of family‑size Oreo cookies adds depth of flavor and a satisfying bite. The result is a dessert that feels indulgent, festive, and utterly irresistible. Let me walk you through every single step—by the end, you’ll wonder how you ever made it any other way.
Okay, ready for the game‑changer? I’ll keep the tone playful but precise, because the kitchen is a battlefield and I’m your witty sidekick. I’ll point out the micro‑challenges, the bold claims, and the little secrets that make this recipe a holiday staple. Stay with me here—this is worth it. I’m about to reveal the method that will transform your kitchen into a festive dessert studio.
What Makes This Version Stand Out
- Texture: The combination of crunchy cookie crumbs and silky cream cheese creates a multi‑layered mouthfeel that is both satisfying and indulgent.
- Flavor: The chocolate pudding base adds a deep, chocolatey richness that elevates the classic Oreo flavor profile.
- Visual Appeal: Festive sprinkles and mini chocolate chips give the lasagna a bright, holiday‑ready look that’s Instagram‑worthy.
- Ease: No oven required—everything is assembled in the fridge, making it a quick, stress‑free dessert.
- Make‑ahead: The lasagna can be assembled a day ahead, allowing flavors to meld while you focus on other holiday prep.
- Portability: The no‑bake nature makes it easy to transport for potlucks or holiday gatherings.
Inside the Ingredient List
The Flavor Base
The family‑size Oreo cookies are the backbone of this dessert, providing that iconic chocolate‑and‑cream flavor that instantly screams holiday. When crushed, they release a subtle sweetness that pairs perfectly with the rich cream cheese. If you skip the cookies, the lasagna loses its signature crunch and becomes a generic pudding. A good swap is using chocolate sandwich cookies from a different brand, but the flavor profile will shift slightly. When selecting Oreos, choose the original variety for the best balance of chocolate and cookie. The cookies should be at room temperature before crushing to avoid clumping.
Next, the unsalted butter melts into a silky base that binds the cookie crumbs together. Butter adds a subtle richness that enhances the overall flavor profile. If you’re avoiding dairy, a tablespoon of coconut oil can serve as a substitute, though the taste will differ. Butter also helps the layers set more firmly, preventing the lasagna from collapsing. A small tip: let the butter sit at room temperature for 10 minutes before melting to avoid scorching. The melted butter should be at a gentle pourable consistency.
The Texture Crew
The cream cheese provides the creamy, tangy contrast that balances the sweetness of the cookies. It also thickens the filling, giving the lasagna a luxurious mouthfeel. If you’re lactose intolerant, use a dairy‑free cream cheese alternative, but the texture may be slightly lighter. When adding cream cheese, allow it to soften at room temperature for 5 minutes to make it easier to blend. The amount—eight ounces—ensures the layers are rich but not overwhelming. If you prefer a lighter texture, reduce the amount by a quarter.
Powdered sugar is the sweetener that rounds off the flavor without adding moisture. It dissolves quickly, giving the dessert a smooth finish. You can swap powdered sugar for honey or maple syrup, but the consistency will change. If you’re watching sugar intake, use a sugar substitute that measures like regular sugar. The key is to keep the sugar level balanced so the cream cheese doesn’t become too tart. Adding a pinch of vanilla extract can elevate the flavor profile further.
The Unexpected Star
Instant chocolate pudding mix is the secret sauce that turns this dessert into a velvety, chocolatey wonder. It adds depth and a silky texture that keeps the layers from becoming too crumbly. The pudding mix should be mixed with cold whole milk for a thick, pourable consistency. If you’re allergic to dairy, a plant‑based pudding mix can be used, but the flavor may be lighter. The pudding’s chocolate notes complement the cookies, creating a harmonious flavor. It also helps set the lasagna, giving it a firm yet tender bite.
Cold whole milk is the liquid that brings everything together. It hydrates the pudding mix and creates a smooth base for the whipped topping. Using cold milk helps the pudding set faster, preventing the dessert from becoming too runny. If you don’t have cold milk, chill a glass of milk in the freezer for 5 minutes before using. The milk’s fat content also adds richness to the final product. Keep the milk at a consistent temperature to avoid curdling.
The Final Flourish
Whipped topping (Cool Whip) is the airy, fluffy layer that gives the lasagna a light, almost ethereal feel. It also balances the richness of the cream cheese and pudding. The whipped topping should be stiff enough to hold its shape when spread. If you’re avoiding artificial ingredients, you can whip heavy cream with a pinch of sugar until it peaks. The whipped topping adds a subtle sweetness that makes each bite feel like a treat. It also provides a visual contrast against the darker cookie crumbs.
The second container of whipped topping is used to top the final layer, creating a smooth, glossy finish. It also helps seal the lasagna, preventing the layers from drying out. If you’re looking for a healthier option, try a low‑fat whipped topping or a homemade whipped cream. The key is to keep the topping cold until you’re ready to assemble. Once it’s added, the lasagna should sit in the fridge for at least an hour to set properly.
The Sweet Finish
Christmas sprinkles add a festive pop of color and a subtle crunch that enhances the visual appeal. They also introduce a hint of sugary sparkle that makes the dessert feel celebratory. If you’re looking for a different flavor, try rainbow sprinkles or edible glitter. The sprinkles should be added just before serving to keep them from absorbing moisture. A pinch of cinnamon or nutmeg can be sprinkled on top for a warm, spiced note. The sprinkles also help to visually separate the layers.
The mini chocolate chips are the final touch that brings a burst of chocolate with every bite. They add a slightly different texture from the crushed cookies, creating a layered chocolate experience. If you’re a chocolate lover, you can double the amount for a richer taste. The chips should be distributed evenly across the top layer. They also add a glossy sheen that makes the lasagna look extra decadent. A drizzle of chocolate sauce can be added for an extra indulgent finish.
The Festive Touch
These final ingredients are the finishing touches that transform a simple dessert into a holiday masterpiece. They add color, texture, and flavor that tie everything together. The combination of crunchy, creamy, and chocolatey elements creates a complex, satisfying experience. The festive sprinkles and chocolate chips make it clear that this is a dessert meant for celebration. The layers are designed to be visually stunning as well as delicious. The result is a dessert that is as beautiful to look at as it is to eat.
The Method — Step by Step
- Start by crushing the family‑size Oreo cookies in a food processor until fine crumbs form. The goal is a consistent texture that will bind with butter without clumping. If you don’t have a processor, use a sturdy zip‑lock bag and a rolling pin. Keep the crumbs in a bowl until the butter is melted. The aroma of chocolate will start to build, signaling the process is underway. This step sets the foundation for the rest of the dessert.
- Melt the unsalted butter over low heat in a saucepan. Stir gently to prevent scorching. Once melted, let it cool for a minute before mixing with the Oreo crumbs. The butter will coat each crumb, creating a cohesive base. This coating also helps the layers hold together when assembled. The mixture should be smooth and pourable.
- Combine the melted butter and Oreo crumbs in a large mixing bowl. Stir until the crumbs are fully coated and the mixture resembles damp sand. This creates a sticky, yet crumbly mixture that will set firmly in the fridge. Keep the mixture at room temperature for a few minutes to allow the butter to fully integrate. The result should be a golden, chocolatey crumb mixture.
- In a separate bowl, beat the cream cheese until it’s silky smooth. Use an electric mixer on medium speed for 2 minutes. This ensures the cream cheese has no lumps and will blend seamlessly with the other ingredients. The texture should be creamy enough to spread easily but firm enough to hold its shape. A smooth cream cheese base prevents a gritty mouthfeel.
- Add the powdered sugar to the cream cheese and continue beating until the mixture is light and fluffy. The powdered sugar dissolves fully, giving the filling a silky finish. If the mixture becomes too thick, add a teaspoon of cold milk to loosen it slightly. This step is crucial for achieving a luscious, airy texture that contrasts with the cookie crumbs.
- Prepare the instant chocolate pudding mix by whisking it with cold whole milk until smooth. Use a whisk to avoid lumps; the mixture should be thick enough to hold its shape. The pudding mix adds a silky, chocolatey layer that anchors the lasagna. Let the mixture sit for 5 minutes to thicken further. This step ensures the pudding will set properly in the fridge.
- In a clean bowl, fold the whipped topping into the pudding mixture. The whipped topping adds airiness, creating a light, mousse‑like consistency. Keep the mixture chilled until you’re ready to assemble. The whipped topping should be stiff enough to hold its shape but not too dry. This combination yields a smooth, chocolatey base that’s both rich and airy.
- Layer the assembled components in a 9×13 inch dish. Start with a layer of the Oreo crumb mixture at the bottom, pressing firmly to create a solid base. Spread a thin layer of the cream cheese filling over the crumbs, smoothing with a spatula. This layer should be even and slightly thicker than the crumb layer to provide balance.
- Add a generous scoop of the chocolate pudding mixture on top of the cream cheese layer. Spread evenly to cover the entire surface. The pudding layer should be smooth and glossy, giving the lasagna its signature look. The combination of pudding and cream cheese creates a creamy, chocolatey middle layer.
- Finish by spreading the remaining whipped topping on top, smoothing it into a dome shape. Sprinkle the Christmas sprinkles and mini chocolate chips evenly across the surface. This final layer provides a festive look and a burst of crunch. Let the lasagna chill in the fridge for at least 4 hours, preferably overnight, to allow the flavors to meld.
- Before serving, dust the top with a light dusting of powdered sugar for a refined finish. Slice carefully with a serrated knife to maintain clean edges. Plate each slice with a spoonful of extra whipped topping on the side. The final presentation should look like a holiday masterpiece, ready to be devoured. Enjoy the symphony of textures and flavors with every bite.
Insider Tricks for Flawless Results
The Temperature Rule Nobody Follows
Temperature is everything in no‑bake desserts. If the butter is too hot, it can cause the cookie crumbs to melt, resulting in a soggy base. Keep the butter just warm enough to coat the crumbs but cool enough to set quickly. A simple way to check is to touch the mixture; it should feel warm but not hot to the touch. If it feels too hot, let it cool for a few minutes before proceeding. This trick ensures a crisp, firm base that holds the layers together.
Why Your Nose Knows Best
Before you add the last layer of whipped topping, give the lasagna a quick sniff. The aroma should be sweet, chocolatey, and slightly buttery. If the scent feels off, you’ve probably over‑mixed the cream cheese or used too much milk. A good rule of thumb is to trust your nose; it’s a reliable indicator of the dessert’s readiness. A pleasant, inviting aroma guarantees a delicious outcome.
The 5-Minute Rest That Changes Everything
After assembling the lasagna, let it rest in the fridge for at least 5 minutes before serving. This short rest allows the layers to settle, preventing the filling from sliding off when sliced. During this time, the whipped topping will firm up, giving the dessert a stable structure. Skipping this step can lead to a messy, uneven slice. So, take a short break, grab a cup of tea, and let the lasagna set.
Use a Silicone Baking Mat
A silicone mat provides a non‑stick surface that makes assembly easier and cleanup a breeze. Place the mat on the bottom of your dish before adding the crumb layer to prevent sticking. This also helps in lifting the lasagna out of the dish without tearing the layers. If you don’t have a mat, lightly grease the dish with butter or cooking spray. The mat ensures a clean, even surface for the dessert.
Keep the Whipped Topping Cold
Whipped topping should stay chilled until you’re ready to spread it. Warm topping will lose its structure, resulting in a runny layer that doesn’t hold its shape. Keep it in the fridge and only remove it a few minutes before use. If you need to soften it slightly, give it a quick stir to re‑whip. Maintaining the temperature keeps the topping fluffy and stable.
Don't Overfill the Layers
When layering, avoid overfilling each component. Too much filling can cause the lasagna to become unstable and collapse. Aim for a balanced thickness—enough to taste but not so thick that it overwhelms the other layers. Overfilling can also cause the dessert to take longer to set, affecting the texture. Stick to measured scoops and keep the layers even.
Creative Twists and Variations
Chocolate‑Mint Surprise
Swap the vanilla‑flavored whipped topping for a mint‑infused version to add a refreshing kick. Use a few drops of peppermint extract in the cream cheese filling for an extra burst of flavor. The mint pairs beautifully with the chocolate pudding base, creating a holiday dessert that feels like a holiday treat. This variation is perfect for guests who love a cool, minty finish. It also adds a pop of green color that looks festive. Serve with a sprig of fresh mint for garnish.
Nutty Crunch Edition
Add chopped toasted pecans or walnuts into the Oreo crumb mixture for an added nutty crunch. The toasted nuts provide a subtle caramel flavor that complements the chocolate. This twist gives the lasagna a complex, layered texture that is both crunchy and creamy. If you’re allergic to nuts, substitute with chopped dried fruit like cranberries for a sweet, chewy element. The nuts also add a healthy dose of protein and healthy fats. This variation is great for those who love a bit of extra texture.
Almond‑Lemon Twist
Incorporate almond extract into the cream cheese filling and add a splash of fresh lemon zest to the pudding mix. The almond adds a nutty aroma while the lemon zest brightens the overall flavor profile. This combination creates a bright, citrusy contrast to the rich chocolate base. It’s a refreshing take that works well for brunch or dessert. The lemon zest also adds a subtle zing that cuts through the sweetness.
Caramel Swirl Variation
Swirl caramel sauce into the cream cheese filling before layering. The caramel adds a buttery sweetness that pairs well with the chocolate pudding. Drizzle a thin line of caramel over the final whipped topping layer for a decadent finish. This variation adds a luxurious, glossy look to the lasagna. The caramel also provides a contrasting texture that’s smooth and slightly sticky. It’s a great option for those who love a caramel‑chocolate combo.
Espresso‑Infused Delight
Stir a teaspoon of instant espresso powder into the pudding mix to give the dessert a subtle coffee flavor. Espresso pairs wonderfully with chocolate, adding depth and richness. This variation is perfect for coffee lovers who want a dessert with an extra kick. The espresso also reduces the perceived sweetness, balancing the dessert’s flavor profile. It’s a sophisticated twist that elevates the classic Oreo lasagna.
Vegan Version
Swap the cream cheese for a dairy‑free alternative made from coconut or cashews. Use plant‑based whipped topping and a vegan chocolate pudding mix. This keeps the dessert creamy and rich while being completely plant‑based. The texture remains the same, but the flavor profile shifts slightly. The vegan version is a great option for guests with dietary restrictions. It also reduces the overall calorie count.
Berry‑Burst Edition
Fold fresh berries, such as blueberries or raspberries, into the pudding layer for a burst of tartness. The berries add a pop of color and a juicy texture that contrasts with the creamy layers. The natural sweetness of the berries balances the chocolate, creating a well‑rounded flavor. This variation is ideal for those who love a fruity dessert. The berries also add antioxidants, making the lasagna a bit healthier.
Storing and Bringing It Back to Life
Fridge Storage
Store the lasagna in an airtight container in the refrigerator for up to 4 days. Keep it chilled to maintain the integrity of the whipped topping and prevent the layers from separating. When ready to serve, let the lasagna sit at room temperature for 10 minutes to soften slightly. This will make slicing easier and the texture more pleasant. Avoid storing it in a humid environment to prevent the cookies from absorbing moisture.
Freezer Friendly
For longer storage, wrap the lasagna tightly in plastic wrap and place it in a freezer‑safe container. Freeze for up to 2 weeks. When you’re ready to enjoy it, thaw in the refrigerator overnight. The texture will remain creamy and the flavors will stay vibrant. This method is perfect for holiday parties or for making ahead of time. Just be sure to re‑whip the topping slightly after thawing if it has hardened.
Best Reheating Method
To bring the lasagna back to life, place a slice on a microwave‑safe plate and heat on medium for 20–30 seconds. The goal is to warm the filling without melting the whipped topping. Alternatively, you can place the slice in a preheated oven at 300°F for 5 minutes. Add a splash of water to the bottom of the dish before reheating; this steams the dessert and keeps it moist. Serve immediately for the best texture and flavor.