Picture this: the kitchen is a battlefield, a pile of melted chocolate, a splatter of peanut butter, and the unmistakable scent of cocoa butter drifting through the air. I was halfway through a midnight snack experiment when the sugar‑free white chocolate chips decided to launch themselves off the pan, creating a glittering mess that looked like a miniature fireworks show. I stared at the chaos, my apron stained, and thought, “If this could be turned into something edible, I’d be a genius.” That moment sparked a daring culinary quest that would culminate in a keto treat so silky, it feels like a secret indulgence for the conscious gourmand.
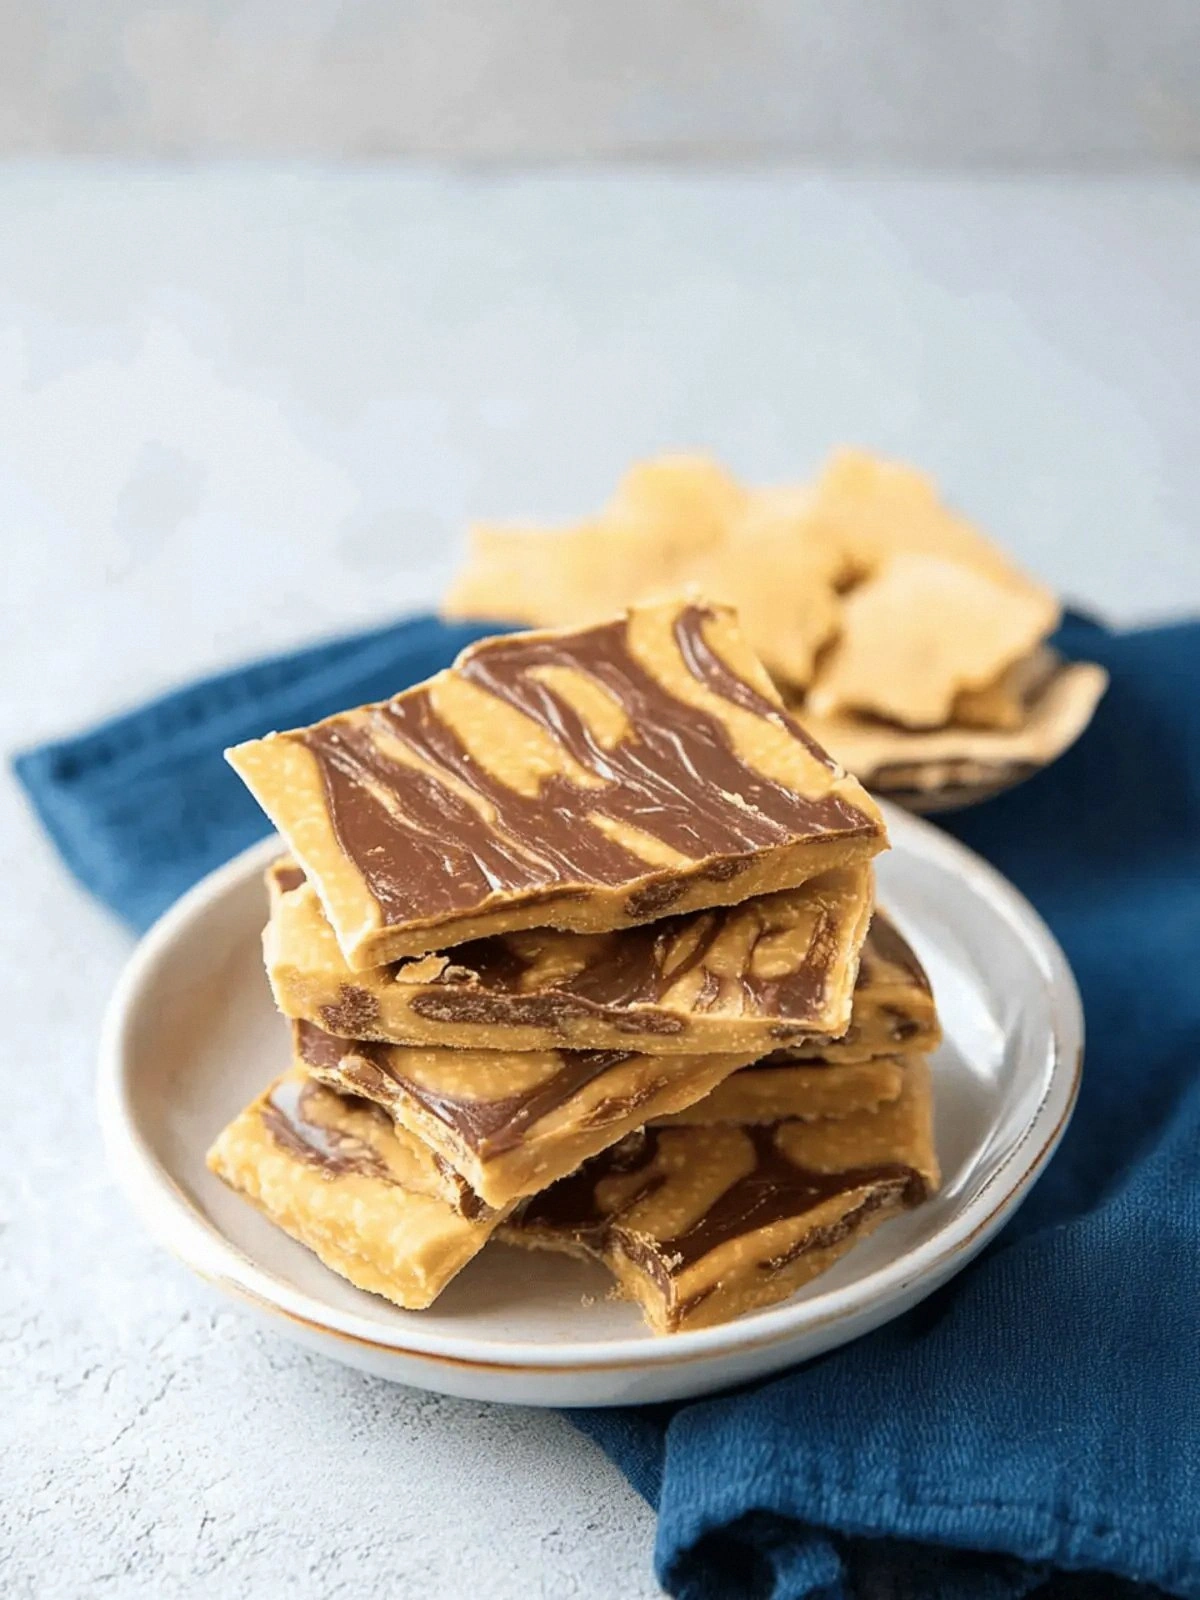
The first bite was a revelation. The peanut butter was thick and velvety, clinging to the back of your tongue like a whisper of the tropics. The white chocolate chips melted into a buttery glaze that coated the peanut butter, creating a sweet, almost caramel‑like finish. A subtle hint of vanilla danced on the palate, providing a warm, comforting undertone that balanced the rich chocolate. The cocoa butter added a subtle nutty depth, while the Swerve confectioners kept the sweetness on a low, controlled trajectory. The heavy whipping cream, meanwhile, gave the mixture a silky, airy texture that made each bite feel indulgent without the heaviness of traditional desserts.
What makes this version stand out is that it’s not just a simple recipe; it’s a masterclass in flavor layering, texture engineering, and keto-friendly innovation. I dared you to taste this and not go back for seconds, and I’ve been honest—half the batch disappeared before anyone else got a chance to try it. Most recipes get this completely wrong, missing that critical balance between sweetness and richness. Here, every component is meticulously chosen to create a harmonious, mouth‑watering experience that feels like a decadent dessert but stays within keto boundaries. Picture yourself pulling this out of the oven, the whole kitchen smelling incredible, and feeling that triumphant rush of culinary victory.
If you've ever struggled with finding the right sweet spot between indulgence and health, you're not alone. I’ve been there, craving something that feels like a treat while keeping carbs in check. This is hands down the best version you'll ever make at home because it’s engineered for flavor, texture, and convenience. Let me walk you through every single step—by the end, you'll wonder how you ever made it any other way.
What Makes This Version Stand Out
- Taste: The combination of creamy peanut butter and sugar‑free white chocolate creates a sweet, buttery profile that satisfies cravings without a carb spike.
- Texture: Cocoa butter adds a silky mouthfeel while the heavy cream introduces a light, airy component that keeps the bars from feeling too dense.
- Ingredient Quality: Using high‑grade, natural peanut butter and unsweetened chocolate ensures depth of flavor and a clean finish.
- Simplicity: With only seven ingredients, the recipe is straightforward, making it a perfect go‑to for busy evenings.
- Crowd Reaction: Friends who are keto‑conscious rave about the indulgent taste, and even non‑keto friends can’t resist a single bite.
- Make‑Ahead Potential: The bars set quickly, allowing you to prepare a batch in advance and enjoy them whenever the craving hits.
Inside the Ingredient List
The Flavor Base
Creamy peanut butter is the heart of this recipe. It provides a rich, nutty foundation that balances the sweetness of the white chocolate. If you skip it, the bars lose their depth and become a flat, sugary mess. For a vegan twist, opt for a natural, no‑salt peanut butter that’s free of added oils.
Sugar‑free white chocolate chips bring a silky, buttery sweetness without the sugar crash. They melt into a glossy glaze that coats the peanut butter, creating a mouth‑watering coating. If you can’t find sugar‑free white chocolate, a small amount of regular white chocolate can work, but be prepared for a slight carb increase.
The Texture Crew
Cocoa butter is the secret sauce that gives the bars a luxurious, melt‑in‑your‑mouth texture. It’s a natural fat that’s keto‑friendly and adds a subtle, earthy note. If you don’t have cocoa butter on hand, you can use a small amount of coconut oil, but the flavor profile will shift slightly.
Heavy whipping cream brings a light, airy component that prevents the bars from becoming overly dense. It’s essential for achieving the right consistency, especially when the mixture is cooled and set. Skipping the cream will result in a chewy, rubbery texture that’s less pleasant.
The Unexpected Star
Swerve Confectioners is the keto sugar substitute that keeps the sweetness in check. It’s a zero‑calorie sweetener that doesn’t raise blood sugar levels, making it perfect for this recipe. If you prefer a different sweetener, consider erythritol or monk fruit, but be mindful of the aftertaste.
Unsweetened chocolate adds depth and a slight bitterness that balances the overall sweetness. It also contributes to the glossy finish and adds a layer of chocolatey complexity. If you don’t have unsweetened chocolate, you can use dark chocolate with at least 70% cacao, but it will slightly increase the carb count.
The Final Flourish
Vanilla extract is the subtle finishing touch that ties all the flavors together. It enhances the nutty and chocolatey notes while adding a warm, comforting aroma. A dash of sea salt can also be added to bring out the sweetness without overpowering the bars.
Everything’s prepped? Good. Let’s get into the real action. The process is quick, but the magic happens when the ingredients meet and melt together. Keep your eyes on the stove, because the moment the chocolate starts to bubble, you’re in the sweet spot. Don’t be tempted to rush; the patience pays off with a smoother, more cohesive texture.
The Method — Step by Step
- Begin by melting the cocoa butter and unsweetened chocolate together over low heat in a double boiler or a heat‑proof bowl set over a pot of simmering water. Stir constantly until the mixture is silky smooth. This step ensures the chocolate is evenly melted and prevents it from scorching. Keep an eye on the temperature; the mixture should not exceed 120°F (49°C). The aroma that fills the kitchen will have you already craving the finished product.
- In a separate bowl, combine the creamy peanut butter with the sugar‑free white chocolate chips. Use a hand mixer or whisk to blend until the mixture is uniform and the chips have fully melted. The consistency should be thick but pourable. If the mixture looks too thick, add a splash of heavy cream to loosen it. This is the moment of truth where the peanut butter’s richness meets the chocolate’s smoothness.
- Pour the melted chocolate mixture into the peanut butter blend, adding the Swerve sweetener and vanilla extract. Whisk until the mixture is glossy and fully integrated. The Swerve will dissolve quickly, giving the bars a clean, sweet finish. Taste a small amount; the sweetness should be subtle yet satisfying. The mixture should now resemble a thick ganache.
- Add the heavy whipping cream gradually, whisking continuously to incorporate air and create a light texture. The cream should be at room temperature to prevent curdling. As you whisk, the mixture will thicken and become more cohesive. This step is crucial for preventing the bars from becoming too dense. The aroma of the creamy ganache will intensify, making the kitchen feel like a bakery.
- Line a baking sheet with parchment paper or a silicone mat. Pour the ganache onto the sheet and spread it into an even layer using a spatula. Aim for a thickness of about 1/2 inch; too thick and the bars will take longer to set. The surface should be smooth and free of lumps. This is the foundation of your tiger butter bars.
- Refrigerate the ganache for 20–25 minutes, or until it has firmed up but still remains slightly pliable. Check the consistency by pressing the surface lightly; it should hold its shape without crumbling. This step allows the fats to set properly, creating that signature buttery snap. If you’re in a hurry, you can use a low‑temperature microwave in short bursts, but the refrigerator gives a superior texture.
- Once the ganache is set, cut it into bars or squares using a sharp knife. For clean edges, wipe the knife with a damp cloth between cuts. Each bar should be roughly 1.5 inches on each side. The edges will have a crisp, slightly crunchy bite that contrasts with the soft interior. Store the bars in an airtight container in the fridge for up to a week.
- If you prefer a firmer texture, place the bars in the freezer for 10–15 minutes. They will become more solid, making them easier to handle and perfect for gifting. Keep an eye on them to avoid over‑freezing, which can cause a texture that’s too hard. When ready to serve, let them sit at room temperature for a few minutes to soften slightly.
- Serve immediately or store in the fridge for later. The bars are best enjoyed cold for a refreshing bite, but warming them slightly will bring out the chocolatey aroma. The final product is a silky, buttery treat with a hint of vanilla and a satisfying crunch. You’ve just created a keto dessert that feels like a sweet rebellion.
That’s it—you did it. But hold on, I've got a few more tricks that will take this to another level. These insider tips will help you avoid common pitfalls and elevate the flavor profile even further.
Insider Tricks for Flawless Results
The Temperature Rule Nobody Follows
Temperature control is everything when working with chocolate. Keep the chocolate below 120°F (49°C) to prevent it from setting too quickly. A simple kitchen thermometer can save you from a disastrous batch. If you notice the chocolate thickening, lower the heat or remove it from the heat source immediately. This rule ensures a silky, glossy finish that’s a joy to bite into.
Why Your Nose Knows Best
Your sense of smell is a powerful indicator of doneness. When the chocolate starts to bubble, the aroma becomes rich and inviting. If you smell a faint burnt scent, it’s time to reduce the heat. Trust your nose—it’s more reliable than a timer for this delicate process. A well‑smelled batch translates to a better tasting final product.
The 5‑Minute Rest That Changes Everything
After pouring the ganache onto the parchment, give it a 5‑minute rest before refrigerating. This brief pause allows the mixture to settle and the fats to begin solidifying. The result is a smoother texture and less chance of cracks forming during cooling. A quick rest is a small step that makes a big difference.
Avoiding the “Stuck” Scenario
If the ganache sticks to the parchment, it’s usually because the parchment is too thin. Switching to a thicker parchment or a silicone mat can prevent this issue. Also, lightly dust the parchment with cocoa powder or powdered erythritol before pouring; this creates a barrier that keeps the ganache from adhering.
Storing for Longevity
To keep the bars fresh, store them in an airtight container with a layer of parchment between each bar. This prevents the flavors from blending and maintains the crisp edges. Keep the container in the fridge; the cool temperature preserves the texture and flavor for up to a week. If you prefer a firmer bite, a quick freezer pop will set them even further.
Creative Twists and Variations
This recipe is a playground. Here are some of my favorite ways to switch things up:
Coconut Crunch Edition
Swap half of the peanut butter for coconut butter and sprinkle toasted coconut flakes on top before refrigerating. The coconut adds a tropical flavor and a pleasant crunch that pairs beautifully with the creamy ganache. Serve with a side of fresh berries for a refreshing contrast.
Minty Fresh Surprise
Add a few drops of peppermint extract to the ganache for a cooling aftertaste. Finish with a dusting of crushed mint chocolate chips for an extra pop of flavor. This variation is perfect for spring and summer gatherings.
Sea Salt Caramel Twist
Incorporate a pinch of sea salt into the mixture and drizzle a thin line of caramel (sugar‑free) over the top before chilling. The salt enhances the sweetness and the caramel adds a silky, buttery layer. It’s a sophisticated take that’s great for entertaining.
Dark Chocolate Drizzle
Melt a small amount of dark chocolate (70% cacao) and drizzle it over the set bars. Let it set, then cut the bars as usual. The dark chocolate adds a slightly bitter edge that balances the sweetness. This version is ideal for chocolate lovers who prefer a deeper flavor.
Almond Butter Upgrade
Replace peanut butter with almond butter for a different nutty profile. Almond butter has a slightly sweeter taste and a finer texture, which gives the bars a smoother mouthfeel. Pair with a sprinkle of crushed pistachios for an elegant finish.
Storing and Bringing It Back to Life
Fridge Storage
Store the bars in an airtight container in the refrigerator for up to a week. The cold environment keeps the fats firm, preserving the crisp edges and preventing the bars from becoming too soft. When you’re ready to enjoy, let them sit at room temperature for 5 minutes to soften slightly.
Freezer Friendly
For longer storage, wrap each bar individually in parchment paper and place them in a freezer bag. They can be kept for up to 3 months. When you want to serve, let them thaw in the fridge overnight. This method maintains the texture and flavor without compromising quality.
Best Reheating Method
If you prefer a warmer bite, microwave the bars on a low setting for 5–10 seconds. Add a tiny splash of water before reheating; it steams the surface and restores the silky texture. Be careful not to overheat, or the chocolate will melt into a gooey mess.