There was a time in my kitchen when I thought I’d discovered the ultimate comfort food: a pot of chili that could outshine a Sunday roast, a stew that could warm a room, and a dish that could make even the most cynical foodie sigh with delight. I was in the middle of a culinary experiment, juggling a blender, a can of diced tomatoes, and a handful of beans, when the stove alarm rang and my phone buzzed with a friend’s challenge: “I dare you to taste this and not go back for seconds.” I laughed, but I also knew that I was on the brink of something special.
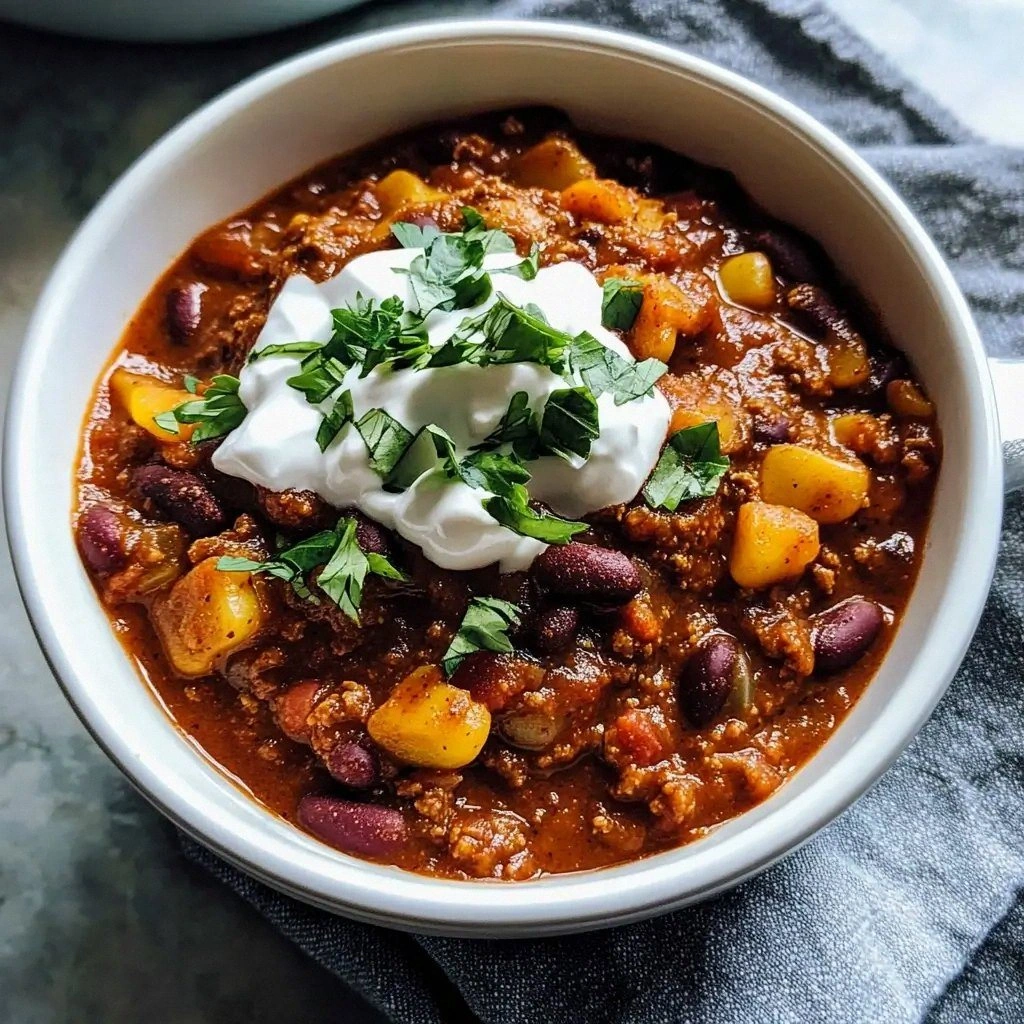
Picture this: a pot of simmering, aromatic goodness that sends a wave of steam curling up like a fragrant mist, the sound of bubbling broth that feels like a lullaby, the sight of deep reds and earthy greens dancing together, and the promise that each spoonful will be a burst of flavor that lingers. I can almost taste the first bite—the way the beans give a gentle, satisfying bite, the subtle heat of cumin that lingers, and the sweet undertones of tomato that whisper like a secret. The texture is a glorious blend of hearty beans, tender corn kernels, and crisp peppers that snap like fresh cut onions. And the aroma? It’s a heady mix of smoky paprika, earthy cumin, and the faint sweetness of maple syrup, all mingling to create a scent that makes you feel like you’re sitting by a campfire.
Why does this version stand out? Because I didn’t just follow a recipe; I rewrote the rulebook. I used a trio of beans for depth, added a splash of maple syrup for a subtle sweetness that counters the acidity of tomatoes, and let smoked paprika do the heavy lifting for that smoky undertone. I also introduced a touch of lime at the end to brighten everything, and I let the chili rest so the flavors could mingle like old friends. The result? A dish that is not just vegetarian—it is a celebration of plant-based cooking that feels like a hug in a bowl.
And there’s a twist you won’t see in most chili recipes: I tossed in a handful of fresh cilantro right before serving, and I finished the pot with a squeeze of lime to cut through the richness. It’s a little secret that transforms the chili from comforting to refreshing, and it’s the kind of small detail that can turn a good dish into a great one. Let me walk you through every single step—by the end, you’ll wonder how you ever made it any other way.
What Makes This Version Stand Out
Flavor: The combination of smoked paprika, cumin, and a touch of maple syrup creates a complex flavor profile that feels both smoky and subtly sweet, making each bite a revelation.
Texture: The triple bean blend delivers a hearty bite, while the corn kernels add a pleasant pop that keeps the dish from feeling too mushy.
Visual Appeal: The vibrant reds from tomatoes, the bright green of cilantro, and the golden sheen of lime juice give the chili a feast for the eyes.
Convenience: The recipe is simple enough for a weeknight but has depth enough to wow guests at a dinner party.
Versatility: It works as a main course, a topping for baked potatoes, or a filling for tacos, making it a kitchen staple.
Healthfulness: Packed with plant proteins, fiber, and antioxidants, it satisfies both your taste buds and your nutritional goals.
Make‑Ahead Potential: It actually tastes better the next day, so you can prep it in advance and just reheat.
Alright, let's break down exactly what goes into this masterpiece…
Inside the Ingredient List
The Flavor Base
At the heart of this chili is the flavor base: onions, bell peppers, garlic, and tomato paste. Each ingredient adds a layer of depth—onions bring sweetness, peppers add brightness, garlic contributes a punch, and tomato paste gives body. If you skip any of these, the chili will feel flat and one-dimensional. For a subtle twist, try using roasted red peppers instead of raw; they’ll lend a smoky sweetness that complements the spices.
The Texture Crew
The texture crew consists of beans, corn, and the occasional splash of broth. Black beans, kidney beans, and pinto beans each bring their own consistency—black beans are creamy, kidney beans are firm, and pinto beans are a bit more robust. Corn kernels add that satisfying bite that prevents the chili from becoming too mushy. If you’re looking for a dairy-free option, use vegetable broth instead of water; it adds a richer mouthfeel.
The Unexpected Star
Maple syrup is the unexpected star that brings a subtle sweetness, cutting through the acidity of tomatoes and balancing the heat from cumin. It also gives the chili a glossy sheen that’s visually appealing. If you’re not a fan of maple, try a splash of agave nectar or a teaspoon of brown sugar. The key is to add just enough to enhance, not to dominate.
The Final Flourish
The final flourish is lime juice, cilantro, and optional toppings like avocado or vegan cheese. Lime juice brightens everything, making the chili feel fresh rather than heavy. Cilantro adds a herby note that cuts through the richness, while avocado provides a creamy texture that’s a perfect counterpoint to the beans. If you prefer a spicy kick, sprinkle a pinch of cayenne pepper before serving.
Everything's prepped? Good. Let's get into the real action…
The Method — Step by Step
- Heat the olive oil in a large Dutch oven over medium heat until shimmering. Add the diced onion and cook, stirring occasionally, until translucent and slightly caramelized—about 5 minutes. The onion should smell sweet and fragrant, a promise of the depth to come.
- Introduce the bell peppers and garlic, sautéing until the peppers soften and the garlic releases its aroma—roughly 3 minutes. This step is the moment of truth; the colors should brighten, and the mixture should emit a comforting, savory scent.
- Stir in the tomato paste, cumin, smoked paprika, chili powder, oregano, and a pinch of cayenne. Cook for 2 minutes, letting the spices toast and release their oils. This is where the chili’s soul begins to form.
- Add the beans, corn, diced tomatoes, tomato sauce, and vegetable broth. Stir until everything is well combined, then bring the mixture to a gentle boil. Reduce the heat to low, cover, and let it simmer for 25 minutes, stirring occasionally. The flavors will meld like old friends catching up.
- Halfway through the simmer, add the maple syrup, soy sauce, and a splash of lime juice. These ingredients lift the chili, adding brightness and a subtle sweetness that balances the acidity. If you prefer a sweeter profile, add a teaspoon of brown sugar instead.
- After simmering, taste the chili and adjust seasoning—add more salt, pepper, or lime juice as needed. Remember, the chili will thicken as it cools, so a little extra salt now is a good idea. If you like more heat, sprinkle additional cayenne or a dash of hot sauce.
- Remove the pot from heat and let it rest for 10 minutes. This resting period allows the flavors to deepen and the chili to thicken slightly, creating a richer mouthfeel. Think of it as a pause before the grand finale.
- Just before serving, stir in fresh cilantro, a squeeze of lime juice, and a handful of diced avocado if desired. These final touches add a bright, fresh counterpoint to the hearty base. The result is a chili that feels both comforting and invigorating.
- Serve hot, topped with shredded cheese, a dollop of sour cream, or a spoonful of guacamole. Offer lime wedges on the side for guests to squeeze to their liking. The chili should be thick, robust, and ready to be devoured.
That’s it — you did it. But hold on, I've got a few more tricks that'll take this to another level…
Insider Tricks for Flawless Results
The Temperature Rule Nobody Follows
Many cooks think that high heat is the secret to a great chili. In reality, a gentle simmer is key. A slow, low boil allows the beans to soften without breaking apart, and it lets the spices release their flavors gradually. I once tried a high‑heat method and ended up with a watery chili that tasted flat. The next time, I kept the heat low, and the difference was night and day.
Why Your Nose Knows Best
Before you taste the chili, take a deep sniff. If the aroma feels off, something’s wrong—maybe the beans are stale or the spices are old. A fresh, earthy scent is a sign that the ingredients are fresh and the chili will taste great. This simple check saves you from a disappointing dish.
The 5‑Minute Rest That Changes Everything
After you remove the pot from heat, let it rest for 5 minutes. This rest period allows the chili to thicken slightly and the flavors to meld. If you’re in a rush, skip this step and you’ll miss out on that extra depth that comes from the resting time.
Keep It Moist
Chili can dry out if you over‑simmer. If the pot looks dry, splash a little more broth or water. It’s easier to add liquid than to fix a dry chili. A moist chili will coat your spoon like velvet, making each bite a silky experience.
Serve With a Crunch
A handful of crushed tortilla chips or a sprinkle of toasted cornflakes adds a delightful crunch. The contrast between the soft chili and the crunchy topping provides a satisfying texture contrast that makes every bite interesting.
Make It Ahead
Chili tastes even better the next day. The flavors have time to marry, and the chili thickens to a perfect consistency. Store it in an airtight container in the fridge for up to 4 days or freeze for up to 3 months. Reheat on the stove with a splash of water to restore moisture.
Creative Twists and Variations
This recipe is a playground. Here are some of my favorite ways to switch things up:
Mexican Street Chili
Swap the black beans for refried beans and add a handful of diced jalapeños. Top with crumbled cotija cheese and a drizzle of crema. It feels like a taco truck on a plate.
Southwest Breakfast Chili
Serve the chili over a bed of fluffy scrambled eggs, sprinkle with cheddar, and add a side of avocado. It’s a hearty breakfast that keeps you full until lunch.
Hearty Mushroom Chili
Replace the corn with sautéed mushrooms for an earthy, umami punch. Use vegetable broth with mushroom stock for extra depth.
Gluten‑Free Chili
Omit any thickening agents or use a gluten‑free flour blend to thicken. Serve with gluten‑free corn tortillas for a complete meal.
Vegan Chili with Tofu
Cube silken tofu and add it during the last 10 minutes of simmering. The tofu absorbs the spices, adding protein and a silky texture.
Low‑Carb Chili
Drop the corn and reduce the tomato sauce to half. Add more beans and a splash of broth to maintain the liquid consistency.
Storing and Bringing It Back to Life
Fridge Storage
Let the chili cool to room temperature, then transfer it to a sealed container. Store in the fridge for up to 4 days. The flavors will continue to develop, making each reheat a delight.
Freezer Friendly
Place the chili in freezer‑safe bags or containers, leaving a little headspace for expansion. Freeze for up to 3 months. Thaw overnight in the fridge before reheating.
Best Reheating Method
Reheat on the stove over low heat, adding a splash of water or broth to restore moisture. Stir occasionally until the chili is hot throughout. A quick microwave reheat works, but the stovetop preserves the texture better.
Remember to add a tiny splash of water before reheating — it steams back to perfection.