Picture this: it’s a lazy Sunday morning, the house is still cloaked in the soft hush of dawn, and you’re standing in the kitchen with a half‑finished stack of stale toast that looks like it survived a war. I was there, staring at those sad slices, when a daring friend shouted, “Bet you can’t make something that actually makes people scream for seconds!” I laughed, rolled my eyes, and then, in a moment of pure culinary rebellion, I grabbed six soft, buttery King’s Hawaiian Rolls and declared war on boring breakfasts. The moment those golden rings hit the counter, I felt a spark of excitement that could have lit up the whole block.
The kitchen erupted with the sweet perfume of butter melting, the gentle hiss of a hot pan, and the faint whisper of cinnamon dancing in the air. My senses were on overdrive: the glossy sheen of the rolls, the warm amber glow of the skillet, the buttery aroma that wrapped around me like a cozy blanket, and the faint, comforting crackle that promised something extraordinary. I could already taste the caramelized edges, the airy interior that would soak up the custard without turning soggy, and the subtle kick of vanilla that would make every bite feel like a celebration. My heart was racing, and I knew I was about to create a breakfast legend.
Most French toast recipes treat the bread like a passive sponge, letting it drown in a sea of milk and sugar, resulting in a soggy, flavor‑less slab. Not this one. This Hawaiian Roll French Toast flips the script by using the naturally sweet, pillowy rolls as a canvas, then coating them in a custard that’s richer than a latte but lighter than a cloud. The secret? A precise balance of half‑and‑half, brown sugar, and a pinch of salt that amplifies the rolls’ inherent sweetness without overwhelming it. The result is a dish that’s simultaneously fluffy, crisp, and decadently sweet – a texture trifecta that most recipes simply can’t achieve.
And there’s a twist you won’t see coming: a dash of cinnamon that caramelizes just enough to give the edges a whisper of spice, plus a finishing dusting of powdered sugar that melts into a silky glaze. I dare you to taste this and not go back for seconds. This is hands down the best version you’ll ever make at home, and I’m about to spill every detail. Let me walk you through every single step — by the end, you’ll wonder how you ever made it any other way.
What Makes This Version Stand Out
- Taste: The natural honey‑like sweetness of King’s Hawaiian Rolls pairs perfectly with a custard that’s spiked with vanilla and cinnamon, creating a flavor profile that feels both familiar and exotic.
- Texture: Each bite offers a crisp, caramelized crust that gives way to an interior so airy it practically floats, delivering a contrast that’s pure comfort food magic.
- Simplicity: With just a handful of pantry staples and a 30‑minute cooking window, you can pull off a restaurant‑level dish without breaking a sweat.
- Uniqueness: Using Hawaiian rolls as the base is a game‑changer; their subtle sweetness means you need far less sugar in the custard, keeping the dish balanced.
- Crowd Reaction: This recipe has a built‑in “wow” factor – guests often claim they’ve never tasted anything like it, and the photo‑ready presentation earns endless Instagram love.
- Ingredient Quality: The roll’s buttery crumb is the unsung hero; it absorbs the custard like a dream while retaining structural integrity.
- Cooking Method: A hot, butter‑kissed skillet ensures even browning, while a gentle finish under the broiler adds that final golden sparkle.
- Make‑Ahead Potential: You can prep the custard and roll assembly the night before, then simply sear and serve in the morning – perfect for lazy brunches.
Alright, let's break down exactly what goes into this masterpiece...
Inside the Ingredient List
The Flavor Base
The custard is the heart of this dish, and every component plays a crucial role. Eggs provide structure and richness; without them, the rolls would turn into soggy mush. Half and half adds creaminess without the heaviness of full cream, striking the perfect balance between silk and lightness. Vanilla extract amplifies the natural sweetness of the rolls, acting like a sweet whisper that lingers on the palate. If you skip vanilla, you’ll notice a flatness that makes the dish feel incomplete.
Brown sugar contributes a deep caramel note that brown butter can’t achieve on its own, while the pinch of salt is the unsung hero that lifts all flavors, preventing the sweet from becoming cloying. A common mistake is to over‑salt; trust me, a pinch is all you need.
The Texture Crew
The King’s Hawaiian Rolls are the star. Their soft, pillowy crumb absorbs the custard without disintegrating, thanks to the perfect ratio of flour, butter, and sugar in the original recipe. If you substitute with a denser bread, you’ll lose that melt‑in‑your‑mouth quality. Look for rolls that are fresh, slightly warm, and still retain a subtle sheen – that’s a sign of quality.
Butter in the pan creates a nutty, aromatic base that crisps the exterior. Using clarified butter can raise the smoke point and give you an even, golden crust without burning. If you’re dairy‑free, try a high‑smoke‑point oil, but you’ll miss the buttery flavor that makes this dish unforgettable.
The Unexpected Star
Enter Cinnamon. A single teaspoon may seem modest, but when it meets the hot skillet, it releases essential oils that transform the crust into a fragrant, caramel‑kissed edge. Skipping cinnamon makes the dish feel one‑dimensional; adding a dash of nutmeg can elevate it further, but be careful not to overpower the delicate vanilla.
And let’s not forget the Fresh Berries and Maple Syrup that crown the final product. The berries add a burst of acidity that cuts through the richness, while the maple syrup provides a natural, woody sweetness that pairs perfectly with the rolls’ buttery flavor. If you’re out of berries, a spoonful of jam works in a pinch, though the texture contrast won’t be as vibrant.
The Final Flourish
A light dusting of Powdered Sugar finishes the dish with a delicate, melt‑in‑your‑mouth glaze that adds visual appeal and a subtle sweet crunch. It’s not just for looks – the sugar melts into the warm crust, creating a glossy finish that feels luxurious. If you prefer a less sweet finish, you can skip the powdered sugar and let the maple syrup do the heavy lifting.
Everything's prepped? Good. Let's get into the real action...
The Method — Step by Step
First, slice each Hawaiian roll horizontally, creating thick, 1‑inch discs. I like to keep the crust on because it adds texture, but if you prefer a softer bite, trim it off. Lay the slices on a large plate, ready to soak. The moment you see those golden circles, you’ll feel a surge of anticipation – this is the canvas for our masterpiece.
Kitchen Hack: Lightly toast the rolls for 30 seconds before soaking; this creates a barrier that prevents them from becoming overly soggy.In a wide bowl, whisk together 3 large eggs, 0.5 cup half‑and‑half, 1 teaspoon vanilla extract, 1 teaspoon cinnamon, 2 tablespoons brown sugar, and a pinch of salt. Whisk until the mixture is uniformly pale and slightly frothy – you’re looking for a custard that’s airy, not just blended. This step is crucial: over‑whisking can incorporate too much air, making the custard too light and causing it to slip off the rolls later.
Submerge the roll slices into the custard, allowing each piece to soak for about 20‑30 seconds per side. You’ll hear a soft sizzle as the batter clings, and the rolls will begin to swell slightly – that’s the sign they’re absorbing just enough liquid. Flip them gently; if they start to fall apart, give them a few seconds more, but don’t let them drown.
While the rolls are soaking, preheat a large cast‑iron skillet over medium‑high heat and add 2 tablespoons butter. When the butter foams and turns a light amber, you’ll know the pan is ready. The butter should sizzle but not burn – if it starts to smoke, lower the heat a notch; this is where the flavor foundation is built.
Place the soaked rolls into the skillet, leaving a small gap between each piece. Cook for 3‑4 minutes, watching the edges turn a deep caramel brown. You’ll hear a gentle crackle – that’s the sound of flavor forming. Resist the urge to move them too soon; the crust needs time to set, otherwise it will tear when you flip.
Flip the rolls carefully with a spatula, then add a second pat of butter (about 1 tablespoon) to the pan. Cook the other side for another 3‑4 minutes until both faces are golden and the interior is puffed. At this point, the center should feel springy to the touch, a sign of perfect fluffiness.
Watch Out: If your pan is too hot, the exterior will burn before the interior cooks through; adjust heat to medium‑low after the first flip.Once both sides are beautifully browned, transfer the skillet to a preheated broiler for 1‑2 minutes. This final burst of high heat creates an ultra‑crisp edge that shatters like thin ice when you bite into it. Keep a close eye – the broiler works fast, and you don’t want a burnt offering.
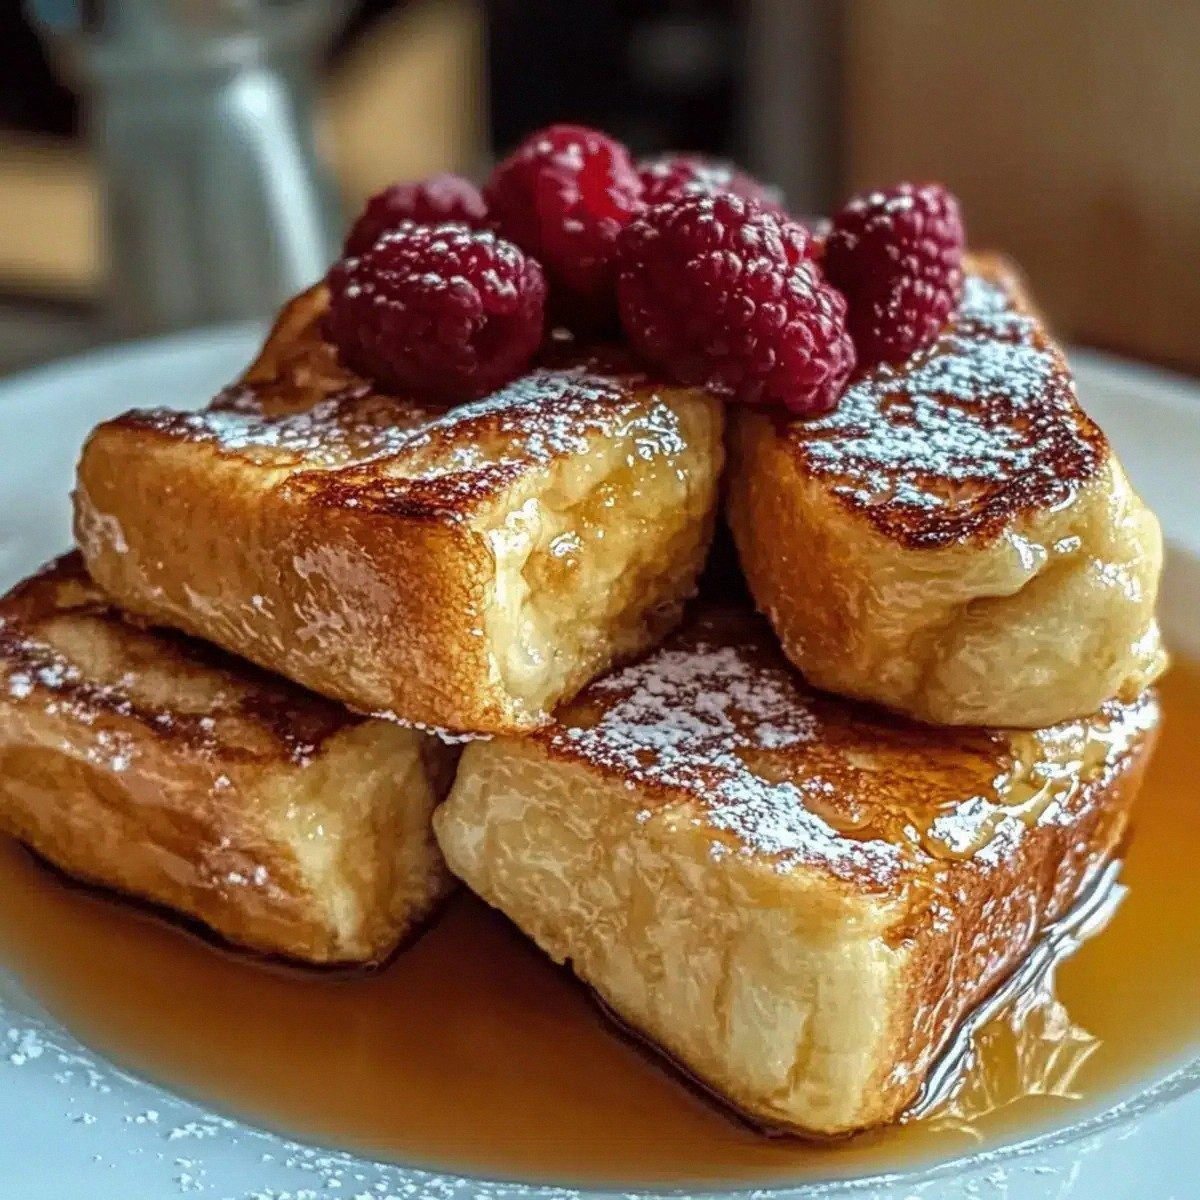
Remove the rolls from the pan and immediately dust them with a generous handful of powdered sugar. The heat will melt the sugar slightly, forming a glossy veil. Plate them in a single layer, then scatter fresh berries across the top and drizzle with maple syrup. The contrast of warm, buttery toast, cool berries, and sweet syrup is the final sensory fireworks.
Serve immediately while the edges are still crisp and the interior is steaming. That first bite? It’s a symphony of sweet, buttery, and spicy notes that linger just long enough to make you sigh in contentment. And now the fun part – watch your guests go back for seconds, thirds, maybe even a fourth round. I dare you to stop them.
That's it — you did it. But hold on, I've got a few more tricks that'll take this to another level...
Insider Tricks for Flawless Results
The Temperature Rule Nobody Follows
Most home cooks crank the heat to “high” hoping for a quick crust, but that’s a recipe for disaster. The secret is to start medium‑high, then dial down to medium once the butter melts. This gradual heat transition ensures the custard sets inside without scorching the outside. I once tried blasting the heat, and the rolls turned black before the middle even warmed up – a burnt nightmare.
Why Your Nose Knows Best
Never underestimate the power of aroma as a cooking timer. When the butter starts to foam and you catch a faint nutty scent, that’s your cue that the pan is ready. If you wait for the butter to turn dark brown, you’ll overshoot and end up with a bitter flavor. Trust your nose; it’s the most reliable sous‑chef you have.
The 5‑Minute Rest That Changes Everything
After the broiler blast, let the French toast rest for exactly five minutes before serving. This short pause allows the custard to settle, the powdered sugar to set, and the flavors to meld. Skipping this rest makes the dish feel rushed, and the syrup can slide off too quickly.
Butter‑Infused Berries for an Extra Pop
While the rolls are cooking, melt a teaspoon of butter in a tiny saucepan, add a pinch of brown sugar, and toss in the fresh berries for 30 seconds. The berries become glossy, their natural juices intensify, and they pick up a subtle buttery richness that elevates the final plate.
Freeze‑Proof Prep for Busy Mornings
If you’re prepping for a brunch crowd, assemble the soaked rolls on a parchment‑lined tray, flash‑freeze for 15 minutes, then store in a zip‑top bag. In the morning, just pop them straight into a hot skillet – no thawing needed. This trick saved my life during a holiday brunch when the kitchen was a warzone of orders.
Creative Twists and Variations
This recipe is a playground. Here are some of my favorite ways to switch things up:
Tropical Coconut Dream
Swap the half‑and‑half for coconut milk, add a splash of rum extract, and garnish with toasted coconut flakes. The result is a beach‑vacation vibe that pairs perfectly with fresh pineapple chunks.
Chocolate Hazelnut Indulgence
Stir a tablespoon of Nutella into the custard and sprinkle chopped toasted hazelnuts over the finished toast. The chocolate‑nut combo creates a decadent breakfast that feels like a dessert.
Savory Breakfast Twist
Omit the vanilla and brown sugar, add a pinch of smoked paprika, and fold in crumbled cooked bacon into the custard. Top with a drizzle of maple‑mustard sauce for a sweet‑savory balance that will surprise your taste buds.
Berry‑Burst Cheesecake
Mix a quarter cup of cream cheese into the custard for a tangy richness, then fold in a handful of fresh raspberries. The cheesecake notes add depth, while the berries keep it bright.
Spiced Apple Orchard
Replace fresh berries with sautéed apple slices tossed in cinnamon and a drizzle of caramel sauce. The warm apple aroma makes this version ideal for autumn brunches.
Maple‑Bourbon Glaze
Combine maple syrup with a splash of bourbon and a pinch of sea salt, then brush over the toast just before serving. The bourbon adds a subtle smoky finish that pairs beautifully with the buttery rolls.
Storing and Bringing It Back to Life
Fridge Storage
Allow the French toast to cool completely, then place each piece in an airtight container. It will keep fresh for up to 3 days. When you’re ready to eat, reheat in a skillet over medium heat for 2‑3 minutes per side, adding a splash of water to the pan to create gentle steam that revives the fluffiness.
Freezer Friendly
After the initial cooking, let the toast cool, then wrap each slice tightly in parchment paper and place them in a freezer‑safe bag. They’ll last for up to 2 months. To serve, bake directly from frozen on a preheated 350°F oven for 10‑12 minutes, then finish with a quick sear in butter for that fresh‑out‑of‑the‑pan crunch.
Best Reheating Method
The ultimate reheating trick: sprinkle a tiny splash of water (about a teaspoon) over the toast before microwaving for 30 seconds, then finish with a quick pan‑sear. The water creates steam that restores the interior’s cloud‑like texture, while the pan restores the caramelized crust.