I was in the middle of a midnight snack crisis, staring at a tub of plain Greek yogurt that looked as exciting as a blank spreadsheet. My roommate dared me to turn that boring white canvas into something that would make even a candy store jealous, and I accepted without hesitation. The kitchen turned into a battlefield of clanging bowls, the hum of the freezer, and the faint whisper of a protein shake shaker trying to keep up. The moment the peanut butter hit the yogurt, it was like a jazz solo—smooth, unexpected, and absolutely addictive. Let me walk you through every single step — by the end, you'll wonder how you ever made it any other way.
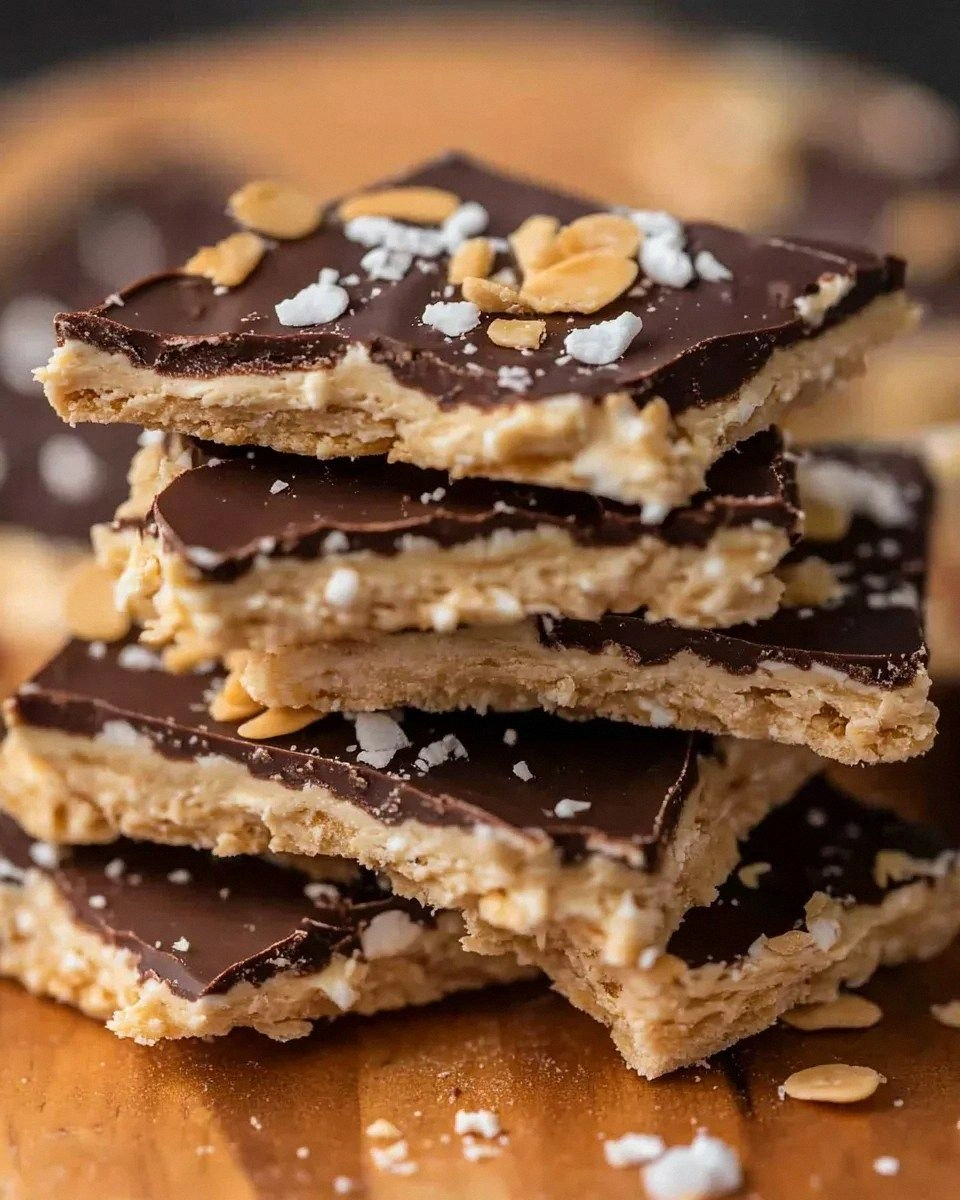
Picture this: a tray sliding out of the freezer, the surface glistening like a frost‑kissed lake at dawn, and the aroma of vanilla and chocolate swirling together in a sweet, nutty embrace. You’ll hear the faint crackle of chocolate chips as they melt just enough to cling to the creamy base, and you’ll feel the chill of the bark against your fingertips, like holding a piece of winter in your palm. The taste? Imagine a Greek yogurt parfait that decided to throw a party with peanut butter, protein powder, and a drizzle of honey, all crowned with a salty crunch that sings louder than a choir of angels. The texture is a delightful contradiction: the smooth, tangy creaminess of the yogurt juxtaposed with the snap of dark chocolate and the delicate crumble of sea‑salt flakes.
Most frozen yogurt bark recipes get this completely wrong—they either drown the yogurt in sugar or forget the crucial step of tempering the chocolate, leaving you with a soggy mess that slides off the tray like a bad haircut. This version stands out because I’ve dialed in the perfect balance of protein, healthy fats, and just enough sweetness to satisfy cravings without sending your blood sugar on a roller coaster. The secret weapon? A splash of vanilla protein powder that thickens the base while adding a subtle, creamy depth that you won’t find in any store‑bought version. And that pinch of flaked sea salt? It’s the finishing touch that makes each bite feel like a luxurious dessert and a smart snack rolled into one.
I’m about to drop a technique that will change the way you think about frozen desserts forever: the “quick‑chill” method. Instead of waiting for hours for the bark to set, you’ll use a pre‑chilled baking sheet and a blast of freezer air to lock in texture and flavor in under 30 minutes. I dare you to taste this and not go back for seconds, because once you’ve experienced the crisp‑edge, creamy‑center contrast, ordinary ice cream will feel like a bland afterthought. Okay, ready for the game‑changer? Let’s dive into the details.
What Makes This Version Stand Out
- Protein‑Packed: The vanilla protein powder not only boosts the nutritional profile but also gives the yogurt a velvety thickness that prevents icy crystals from forming.
- Healthy Fat Balance: Peanut butter adds a buttery richness and satiety factor, making each bite feel indulgent without the guilt.
- Texture Symphony: Creamy base meets crunchy chocolate chips and flaky sea salt, creating a mouthfeel that’s both smooth and exciting.
- Simplicity: Only seven ingredients, all pantry‑friendly, and no fancy equipment beyond a freezer‑safe tray.
- Flavor Depth: The subtle vanilla extract and maple syrup (or honey) round out the flavor, adding a natural sweetness that sings.
- Crowd‑Pleaser: Kids love the chocolate, adults appreciate the protein boost, and everyone admires the glossy finish.
- Make‑Ahead Magic: Store in the freezer for up to two weeks; the bark stays crisp and delicious, ready for a quick snack.
- Visual Wow Factor: The contrast of white yogurt, dark chocolate, and glimmering sea salt looks as good as it tastes.
Inside the Ingredient List
The Flavor Base
Plain Greek yogurt is the canvas, offering a tangy backdrop that balances the richness of peanut butter and chocolate. It’s high in protein, which means the bark will stay satisfying longer than a typical sugary treat. If you skip the yogurt, you’ll lose that creamy tang and the bark will become a dry, crumbly mess that can’t hold the chocolate chips.
The Texture Crew
Peanut butter is the star of the texture crew, providing a luscious, nutty mouthfeel that coats the yogurt like velvet. Choose a natural, unsweetened variety to keep the sugar count low; if you love a bit of crunch, stir in some chopped peanuts after spreading the base. Swapping it for almond butter works, but expect a slightly lighter flavor profile.
The Unexpected Star
Vanilla protein powder is the secret weapon that turns a simple snack into a post‑workout powerhouse. It thickens the yogurt, preventing ice crystals, and adds a subtle vanilla note that elevates the overall taste. If you’re dairy‑free, a plant‑based vanilla protein works just as well, though the texture may be a touch thinner.
The Final Flourish
Dark chocolate chips and flaked sea salt are the finishing touches that make this bark unforgettable. The chocolate adds a bittersweet snap that contrasts with the creamy base, while the sea salt amplifies every flavor, making the sweet taste pop. If you’re avoiding chocolate, try crushed cacao nibs for a less sweet, more antioxidant‑rich alternative.
Everything's prepped? Good. Let's get into the real action...
The Method — Step by Step
Start by gathering a large mixing bowl, a sturdy whisk, and a 12‑inch parchment‑lined baking sheet. The parchment prevents sticking and makes removal a breeze, so you won’t have to wrestle with a frozen slab. I always set the sheet on a cooling rack inside the freezer for an extra‑cold surface; this is the “quick‑chill” trick that cuts set time in half. The moment you place the parchment, you’ll hear a faint “whoosh” as the cold air rushes over it—pure magic.
Kitchen Hack: Freeze the mixing bowl for 5 minutes before whisking; the cold bowl helps keep the yogurt mixture from warming up.In the chilled bowl, combine 1 cup of plain Greek yogurt with ¾ cup of natural peanut butter. Whisk vigorously until the mixture becomes a uniform, glossy swirl—think marble cake but without the sugar. This is the moment of truth; if you see streaks of peanut butter, keep whisking until they dissolve completely. The aroma will shift from tangy to nutty, a clear sign you’re on the right track.
Add ¼ cup of vanilla protein powder, ¼ teaspoon of vanilla extract, and 1‑2 tablespoons of maple syrup or honey. The sweetener should be added gradually, tasting as you go to avoid over‑sweetening. The mixture will thicken noticeably, coating the whisk like a silky ribbon. If the batter feels too stiff, splash in a teaspoon of cold water—just enough to loosen it without making it runny.
Give the blend one final whisk to ensure everything is fully incorporated. The texture should be thick enough to spread with a spatula but still fluid enough to glide across the parchment. At this point, you can taste a tiny spoonful; it should feel creamy, slightly sweet, and have a faint vanilla perfume. If it’s too thick, a quick stir with a warm (not hot) spoon can help, but remember—every extra heat risks forming ice crystals later.
Spread the yogurt mixture onto the parchment in an even layer, about ¼‑inch thick. Use a silicone spatula to smooth it out, creating a uniform surface that will freeze evenly. The edges should be slightly thinner; they’ll crisp up faster, giving you that satisfying snap when you break a piece. While you’re spreading, imagine the final product: a glossy white sheet studded with dark chocolate islands.
Now, melt the dark chocolate chips in a microwave or double‑boiler, stirring every 20 seconds until smooth. Once melted, drizzle or pipe the chocolate over the yogurt base, creating random swirls or a deliberate lattice—your artistic choice. The chocolate should be glossy and fluid, not grainy; if it looks dull, add a teaspoon of coconut oil to restore shine.
Watch Out: Over‑heating chocolate can cause it to seize; keep the temperature low and stir constantly.Sprinkle 1 cup of dark chocolate chips over the drizzled surface, allowing them to sink slightly into the still‑soft yogurt. This creates pockets of molten chocolate that, once frozen, become crunchy gems. Then, liberally dust flaked sea salt over the entire bark; the salt crystals will cling to the chocolate and the yogurt, offering a salty crunch that balances the sweetness.
Slide the prepared sheet into the pre‑chilled freezer. Set a timer for 25‑30 minutes; the bark should be firm to the touch but not rock‑hard. You’ll know it’s ready when the chocolate has set and the edges pull away cleanly from the parchment. If you tap the surface, you should hear a faint “ping” like a frozen lake.
Remove the bark from the freezer and let it sit at room temperature for 2‑3 minutes. This short rest prevents the bark from cracking when you break it. Using the parchment edges, gently lift the entire slab onto a cutting board. With a sharp chef’s knife warmed under hot water, cut the bark into bite‑size rectangles or shards—whatever feels fun.
Transfer the pieces into an airtight container or zip‑lock bag, separating layers with parchment to avoid sticking. Store them in the freezer for up to two weeks. When you’re ready to indulge, let a piece sit for a minute to soften just enough for a perfect bite. And there you have it—guilt‑free, protein‑packed, chocolate‑studded frozen Greek yogurt bark that will make you the snack hero of any gathering.
That's it — you did it. But hold on, I've got a few more tricks that'll take this to another level. Keep reading for insider tips that will make every batch even more impressive, and you’ll never settle for a mediocre snack again.
Insider Tricks for Flawless Results
The Temperature Rule Nobody Follows
Never let the yogurt sit at room temperature for more than five minutes before it hits the freezer. The longer it stays warm, the more ice crystals will form, turning your bark into a frosty brick. I once left the mixture out while I answered a phone call, and the result was a grainy texture that no amount of chocolate could mask. Keep the bowl chilled, and you’ll get that silky, melt‑in‑your‑mouth consistency every single time.
Why Your Nose Knows Best
Before you even taste the bark, trust the aroma. When the chocolate chips are melting, a fragrant, buttery scent should fill the kitchen; if you smell a burnt or metallic note, the chocolate is overheating. This sensory checkpoint saves you from a ruined batch and teaches you to rely on your senses, not just timers. I’ve learned that my nose can detect a problem a full minute before my eyes notice any visual cue.
The 5‑Minute Rest That Changes Everything
After you pull the bark from the freezer, give it a brief 2‑3 minute rest on the counter. This short pause allows the outer layer to soften just enough for clean cuts, while the interior stays firm. Skipping this step means you’ll be fighting a rock‑hard slab that shatters into uneven shards. Trust me, those perfect, uniform pieces make the presentation look professional and boost the eating experience.
Layering the Chocolate for Depth
Instead of a single drizzle, try a two‑step chocolate layering: first, drizzle a thin line of melted chocolate, then sprinkle chips, and finish with a second drizzle. This creates a “marbled” effect that not only looks stunning but also ensures every bite gets a hit of chocolate. One friend tried a single drizzle and complained the chocolate was too sparse—don’t make the same mistake.
Freezer‑Friendly Storage Secrets
When storing, separate each layer of bark with parchment or wax paper. This prevents pieces from sticking together and makes it easy to grab a single portion without thawing the whole batch. Also, label the container with the date; even though the bark stays good for two weeks, a quick glance will remind you to enjoy it before the flavor fades. A tiny splash of water before reheating can bring back that fresh‑out‑the‑freezer snap.
Creative Twists and Variations
This recipe is a playground. Here are some of my favorite ways to switch things up:
Berry Burst
Swap the vanilla protein powder for an unflavored whey and fold in a handful of fresh raspberries or blueberries before freezing. The berries add a burst of tartness that contrasts beautifully with the sweet chocolate, and the antioxidants give you an extra health boost. Perfect for a summer brunch or a post‑run snack.
Coconut Crunch
Replace half of the peanut butter with coconut butter and sprinkle toasted coconut flakes on top instead of sea salt. The tropical flavor transports you to a beachside cabana, and the added crunch makes each bite feel like a mini‑dessert bar. Ideal for fans of coconut water and island vibes.
Espresso Edge
Add a teaspoon of instant espresso powder to the yogurt mixture and drizzle a thin line of dark chocolate infused with a shot of espresso. The coffee notes deepen the chocolate flavor, turning the bark into a sophisticated after‑dinner treat. Great for those who love a mocha kick without the added sugar.
Nutty Delight
Fold in chopped almonds, walnuts, or pistachios into the base before spreading. The nuts add a buttery crunch that complements the creamy yogurt and the chocolate chips, creating a multi‑textured experience. If you’re allergic to peanuts, this variation is a safe and tasty alternative.
Spicy Sweet
Mix a pinch of cayenne pepper or smoked paprika into the yogurt mixture and finish with a drizzle of honey instead of maple syrup. The subtle heat pairs with the dark chocolate for a surprising flavor twist that will wow anyone who loves a little fire in their dessert.
Storing and Bringing It Back to Life
Fridge Storage
If you plan to eat the bark within three days, transfer it to an airtight container and keep it in the refrigerator. The texture will stay firm but slightly softer than freezer‑stored bark, making it easier to bite into without a tooth‑crack. Remember to keep the container sealed to prevent freezer burn‑like dryness.
Freezer Friendly
For longer storage, wrap the parchment‑lined sheet tightly in plastic wrap before placing it in a zip‑lock bag. This double‑layer protection guards against freezer burn and keeps the bark fresh for up to two weeks. When you’re ready to serve, simply pull out a piece and let it sit for a minute; the outer layer will soften just enough for a perfect bite.
Best Reheating Method
To revive that crisp‑edge, place a single piece on a microwave‑safe plate, sprinkle a few drops of water around the edges, and microwave for 5‑7 seconds. The steam created by the water re‑hydrates the yogurt surface without melting the chocolate, restoring the original snap. Avoid using a conventional oven, as it can melt the chocolate unevenly and make the bark soggy.