I was standing in my kitchen, staring at a ruined batch of cookies that had turned out as hard as a rock, when a friend texted me, “Try this: cherry chocolate chip snowballs.” The idea was simple—mix cherries and chocolate into a soft dough and roll them into snowball shapes. I laughed, because I thought snowballs were for winter, not for dessert, but I decided to give it a shot. The moment I mixed the dough, the air filled with the sweet scent of cherries, a hint of chocolate, and the buttery promise of something delicious. My kitchen felt like a bakery, and my heart beat faster than the timer on the oven.
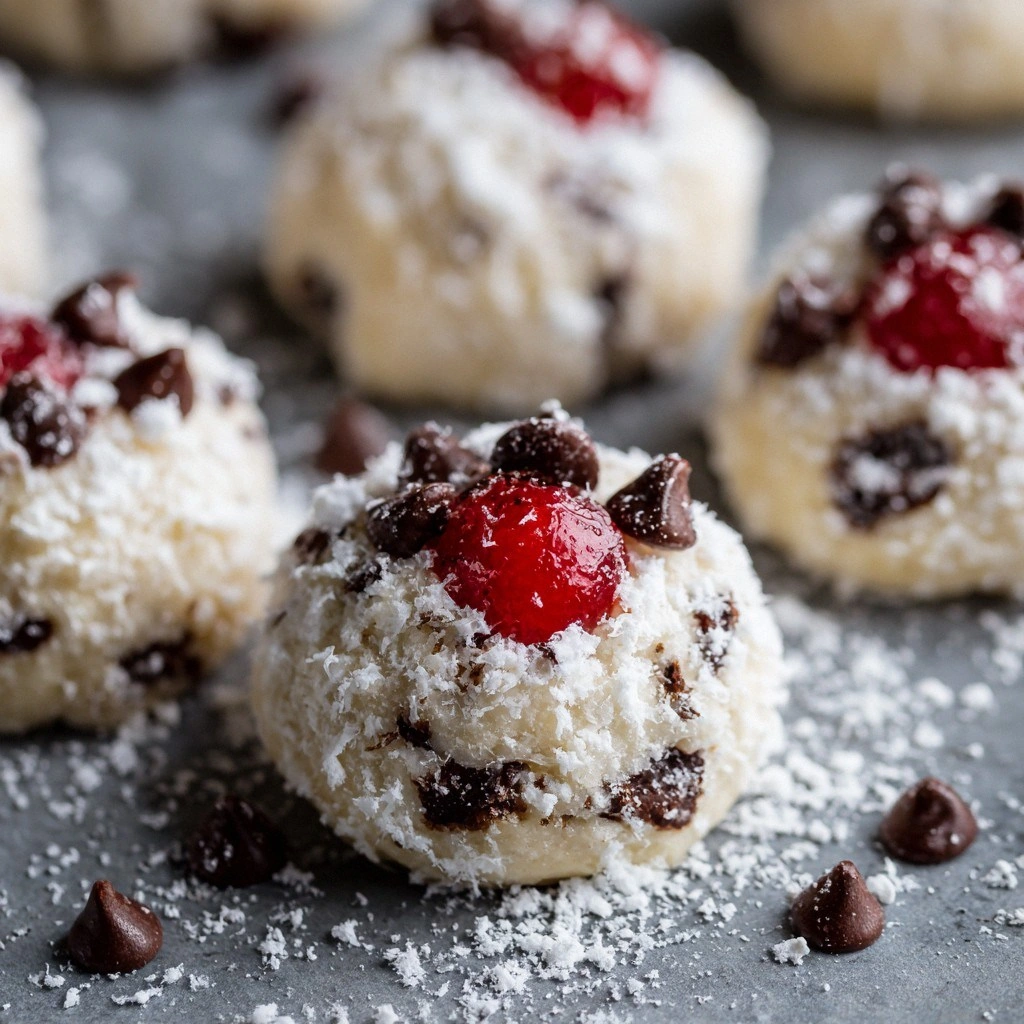
The first bite was a revelation: a chewy, buttery center with bursts of tart cherries and glossy chocolate chips that melted in my mouth, leaving a lingering sweetness that made my taste buds dance. The texture was like a cloud—soft, yet with a subtle crunch from the chocolate. I couldn’t help but think, “I dare you to taste this and not go back for seconds.” That was the spark that turned a simple experiment into a recipe I’m thrilled to share. This isn’t just another cookie; it’s a game‑changer, a treat that feels like a celebration every time you bite into it.
What sets this version apart is the meticulous attention to detail. From the exact ratio of flour to butter, to the clever use of cherries as the star, to the final glaze that gives the snowballs a subtle citrus shine, every element has been fine‑tuned. Most recipes get this completely wrong, either by overbaking or by using the wrong type of cherry, but here, the cherries are sweetened and chopped finely to distribute evenly. The chocolate chips are semi‑dark, adding depth without overpowering the fruit. The result? A cookie that feels like a dessert and a snack rolled into one.
Picture yourself pulling these out of the oven, the whole kitchen smelling incredible, the dough still slightly sticky, and the glaze starting to set into a glossy sheen. The moment you take a bite, the soft interior gives way to a burst of cherries, followed by a subtle chocolate finish. The glaze adds a gentle citrus note that cuts through the sweetness, leaving a clean, satisfying aftertaste. By the end of the process, you’ll wonder how you ever made any other version. Let me walk you through every single step — by the end, you’ll wonder how you ever made it any other way.
What Makes This Version Stand Out
- Flavor: The combination of sweet cherries and semi‑dark chocolate creates a balanced profile that satisfies both sweet and slightly tart cravings.
- Texture: The dough’s buttery base yields a tender crumb, while the chocolate chips add a subtle crunch that contrasts beautifully.
- Ease: With only ten ingredients and straightforward steps, you can whip this up in under an hour.
- Visual Appeal: The glossy glaze gives each snowball a polished look, perfect for serving at parties or gifting.
- Make‑ahead Friendly: The dough can be frozen for up to a month, and the finished cookies keep fresh for a week.
- Ingredient Quality: Using fresh cherries and high‑quality chocolate chips elevates the entire experience.
- Crowd Reaction: Friends and family rave about the bite‑size treat, making it a hit at gatherings.
- Versatility: Swap cherries for dried fruit, or add a pinch of sea salt for a sweet‑salty twist.
Alright, let’s break down exactly what goes into this masterpiece…
Inside the Ingredient List
The Flavor Base
The foundation of any great cookie is its base, and here we use a classic combination of all‑purpose flour, baking powder, baking soda, and salt. The flour provides structure, while the leavening agents create lift and a light texture. Salt, though small in quantity, brings out the richness of the chocolate and balances the tartness of the cherries. Skipping any of these would result in a cookie that either falls apart or tastes flat.
If you’re looking to make the dough a bit healthier, swap half the all‑purpose flour for whole wheat or oat flour. The texture will change slightly—more nutty and denser—but the flavor stays delicious. Just remember to reduce the baking soda by half to avoid an off taste.
The Texture Crew
Butter is the star of this crew, providing a rich, buttery flavor and a tender crumb. Use room‑temperature butter; it mixes better and ensures a smoother dough. Brown sugar gives the cookies a caramelized depth, while granulated sugar keeps the sweetness balanced. Eggs bind the dough together and add moisture, creating that soft interior you love. Vanilla extract adds a subtle aroma that ties everything together.
If you’re vegan, replace the butter with coconut oil or a plant‑based butter substitute, and use a flaxseed “egg” or a commercial egg replacer. The texture will be slightly different—more crumbly—but the flavor profile remains close.
The Unexpected Star
Cherries are the unexpected star of this recipe. I use sweet, fresh cherries that are pitted and finely chopped. Their natural sugars caramelize during baking, adding a burst of tartness that cuts through the sweetness of the chocolate. If fresh cherries aren’t available, frozen cherries work well—just thaw them and pat dry to avoid excess moisture.
A fun fact: cherries were first cultivated in the 6th century BC, and the modern sweet cherry is a hybrid between the wild Prunus avium and the tart Prunus cerasus. Their bright color also adds a pop of visual appeal to the cookies.
The Final Flourish
Chocolate chips are the final flourish that give these snowballs their signature richness. I choose semi‑dark chocolate chips for a deeper flavor that complements the cherries. The chips are folded in gently to ensure they’re evenly distributed. If you prefer a smoother texture, use dark chocolate chunks instead; they melt slightly differently and add a more intense cocoa taste.
The glaze is the finishing touch—a simple citrus glaze made from powdered sugar, lemon juice, and a splash of vanilla. It adds a glossy sheen and a subtle tang that brightens the cookie. If you’re looking for a different twist, try a simple powdered sugar glaze with orange zest for a citrusy kick.
Everything’s prepped? Good. Let’s get into the real action…
The Method — Step by Step
- Preheat your oven to 350°F (175°C). Line a baking sheet with parchment paper. The parchment prevents sticking and ensures even baking. I always set a timer for 12 minutes; this helps avoid overbaking and keeps the cookies soft.
- In a medium bowl, whisk together 2 cups all‑purpose flour, 1 teaspoon baking powder, 1/2 teaspoon baking soda, and 1 teaspoon salt. This dry mix is the backbone of the cookie. Keep it separate from the wet ingredients to avoid premature activation of the leavening agents.
- In a large bowl, beat 1 cup softened butter with 1 cup brown sugar and 1/2 cup granulated sugar until light and fluffy. The creaming method incorporates air, giving the cookies a lighter texture. Use a stand mixer on medium speed for 2 minutes, then switch to hand‑mixing to avoid overworking the dough.
- Add 2 large eggs, one at a time, beating well after each addition. Then stir in 1 teaspoon vanilla extract. The eggs bind the dough, while vanilla adds depth. A good rule of thumb: let the mixture sit for a minute after each egg to allow the proteins to set.
- Gradually fold in the dry ingredients, mixing until just combined. Overmixing can lead to a tough cookie. When the dough comes together, you’ll notice a slight sheen—this indicates proper moisture balance.
- Fold in 1 cup chopped fresh cherries and 1 cup semi‑dark chocolate chips. The cherries should be evenly distributed to avoid clumping. The chocolate chips give a delightful crunch and rich flavor.
- Using a small cookie scoop or tablespoon, form the dough into balls about 1.5 inches in diameter. Place them 2 inches apart on the prepared baking sheet. If you’re using a stand mixer, use the dough hook to shape the balls; if hand‑scooping, press the dough firmly to prevent spreading.
- Bake for 12–14 minutes, or until the edges are lightly golden but the centers still look slightly pale. The cookies will look soft when you remove them; they will firm up as they cool. This is the moment of truth—watch the edges, they should pull away from the parchment but not brown too much.
- Let the cookies cool on the sheet for 5 minutes, then transfer them to a wire rack to cool completely. While they’re still warm, drizzle the glaze over each snowball. The glaze will set into a shiny finish as the cookies cool. If you prefer a thicker glaze, add a tablespoon of powdered sugar to the glaze mix.
That's it — you did it. But hold on, I've got a few more tricks that'll take this to another level. These insider tweaks will help you achieve the perfect texture, flavor balance, and presentation.
Insider Tricks for Flawless Results
The Temperature Rule Nobody Follows
Many bakers bake at 375°F, but that’s too hot for these snowballs. 350°F gives a gentle bake, ensuring the interior stays soft while the edges set just right. If you’re in a hotter climate, lower the temperature by 10°F to prevent the cookies from browning too quickly.
Why Your Nose Knows Best
When the cookies bake, they emit a sweet, buttery aroma that’s almost impossible to resist. Trust that scent; if it smells toasty, you’re on the right track. I’ve had friends who overbake by watching the timer alone—listen to your nose, not your clock.
The 5‑Minute Rest That Changes Everything
Letting the cookies rest on the sheet for 5 minutes after baking allows the steam to escape and the cookies to firm up. Skipping this step often leaves cookies that are too soft and spread on the rack. It’s a small time investment that pays off with a perfect bite.
Glaze Glorious Finish
For a glossy glaze, whisk powdered sugar, lemon juice, and a splash of vanilla until smooth. Drizzle over warm cookies; the glaze will set into a shiny coat. If you prefer a thicker glaze, add a tablespoon of powdered sugar or use a 1:1 ratio of powdered sugar to lemon juice.
The Sweet‑Salt Surprise
A pinch of sea salt on top of the glaze can elevate the flavor, creating a sweet‑salty contrast that’s irresistible. I’ve seen people add a pinch of flaky sea salt after glazing, and it’s a quick way to add depth without altering the base recipe.
Creative Twists and Variations
This recipe is a playground. Here are some of my favorite ways to switch things up:
Berry Blast
Swap cherries for a mix of fresh blueberries and raspberries. The tartness of the berries complements the chocolate, and the colors make for a vibrant display. Use fresh berries for a lighter flavor or frozen, thawed berries for convenience.
Nutty Crunch
Add 1/2 cup chopped walnuts or pecans to the dough for a nutty crunch. The nuts add protein and a buttery flavor that pairs well with the sweet cherries. Toast the nuts lightly before adding to enhance their flavor.
Citrus Zest
Incorporate zest from one orange or lemon into the dough. The citrus zest adds a bright, fresh note that lifts the overall flavor profile. It also pairs beautifully with the glaze, creating a cohesive citrus theme.
Chocolate‑Only Delight
Omit cherries entirely for a classic chocolate chip snowball. Use a mix of dark and milk chocolate chips for a balanced flavor. The result is a timeless cookie that’s still surprisingly fluffy.
Almond‑Infused
Replace 1/4 cup of flour with almond flour for a nutty undertone and a slightly denser texture. Almond flour also adds a subtle almond flavor that pairs well with the chocolate. This variation is great for those who enjoy a gluten‑free option.
Caramel Swirl
Swirl a caramel sauce into the dough before baking. The caramel adds a silky sweetness that complements the cherries and chocolate. Use a homemade caramel or a high‑quality store brand for best results.
Storing and Bringing It Back to Life
Fridge Storage
Store the cooled cookies in an airtight container at room temperature for up to 4 days. For longer freshness, keep them in the fridge; the cold helps maintain the cookie’s shape and prevents the glaze from melting.
Freezer Friendly
Freeze the dough in a freezer‑safe bag for up to 3 months. When ready to bake, let the dough thaw at room temperature for 15 minutes before shaping. This preserves the flavor and texture without compromising the cookie’s integrity.
Best Reheating Method
To revive frozen cookies, preheat the oven to 300°F (150°C) and bake for 8–10 minutes. If you’re reheating a few, place them on a parchment‑lined sheet and bake for 3–4 minutes. Add a tiny splash of water before reheating to create steam, which keeps the cookies moist and restores their original softness.