I was standing in my kitchen at 6 a.m., half‑asleep, staring at a bowl of soggy oatmeal that had been reheated for the third time that week. The bland, mushy texture was a betrayal of everything I love about breakfast, and I swore I’d never settle for another bite of that disappointment. Then, out of sheer desperation (and a dare from my roommate who claimed “nothing can beat a good muffin”), I grabbed a handful of apples, a splash of maple syrup, and a pinch of cinnamon, and tossed them into the oven. The result was an instant epiphany: a warm, portable cup of breakfast that felt like a hug in a mug.
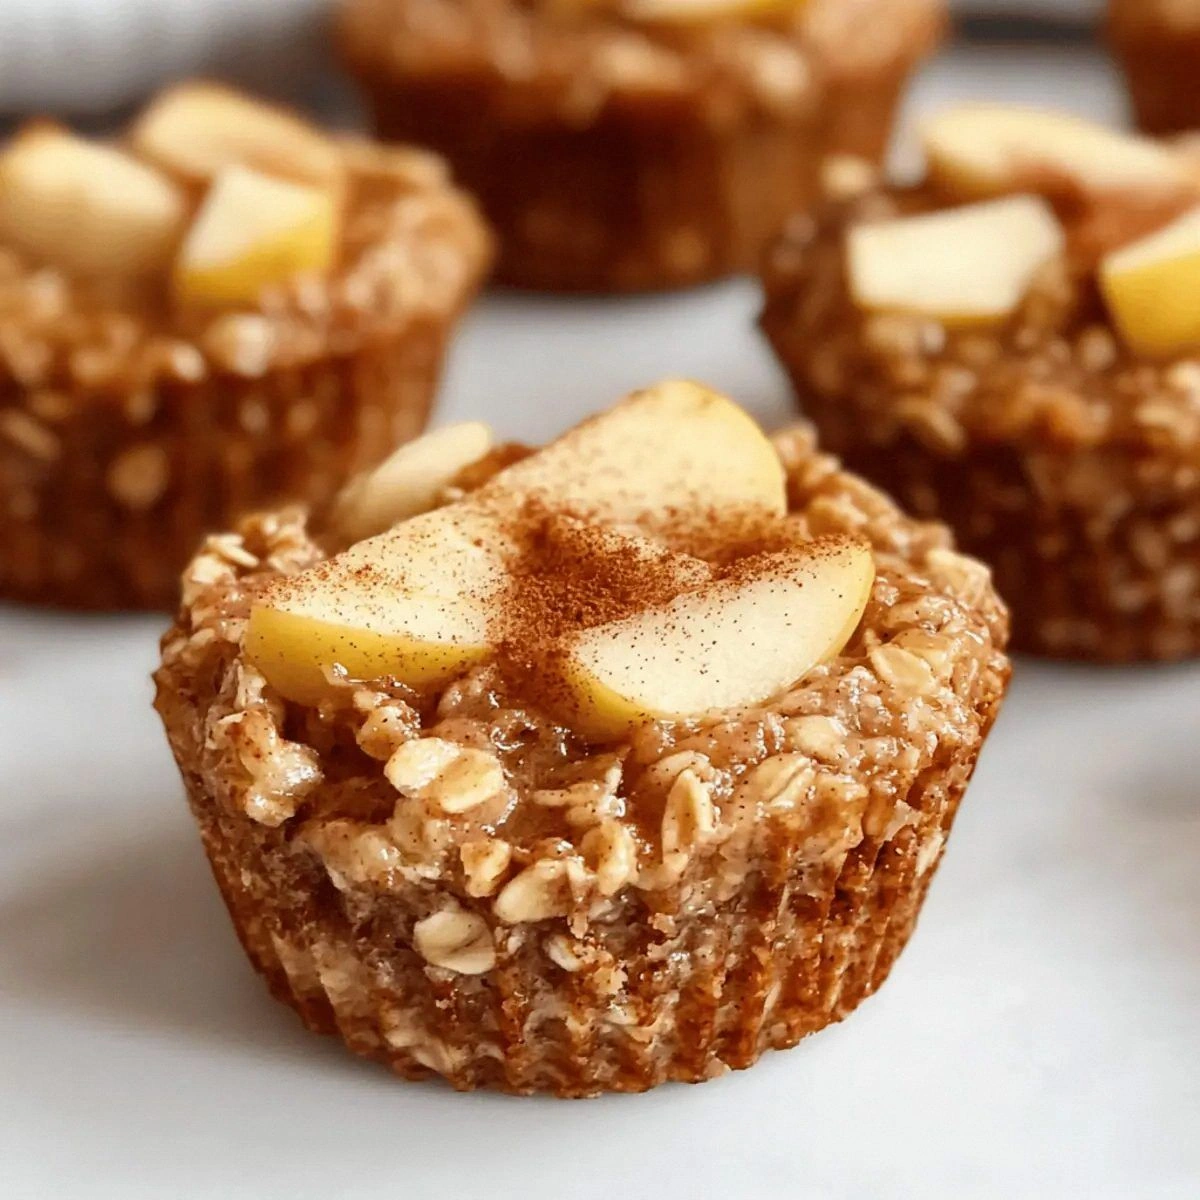
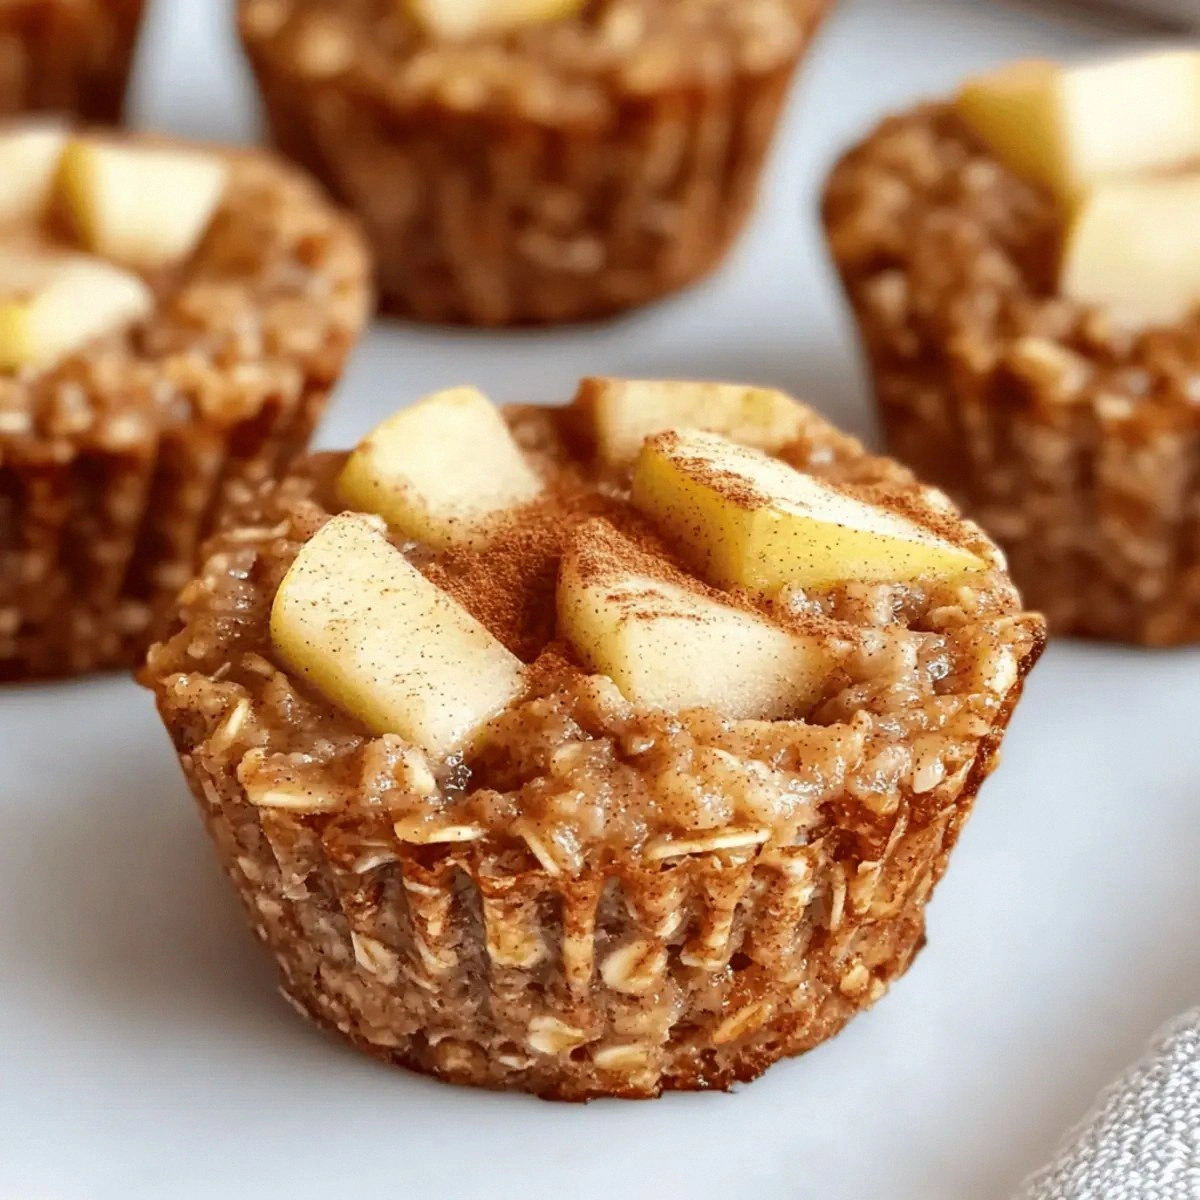
Picture this: the kitchen fills with the sweet, spicy perfume of apples caramelizing, the faint crackle of sugar crystals melting, and the comforting rustle of oats turning golden. The oven door opens with a soft sigh, revealing perfectly domed cups that are crisp around the edges yet tender in the middle, like a sunrise caught in a pastry. You take a bite, and the first thing that hits you is the buttery crunch of toasted nuts, followed by the juicy burst of apple, all wrapped in a cinnamon‑kissed oat blanket. It’s a texture party—crunch, chew, and a hint of melt that makes your taste buds do a little dance.
Most oatmeal recipes get this completely wrong. They either end up as a soggy porridge or a dry, crumbly bar that crumbles the moment you try to lift it. What makes this version a game‑changer is the balance of moisture from the apples and milk, the caramelized sugar that creates that glossy crust, and the strategic use of whole‑grain oats that give it a hearty, satisfying bite. I’ve tried a dozen variations, and I can honestly say this is hands down the best version you’ll ever make at home. I dare you to taste this and not go back for seconds.
Now, I’m about to spill the beans (or rather, the oats) on the one technique that elevates this from ordinary to extraordinary: a brief toast of the oats before they meet the wet ingredients. This little step adds a depth of flavor that’s as subtle as a whisper but as impactful as a drumroll at the climax of a movie. Okay, ready for the game‑changer? Let me walk you through every single step — by the end, you’ll wonder how you ever made it any other way.
What Makes This Version Stand Out
- Taste: The combination of maple’s caramel notes with cinnamon’s warm spice creates a flavor profile that feels both nostalgic and fresh, like a classic autumn sweater reinvented for summer.
- Texture: A crisp, golden crust gives way to a soft, chewy interior, delivering that coveted contrast you only get from expertly baked pastries.
- Simplicity: Fewer than ten ingredients, all pantry‑friendly, mean you can whip these up on a lazy weekend or a rushed weekday morning without a grocery run.
- Uniqueness: Toasted oats and a splash of milk create a custardy heart that’s unlike any standard oatmeal bake you’ve seen on the internet.
- Crowd Reaction: Friends and family have called these “the best breakfast ever” and begged for the recipe after just one bite—yes, that’s a real thing.
- Ingredient Quality: Using old‑fashioned whole oats adds a nutty depth that instant oats simply can’t match, and the apples bring natural sweetness and moisture.
- Cooking Method: Baking in individual silicone cups ensures even cooking and makes serving a breeze—no cutting, no mess.
- Make‑Ahead Potential: These cups store beautifully, so you can prep a batch on Sunday and have breakfast ready for the whole week.
Inside the Ingredient List
The Flavor Base
The apples are the heart of this recipe. Their natural sugars caramelize in the oven, creating pockets of juicy sweetness that burst with every bite. I recommend using a mix of tart Granny Smith and sweet Fuji for a balanced flavor; the tartness cuts through the maple, while the sweetness amplifies it. If you skip the apples, you’ll lose that essential moisture and the subtle fruitiness that makes these cups feel like a dessert‑breakfast hybrid.
The Texture Crew
Old‑fashioned whole oats are the backbone, providing a hearty chew that’s both filling and satisfying. Their larger flakes hold up better during baking, preventing the cups from turning into a soggy mush. The chopped nuts—preferably toasted almonds or pecans—add a buttery crunch that contrasts beautifully with the soft oat interior. If you’re allergic or vegan, swap them for toasted pumpkin seeds or sunflower seeds without sacrificing the crunch factor.
The Unexpected Star
Maple syrup isn’t just a sweetener; it’s a flavor enhancer. Its amber richness deepens the caramel notes of the apples and creates a glossy finish on the tops of the cups. The coarse sugar, when sprinkled before baking, melts and recrystallizes into a delicate crust that crackles like thin ice under your fork. Skipping either will make the cups taste flat and lose that signature sparkle.
The Final Flourish
A splash of milk ties everything together, turning the dry oat mixture into a cohesive batter that bakes into a custardy center. The cinnamon, of course, is the aromatic hero, weaving its warm spice through every bite. If you’re daring, a pinch of nutmeg or a dash of vanilla extract can add an extra layer of complexity. Remember, each ingredient plays a specific role—remove one, and the symphony falls out of tune.
Everything's prepped? Good. Let's get into the real action...
The Method — Step by Step
-
Preheat your oven to 375°F (190°C). While the oven warms up, line a 12‑cup muffin tin with silicone or paper liners. This step is crucial because the silicone prevents sticking and makes cleanup a breeze. I like to give each liner a quick spray of non‑stick spray—just a light mist, not a soaking.
Kitchen Hack: Place the muffin tin on a baking sheet before loading the cups; it catches any overflow and makes transferring the pan in and out of the oven easier. -
In a large bowl, combine the 3 cups of old‑fashioned oats with 2 teaspoons of cinnamon. Toss them together until the cinnamon evenly coats each oat flake. This coating ensures every bite gets that warm spice without any bland spots.
Next, add the 1/2 cup of chopped nuts and give the mixture a quick stir. The nuts will toast slightly as they bake, releasing their natural oils and adding depth.
-
In a separate saucepan, melt 2 tablespoons of coarse sugar with 1/4 cup of maple syrup over medium‑low heat. Stir continuously; you’ll hear a gentle sizzle as the sugar dissolves and begins to caramelize.
Once the mixture turns a deep amber color and smells like caramel‑kissed apples, remove it from the heat and let it cool for a minute. This cooling step prevents the milk from curdling when it’s added later.
Watch Out: Do not let the sugar burn; a burnt caramel will introduce a bitter note that overwhelms the delicate apple flavor. -
While the caramel cools, dice the 2 cups of apples into small, uniform pieces—about a quarter‑inch cubes. This size ensures they soften quickly and distribute evenly throughout each cup.
Add the diced apples to the oat‑nut mixture, then drizzle the warm maple‑sugar sauce over the top. Stir gently until everything is just combined; you want the apples to stay intact, not turn into mush.
-
Now, pour in the 1/4 cup of milk. The liquid will bind the dry ingredients, creating a batter that’s thick but pourable. If the batter feels too dry, add an extra tablespoon of milk; if it’s too runny, sprinkle a few more oats.
Give the batter a final gentle fold, making sure the maple‑sugar glaze is evenly distributed. You should see tiny glistening specks of caramel throughout the mixture—that’s the visual cue that flavor is locked in.
-
Spoon the batter into the prepared muffin cups, filling each about three‑quarters full. This leaves room for the batter to rise without spilling over the edges.
For an extra touch, sprinkle a light dusting of coarse sugar on top of each cup. This will create a beautiful crackly crust as the cups bake.
Kitchen Hack: Use a small ice‑cream scoop to portion the batter evenly; it ensures uniform size and cooking time for each cup. -
Slide the pan into the preheated oven and bake for 25‑30 minutes. Around the 20‑minute mark, check the tops; they should be golden‑brown and the edges should start pulling away from the liner.
When you tap the side of a cup, it should feel firm and give a slight “thud” sound—this is the moment of truth that tells you they’re perfectly baked.
-
Remove the pan from the oven and let the cups cool in the tin for 5 minutes. This resting period lets the interior set, making them easier to lift out without crumbling.
After 5 minutes, run a thin knife around each cup’s edge and gently pop them onto a cooling rack. Serve warm, perhaps with a drizzle of extra maple syrup or a dollop of yogurt for added creaminess.
That’s it — you did it. But hold on, I’ve got a few more tricks that’ll take this to another level...
Insider Tricks for Flawless Results
The Temperature Rule Nobody Follows
Most home bakers set the oven and forget about it, but the secret to a perfect crust is a brief blast of high heat at the end. After the initial 25‑minute bake at 375°F, crank the temperature up to 425°F for the final 5 minutes. This extra heat caramelizes the sugar topping into a glossy, crackly crown without over‑drying the interior. I tried this once and the cups turned into miniature caramel tarts—pure magic.
Why Your Nose Knows Best
Don’t rely solely on timers; trust the aroma. When the kitchen fills with the scent of caramelized apples and toasted nuts, you’re within minutes of perfection. If the smell turns slightly bitter, the sugar is on the verge of burning—pull the pan out immediately. This sensory checkpoint saves you from a batch of “too‑dark” cups that taste like burnt toast.
The 5‑Minute Rest That Changes Everything
Allowing the cups to rest for five minutes after baking isn’t just about cooling; it lets the steam redistribute, making the interior moist and the crumb set. Skipping this step results in a crumbly texture that falls apart when you try to lift it. I once rushed this part and ended up with a mess—lesson learned.
Mix‑Then‑Rest for Uniform Rise
After combining wet and dry ingredients, let the batter sit for 5 minutes before filling the cups. This short hydration period lets the oats absorb the liquid, ensuring an even rise and a tender crumb. If you skip the rest, the oats stay dry in spots, leading to uneven baking.
Cool‑Then‑Freeze for Breakfast on the Go
If you want a grab‑and‑go breakfast, freeze the baked cups in the liners. When you’re ready to eat, simply microwave for 45 seconds, add a splash of milk, and enjoy a hot, comforting breakfast that tastes fresh out of the oven. This method keeps the texture intact and prevents sogginess.
Creative Twists and Variations
This recipe is a playground. Here are some of my favorite ways to switch things up:
Berry Burst
Swap half of the apples for a mix of fresh blueberries and raspberries. The berries add a tart pop that balances the maple sweetness, and they release beautiful juices that create a slightly runnier center—perfect for those who love a juicy bite.
Chocolate Hazelnut Dream
Add 2 tablespoons of cocoa powder to the dry oat mixture and fold in chopped toasted hazelnuts. Drizzle with a swirl of chocolate hazelnut spread after baking for an indulgent, dessert‑like breakfast.
Savory Sunrise
Omit the maple syrup and sugar, and instead incorporate shredded cheddar, crumbled bacon, and a dash of smoked paprika. This savory version works wonderfully as a brunch side or a hearty snack.
Tropical Twist
Replace apples with diced pineapple and add a splash of coconut milk instead of regular milk. Top with toasted coconut flakes for a beach‑vibes breakfast that transports you to a sunny shore.
Pumpkin Spice Delight
In the fall, stir in ½ cup of pumpkin puree and a pinch of nutmeg along with the cinnamon. The pumpkin adds moisture and a subtle earthiness that pairs beautifully with maple.
Storing and Bringing It Back to Life
Fridge Storage
Allow the cups to cool completely, then transfer them to an airtight container and store in the refrigerator for up to 5 days. When you’re ready to eat, reheat in the microwave for 45 seconds, or warm in a 350°F oven for 8‑10 minutes for a crispier crust.
Freezer Friendly
Freeze the baked cups in their liners, stacked with parchment paper between layers. They’ll keep for up to 3 months. To reheat, microwave for 60 seconds, then add a tiny splash of milk (about a teaspoon) before the final 15‑second zap to steam them back to perfection.
Best Reheating Method
For the ultimate texture, reheat in a preheated oven at 325°F for 8 minutes. This method revives the crisp edges while keeping the interior soft. If you’re in a hurry, the microwave works, but the oven gives you that bakery‑like finish.